
QuickBooks Pro 2018 Accounts Receivable Graph will cover the generation of the accounts receivable graph within the accounting software. We will generate the graph from QuickBooks 2018’s report center. We will then adjust the dates and look over the options for the graph. We will discuss how the graph relates to the financial statements. We will then talk about how to use the graph in presentations.
Posts with the QuickBooks 2018 tag
QuickBooks Pro 2018 Income & Expense Graph
QuickBooks Pro 2018 Income & Expense Graph well cover the creation of income and expense graphs within the accounting software. We will first to to QuickBook 2018’s report center and locate the Income & Expense Graph. Once we generate the graph the first thing we will need to do is change the dates. Next we will look at some of the features of the graph. We will also discuss how the graph ties into the financial statements. we will talk about how to use the graph in a presentation.
QuickBooks Pro 2018 Sales Graph
QuickBooks Pro 2018 Sales Graph will cover the generation of a sales Graph in the accounting software. We will generate the sales graph form QUickBOoks Pro 2018’s reports section. We will talk about the options available for the graph. We will also discuss how to save the graph and use it in a presentation.

Excel Vs QuickBooks – Set Up New Company
We will travel through the journey of setting up a new company file in Excel and QuickBooks, comparing and contrasting the process in both.
These presentations will work a comprehensive bookkeeping problem, both within Excel and Quickbooks, Excel having the advantage of being more transparent, allowing us to see all the components of the process; QuickBooks having the advantage of being able to use forms and simple data input to quickly and easily generate the end product, the financial statements.
We will work each component of the problem in Excel first and show how the same process can be done in QuickBooks.
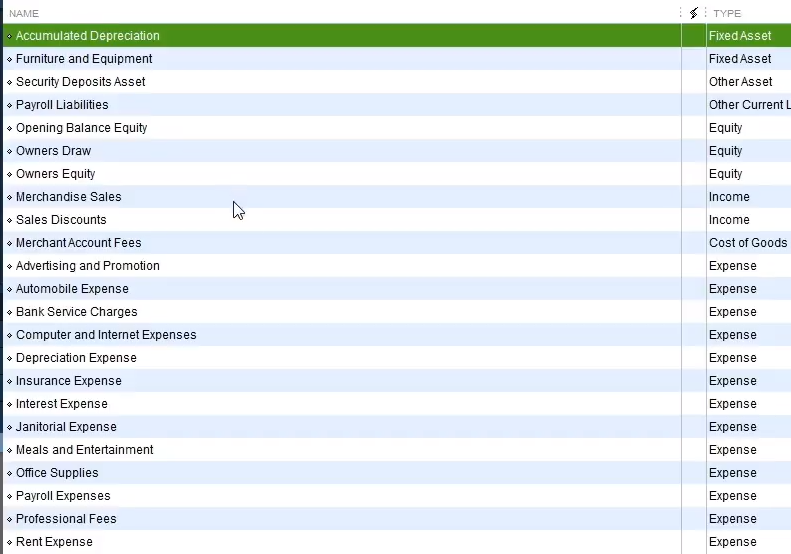
First, we will set up a new worksheet in Excel and compare that to the setup process of a new company file in QuickBooks. When setting up a new company file in QuickBooks one of the first things QuickBooks generates is a chart of accounts like the one below. The chart of account is the first thing we will set up in Excel.
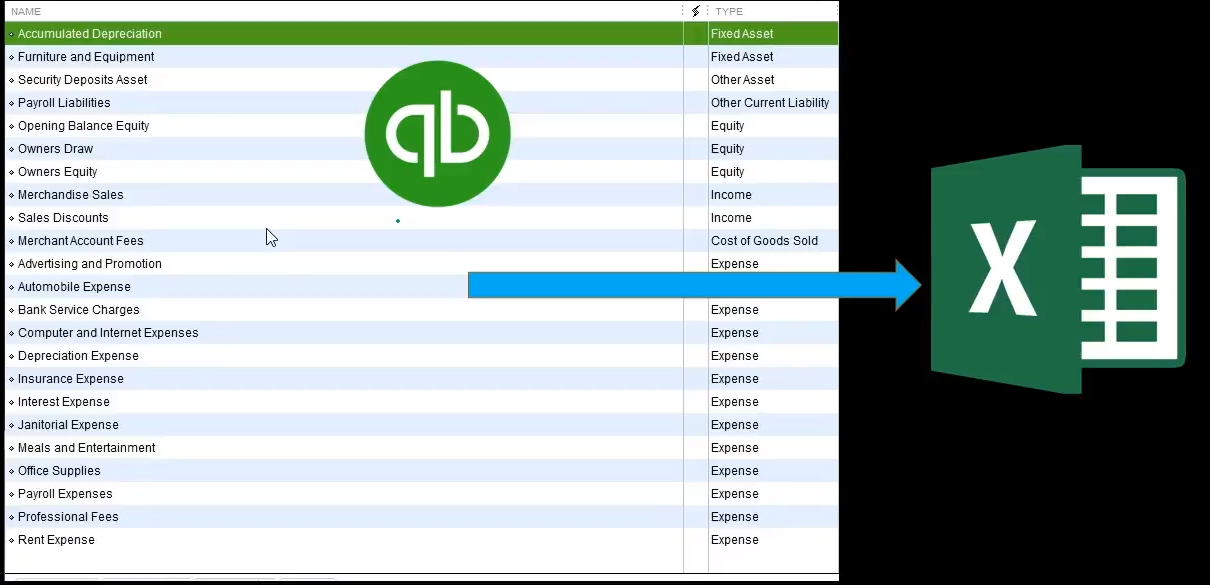
Note that the setup process in QuickBooks generally involves a shortcut, QuickBooks generating a chart of accounts based on the industry we select. The chart of accounts is not perfect but is often a good starting point.
For more information about QuickBooks take a look at our comprehensive course. Get more information by clicking the image below.

Note that the chart of accounts is not ordered by alphabetical order but by account type. On a general level, the order of accounts will always be asset type account, liability type accounts, equity-type accounts, income type accounts, and then expense type accounts. Each account type will have more subcategories. For example, assets will be broken down into cash type accounts, accounts receivable type accounts, current assets, and other assets.
We will need a similar ordering when entering our chart of accounts into Excel. Below is an example of a chart of accounts generating in Excel. We have listed half the accounts on the left followed by half the account on the right to save space.
Note the same ordering of the accounts, assets first in green, followed by liabilities in orange, then equity in light blue, and revenue followed by expenses in navy blue.
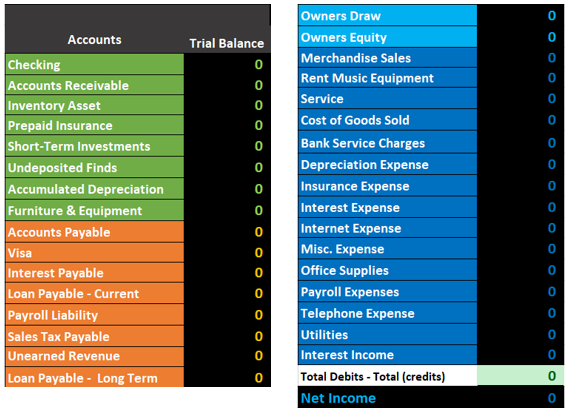
This chart account is the starting point for entering data into our Excel worksheet. We have also set up a general journal and a general ledger.
Below is an example of the general journal.
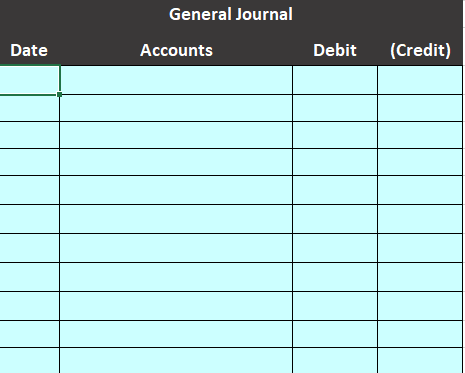
The general journal will just be an area for us to enter our journal entries, journal entries that include date, accounts, and debits and credits.
Below is an example of the general ledger.
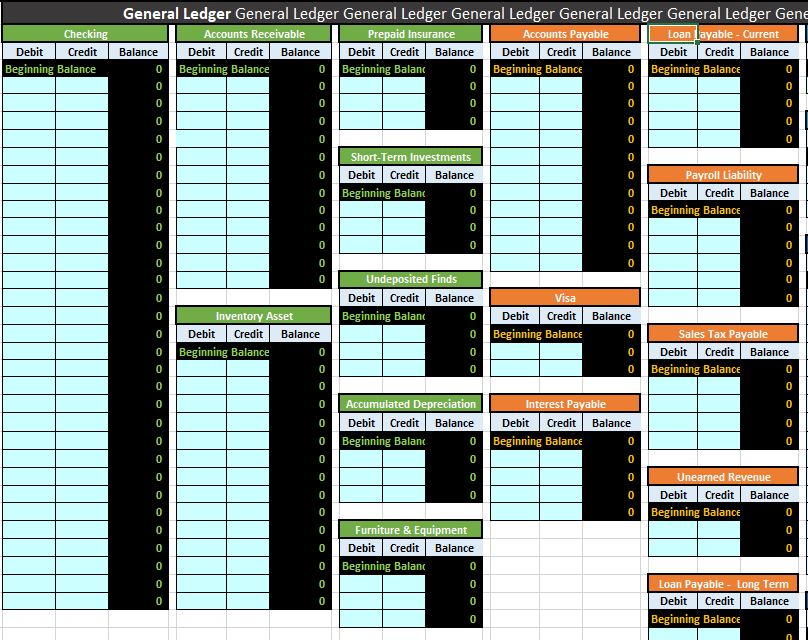
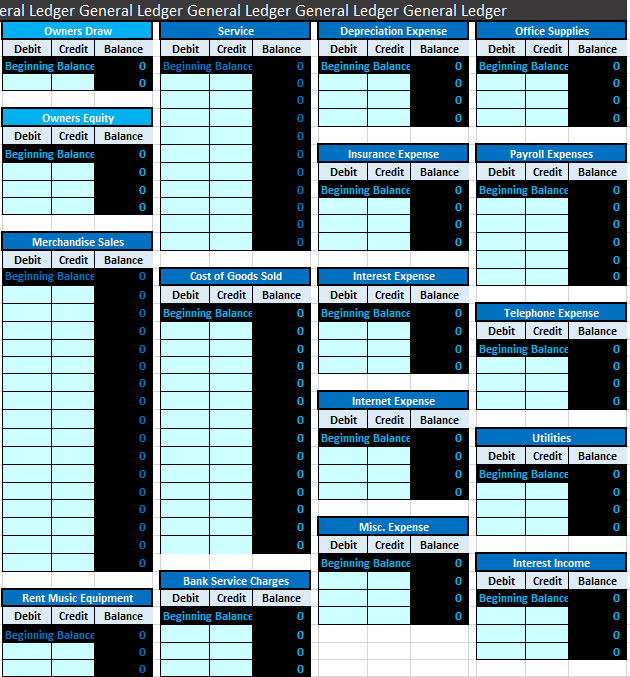
The general ledger can be intimidating because of its length, but it is just another list of accounts, the same list as the chart of accounts, in the same order of assets, liabilities, equity, income, and expense. The difference is that the general ledger will provide more detail, provide the activity in order by date of the transaction.
Next, we will take a quick look at the setup process for a new QuickBooks file.
First, we will run the QuickBooks software.
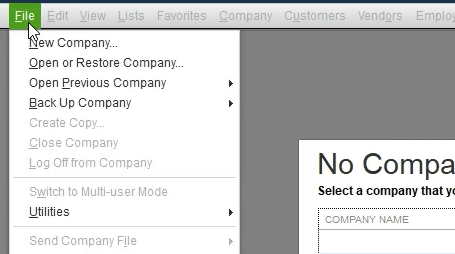
We will then select the file dropdown and new company.
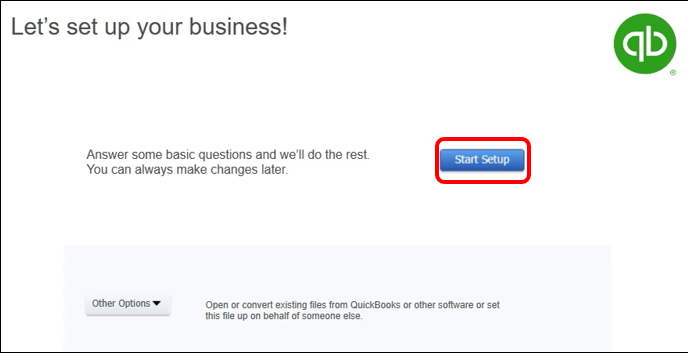
QuickBooks has a few options for setting up a new company. We will chose the start Setup option.
Next, we enter company data.
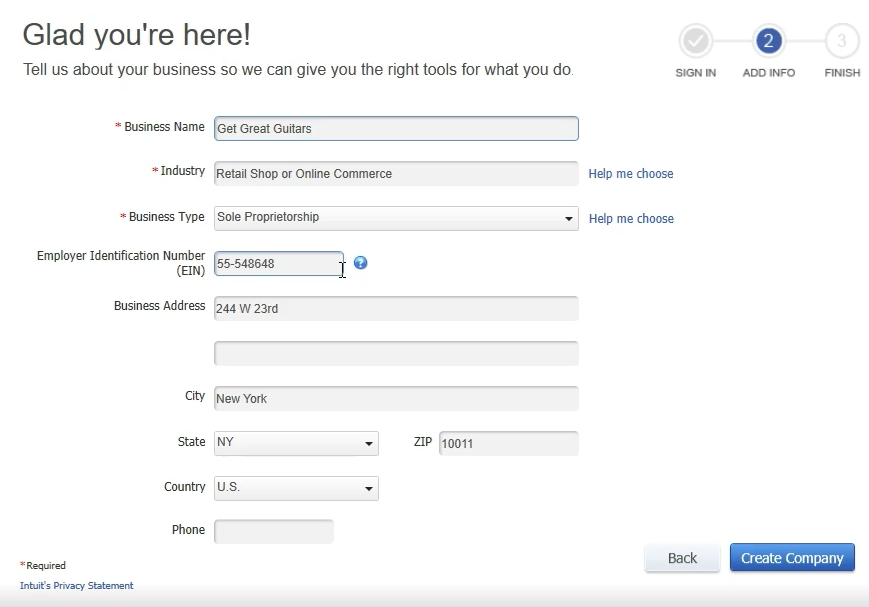
Note that we have chosen the industry of retail shop or online commerce. QuickBooks will use this information to provide us with the chart of accounts, QuickBooks guessing which accounts will be needed based on our industry.
The startup process above is all we need to do for QuickBooks to set up a basic chart of accounts and get up and running.
For more information about QuickBooks take a look at our comprehensive course. More detail at the link below. Click the image for more information.
QuickBooks Bank Reconciliation – How to Enter First Bank Reconciliation
QuickBooks Pro 2018 Vertical Analysis Profit & Loss
QuickBooks Pro 2018 Vertical Analysis Profit & Loss will cover the generation of a profit and loss report with ration analysis. We will start by creating a standard profit and loss report within the accounting system. We will then use QuickBooks 2018s customize feature to customize the report, adding a column for percentages.
QuickBooks Bank Reconciliation – How to Enter First Bank Reconciliation
Learn how to complete the first bank reconciliation for a new company in QuickBooks.
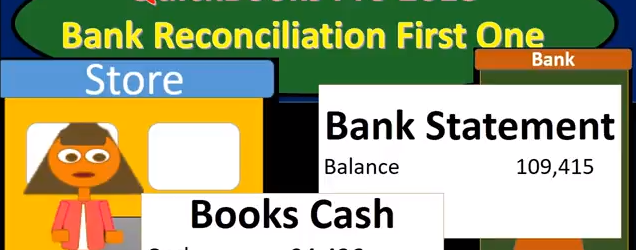
Entering a bank reconciliation into QuickBooks takes time to learn, and the first bank reconciliation often includes added difficulties.
We will show a real-life example providing a bank statement, QuickBooks data, and the bank reconciliation process.
If you would like a to follow along with a demonstration, we will be creating a QuickBooks 2018 course and providing backup files which can be used to practice and follow along step by step soon. Click Here
Reconciling the bank accounts is one of the most important things that we have to do to make sure our data is entered correctly into the accounting software.
If we complete the bank reconciliation, then we have good assurance that the information input into the system is correct. Bank reconciliations do not mean, however, there are no errors, but they do give good assurance that the data has been input.
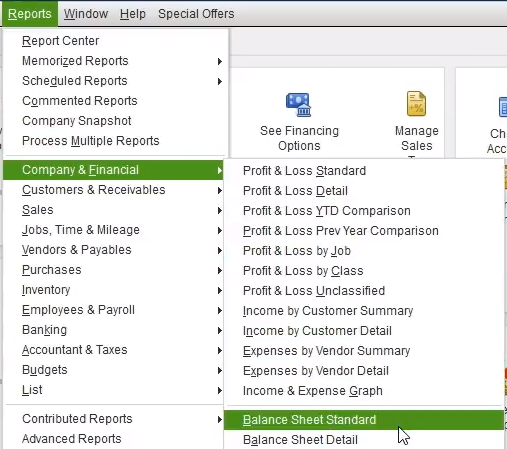
First we will look at the balance sheet cash account as of the end of the month we are reconciling.
To open the balance sheet, we go to the reports dropdown, Company and Financial, and then Balance Sheet Standard.
We will change the dates to 01/31/2021 because we will be entering the first month of data as of January 31, 2021 for this problem.

We will compare this number with our QuickBooks data, on our balance sheet, to the bank statement. We would assume that if we input everything perfectly the book balance of $94,436.17 would match what is on the bank statement.
The book balance will never match the bank balance, however, even if we are talking about the same date, the date in this case of January 31, 2021. The reason is due to timing differences.
An example of a timing difference is a person writing a rent check today and giving it to their office building owner. If we wrote a check, we know the money has been spent, but the bank does not yet know. The bank will not know until the building owner deposits the check into their bank and their bank notifies our bank. This difference in information due to the time it takes for a check to process is what requires us to reconcile the bank accounts.
If we received our bank statement after having written a check two days prior, we would not be surprised that the check does not appear on the bank statement, but we would also recognize that the money is still essentially spent and gone.
If we can find every timing difference and can identify the exact transaction which are causing the differences between the bank balance and our balance we have also verified all the other transactions, all the transaction that are on both the bank statement and on our QuickBooks data, and by doing this we have a third party verification that all those transactions are correct. The bank is a very credible third party to verify all of our transactions.
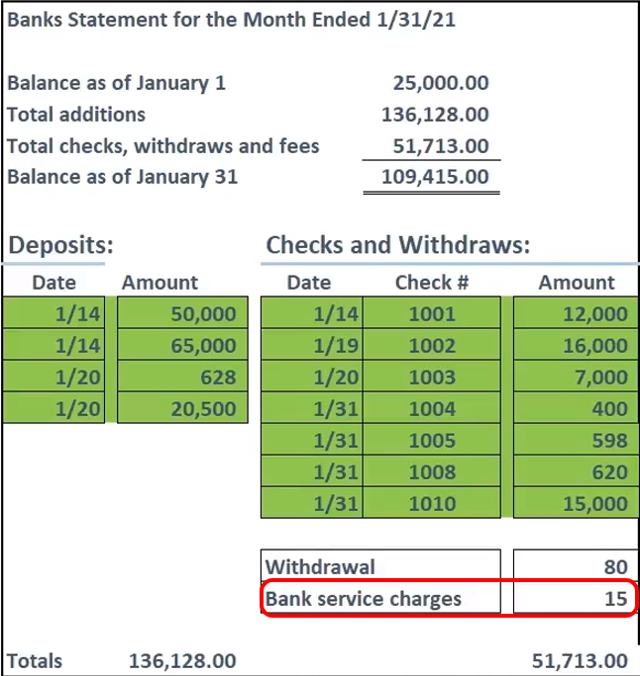
Next, we will look at an example of a bank statement, the second document we are looking to reconcile to our QuickBooks data.
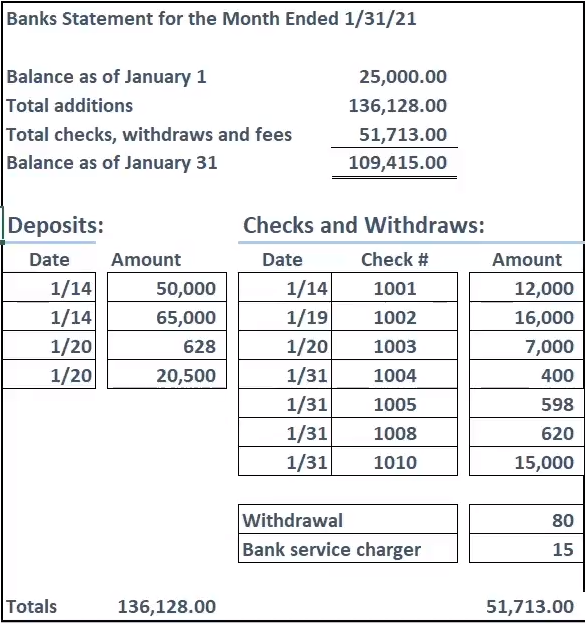
The bank statement will generally have a summary of the month, starting with the beginning balance, adding deposits, and subtracting checks and other decreases to arrive at the ending balance. It is important to note that the beginning balance on the bank statement will equal the prior bank statements ending balance.
Because the this is the first month of operation, we have entered the beginning balance shown on this banks statement of $25,000 into the opening balance of the checking account in QuickBooks. Entering the beginning balance for the first bank reconciliation is often a problem when we attempt the first bank reconciliation. We will talk about this more later, which will be great.
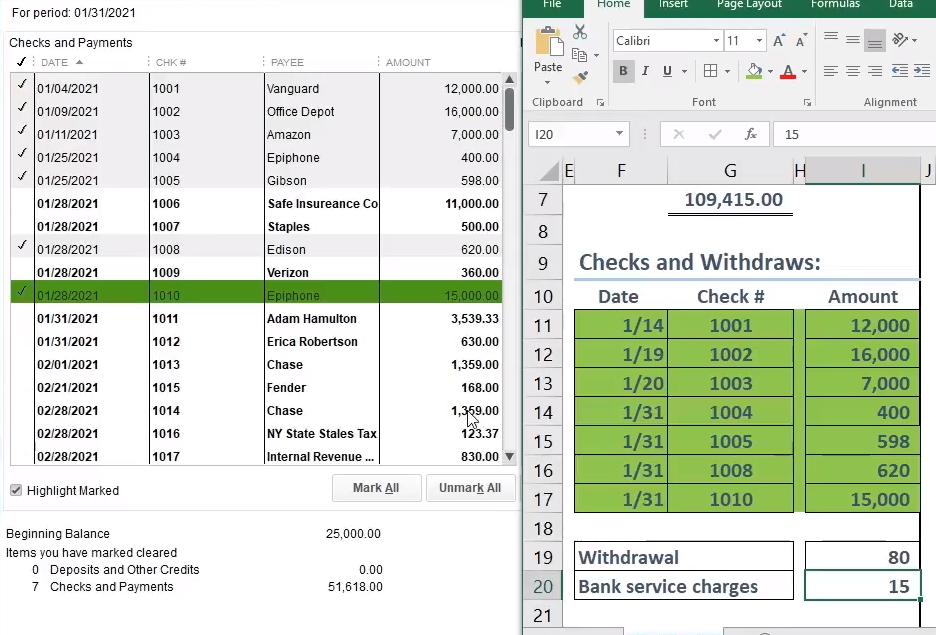
The ending balance is $109,415 on the bank statement. This $109,415 is the amount we need to reconcile with our book balance. We will make any adjustments necessary and reduce the differences to just timing differences, to just outstanding checks and outstanding deposits that we can verify and identify.
The bank statement then shows the detail of deposits, checks, and other decreases. The bank statement activity is what we will compare to our QuickBooks Data, checking off each item. The deposits will have to be verified by amount. The checks have an added level of verification in that we can check the amount and the check number. The dates on the bank statement will never match what we have on the QuickBooks data because of the timing differences; the bank statement dates always being later.
The example bank statement has two non-check decreases of withdrawal and bank service charges. These are items on the bank statement, which are most likely not entered into QuickBooks. Items on the bank statement that are not in our QuickBooks data are items we will have to enter into the QuickBooks data.
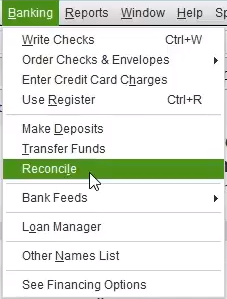
We will now open the bank reconciliation tool in QuickBooks by going to the Banking dropdown and selecting Reconcile.
We will reconcile for the month ended January 31, 2021. This is the first month of operation for our business.
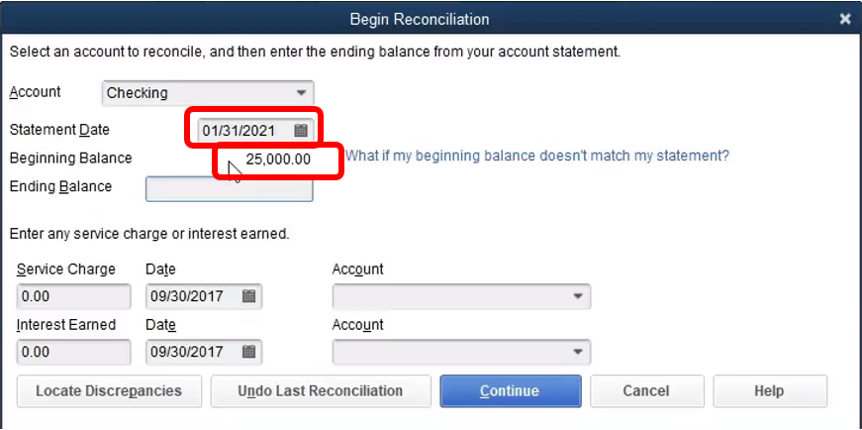
The beginning balance will populate automatically, and the QuickBooks data is from us entering the opening balance into the checking account when we created the checking account in QuickBooks.
If we did not enter the beginning balance when setting up the company, there is a work around for the first month. We can enter zero as the beginning balance, enter the beginning balance into the register as of a date prior to the date we start recording operations, and then check of the begging balance amount as part of our reconciliation process.
The beginning balance is one to the tricky parts when entering the first bank reconciliation but will be much easier as we move forward to future bank reconciliations.
We then enter the ending balance from the bank statement of $109,415.
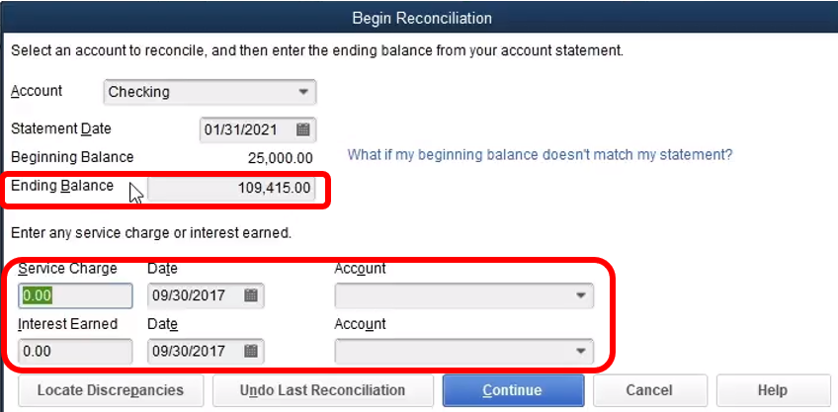
QuickBooks then provides the opportunity to enter service charges and interest earned, options that can save time, but which can also cause confusion. I recommend not using these options when we are starting out. We will enter these adjustments into the bank register once identified and then locate them on the bank reconciliation.
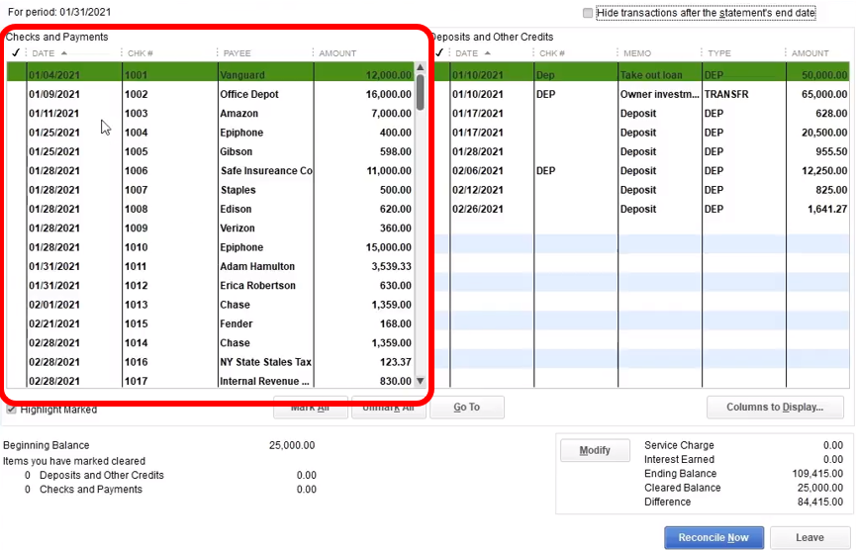
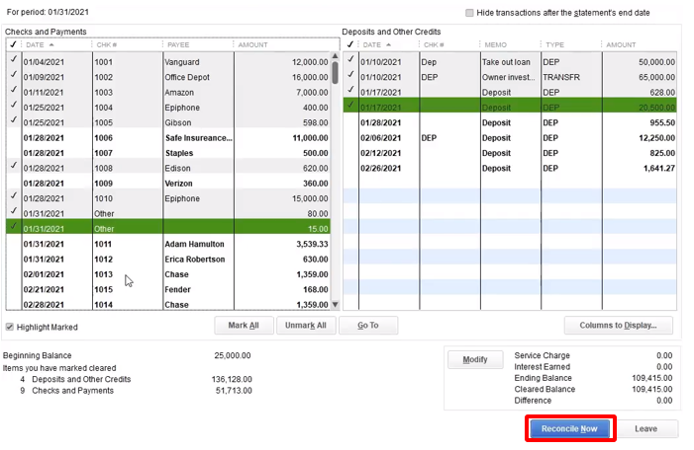
Once we continue to the bank reconciliation we will see a screen like the one above. This screen is where the magic happens.
The left side shows the checks and payments and is generally the longer of the two sides, unfortunately, ☹.
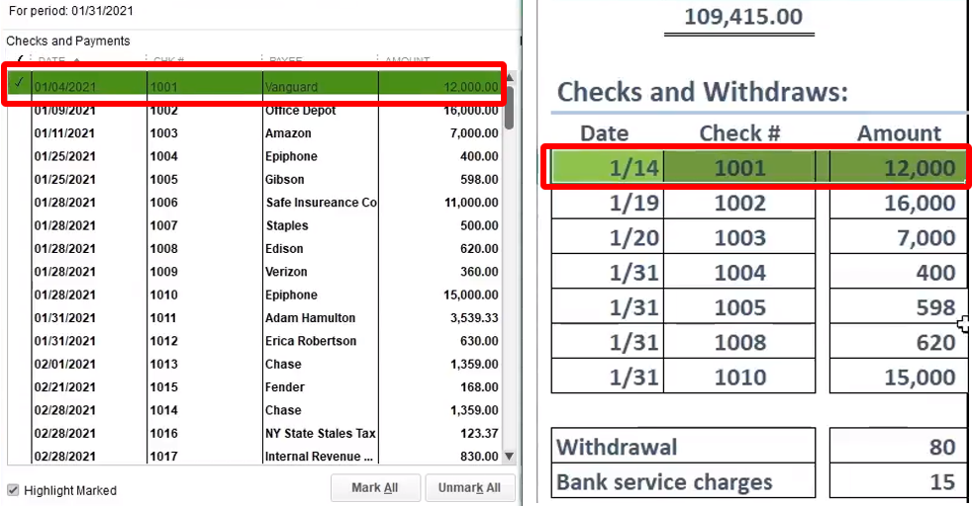
The checks and payment include the date of deposit into the QuickBooks system, the check number, the vendor, and the amount. The check number and amount are the most relevant items to match up with the bank statement. Remember that the date will differ due to timing differences, the bank dates always being later. The check numbers and amounts should match exactly.
On the deposit side, we only have date and amount which we can use to match up with the bank statement. Because there are fewer deposits, they should be easier to match up. QuickBooks should have grouped the deposits in the same format as they appear on the bank statement.
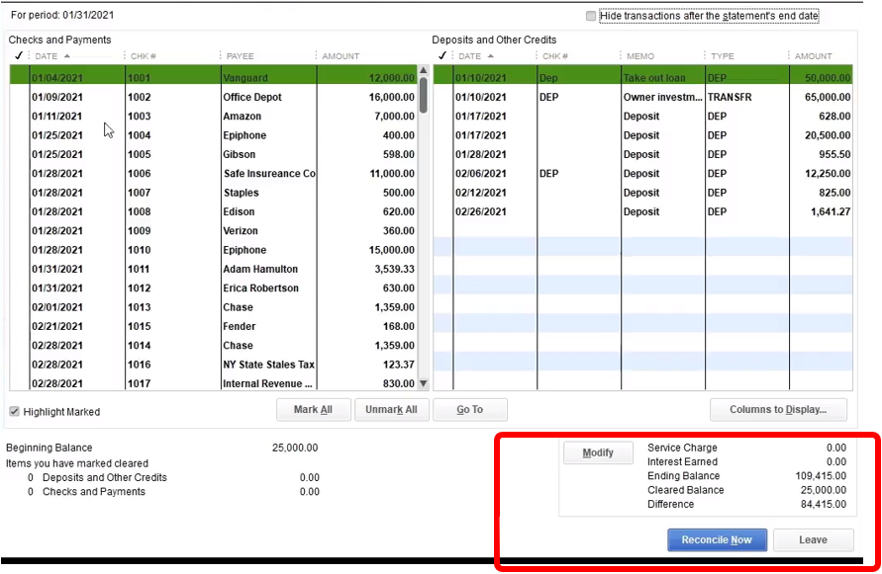
At the bottom right, we see our reconciliation tool. Once the difference number is down to zero the reconciliation process is complete, meaning the difference between the bank statement balance and QuickBooks data balance has been identified and reconciled.
The current QuickBooks data is showing that $25,000 has cleared, this being our cleared balance. The $25,000 has not cleared this month, the month of January, but has cleared the bank in prior months.
Once we check all item off that are on the bank statement we will increase the $25,000 cleared balance to match the balance on the bank statement and the difference will go down to zero. The unchecked items will represent items in the QuickBooks data not reported on the bank statement, the unchecked items representing the outstanding items, the timing differences.
Once we have the bank statement and QuickBooks data set up, we will go through the enjoyable task to checking of amounts that are on both the bank statement and the book, going from the bank statement to the QuickBooks data.
We generally start the checking off process with the checks and decreases. We can match up the check number and check amount on both the bank statement and QuickBooks data. Once we match up an amount, we will highlight the bank statement and put a check next to the QuickBooks data.
Note that the dates above are not the same between the bank statement and the QuickBooks data.
Once we complete the process of checking off all decreases on both the bank statement and in the QuickBooks data we see there are a few checks written in the QuickBooks data in the month of January that are not on the bank statement. These unchecked amounts are the outstanding checks and will make up the difference in the bank reconciliation.
We also see that there are two non-check items on the bank statement that are not on the QuickBooks data. These are items we will have to fix, items we will have to add to the QuickBooks data to reconcile and for our QuickBooks data to be correct.
If we are concerned with these outstanding items, we can contact the bank to see if those items had cleared in the following month, in the month of February in this case. If they have cleared in the following month then we know it is just a timing difference, a difference w is OK with, but one we will document in the bank reconciliation, as we will see.
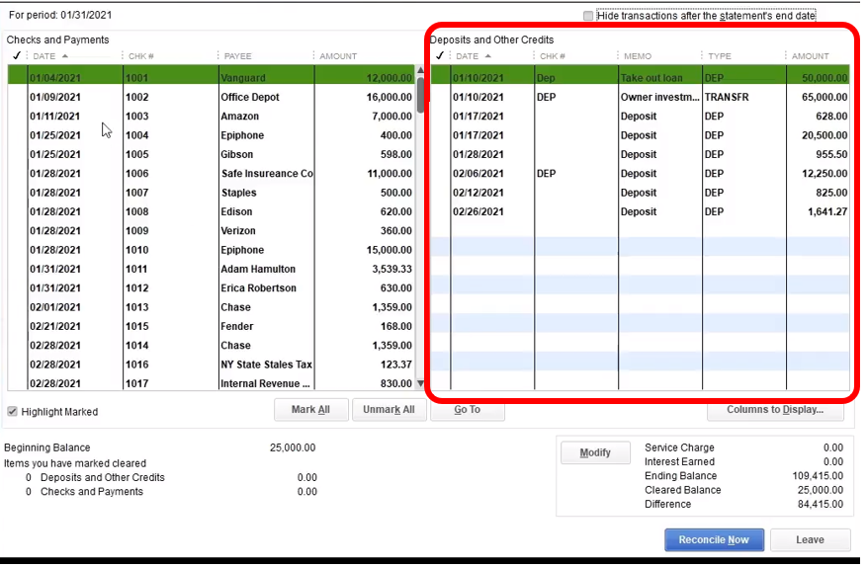
Next, we will reconcile the deposit side.
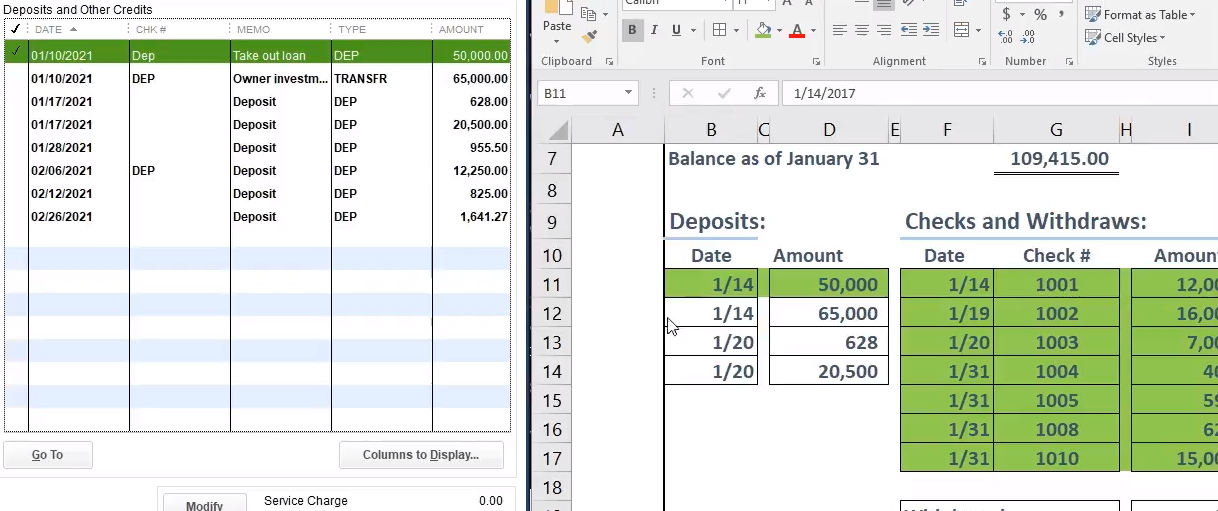
The first deposit that is on both the bank statement and the QuickBooks data is the deposit of $50,000. We will check this amount off in the bank reconciliation and highlight the amount on the bank statement. Note that we do not have much information to help us with the deposit, lacking the check numbers, but the deposits are usually fewer in number so are not usually difficult to match up.
If we do not record the deposits in QuickBooks in the same format as they are recorded in the banks, however, reconciling the deposits becomes more difficult. For example, if we record each individual deposit into the QuickBooks but deposit them in batches to the bank we will have to add up the individual deposits in the QuickBooks data to match the bank deposits. We discuss how QuickBooks makes sure the batches match up in the QuickBooks course.
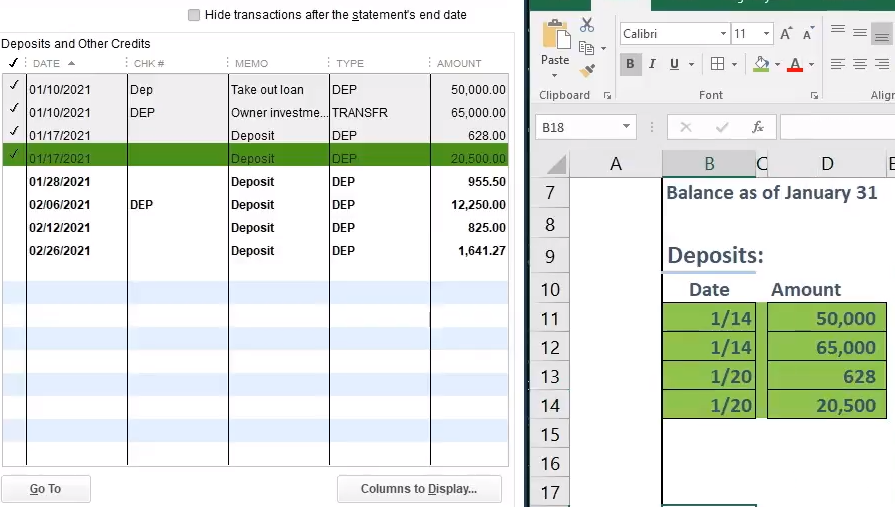
Once we check off all deposits on the banks statement and in the QuickBooks data, we see that we have found all deposits on the bank statement in the QuickBooks data but have on deposit in the QuickBooks data entered in January not included in the bank balance.
This one deposit is the outstanding deposit and will be the timing difference we will recognize on the bank reconciliation.
If we are concerned about this deposit, we can call the bank to see if it has cleared the bank in the following month, in the month of February for our example.
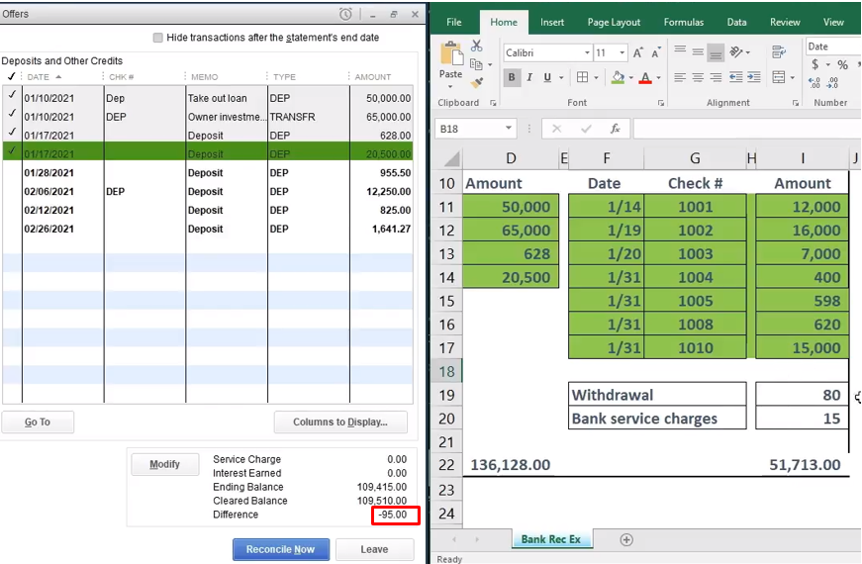
Once we have checked off all check, decreases, and deposits, we see QuickBooks indicating that we are still out of balance by $95. This $95 difference is not the timing differences, not the outstanding checks and deposits. The $95 represents items on the bank statement we have not checked off on the QuickBooks data.
In our example the $95 represents withdrawals and bank service charges, amounts that have been recorded by the bank but have not been recorded into QuickBooks, amounts which we must therefore, record into QuickBooks.
To enter the $95, we will select leave the bank reconciliation. Don’t worry the data will not be deleted. We will open the check register by selecting the Baking dropdown and Use Register.
We will then enter the data as of the end of the month. First, we will enter the $80 withdraw. We will enter the date of 1/31/21.
We want to make sure and not use a check number because this is not a check. I usually put something like the work other into the check number section as a placeholder.
We do not know the name of the vendor in this case because it was a draw. Therefore, we will leave this blank.
![]()
We then need another account to record the draw, and this is often a problem. In our example, we may not know why the $80 was drawn out of the business. If it was drawn out for personal use, we should use an equity account like draws or capital so that the amount is not reflected on the income statement and does not lower net income. If the draw was for a business use, we should use some kind of expense accounts.
Since we do not know the use of the $80 we will use an account called Misc. Expense, every auditor’s favorite account 😊.
Make sure we have select enter, or it will not yet have been recorded. Once we select enter QuickBooks will order the transaction by date, so it may disappear, but we can find it by date.
If we then go back to the bank reconciliation the $80 will magically appear with the check number other, and we can now check it off on the QuickBooks side and highlight the bank statement side reducing our reconciling balance to only $15, the amount of the bank service charges.
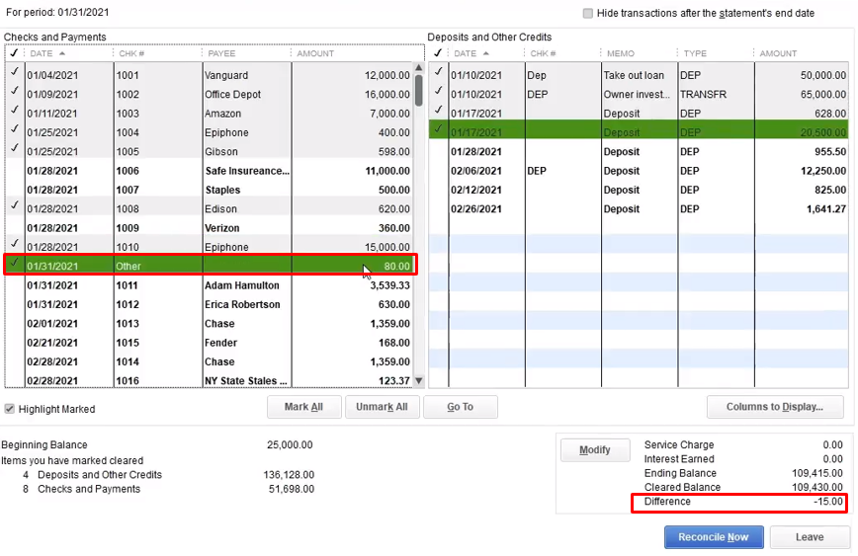
That $15 difference is on the bank statement as a banks service charge and is the next amount we will record into the check register.
We will go back to the check register in QuickBooks using the open windows.
We will enter the service charges as of January 1, 2021. We could enter the bank as the name, but we will keep it blank here. We then enter the amount of $15 and choose the account of Bank Service Charges.
When setting up QuickBooks for most industries, QuickBooks generally adds an account called Bank Services Charges to our chart of accounts. If the account has not been set up then we can set the account up.

Remember to select enter to complete the transaction.
We will then return to the bank reconciliation from the open windows, where we will see the $15 in the checks and payments section.
After checking off this last item, QuickBooks will indicate that we are in balance by showing a zero in the differences section.
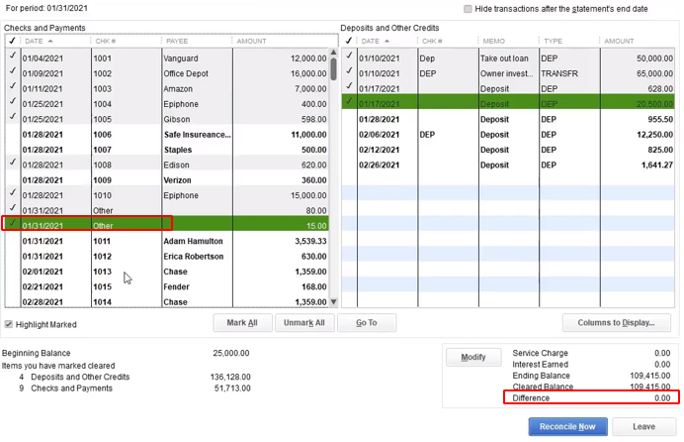
The zero in the differences item indicates that we can no select reconcile so that QuickBooks can complete the process.
Before we continue note that this problem is more simplified than some reconciliation can be because we did not have any outstanding check from the prior month. If is often the case that a company will have outstanding checks, written in the prior month that had not yet cleared the bank in the prior month and which are clearing the bank this month.
If we do have outstanding checks for a prior month, checks that are represented on the bank statement at the beginning of the month but which are not represented in our QuickBooks data we can go back the register and enter the checks. Make sure to enter then as of the prior month, however, so they do not distort our current data.
Once we have completed the bank reconciliation and there is a zero in the difference section, we can select Reconcile Now so that QuickBooks can complete the process and generate the bank reconciliation.
If we do not have a zero in the Difference section and we select Reconcile Now QuickBooks will give us a message saying that we are not reconciled. We can tell QuickBooks to force the process and reconcile anyway, and QuickBooks will enter and adjusting journal entry
I highly, highly, highly recommend not forcing QuickBooks to reconcile even if the difference is small because it greatly reduces the value of the reconciliation process. Even when the difference is small, it could represent a lot of data not input into the system. For example, a difference of $.02 could be caused by a deposit of $100,000 and a check of $100,000.02, this being an extreme example, but one that shows that any difference reduces the value of the process, and the bank reconciliation process has a lot of value.
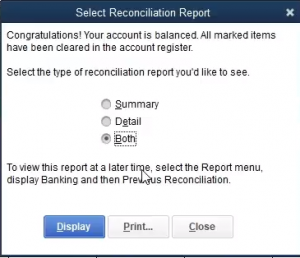
Once we select Reconcile Now QuickBooks will provide the screen above, asking us to choose a summary, detail, or both, type of report. We do want to print these reports or save them as a PDF because we cannot always go back to them.
I recommend saving the detailed version of the bank reconciliation because it will show us which checks, and deposits are outstanding. The summary version is also useful to show people who do not need to see all the detail.
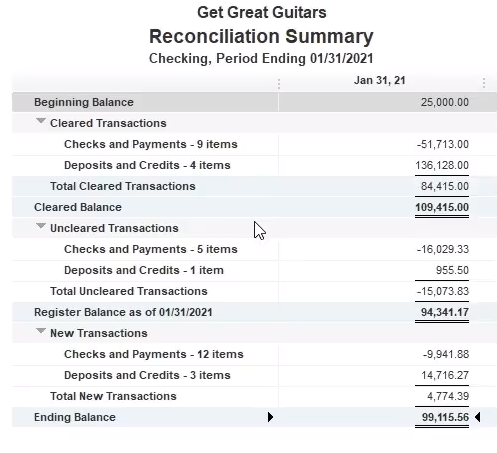
Above is an example of QuickBooks Reconciliation Summary report. The main part of the report we are concerned with, the actual bank reconciliation, starts at the cleared balance of $109,415, this amount matching the amount on the bank reconciliation, the amount representing the bank balance.
The cleared balance is followed by uncleared items including uncleared checks and deposits. The uncleared checks and deposits are the outstanding amounts, amounts we input into the QuickBooks system, but which have not yet cleared the bank.
Next, we see the Register Balance of $94,341.17, representing the QuickBooks data balance as of January 31, 2021, meaning that this is the amount we will see on the check register as of January 31, 2021, and this is the amount we will see on a Balance sheet run as of January 31, 2021
The data above the cleared balance shows the beginning balance of $25,000, this being the beginning bank balance and the cleared checks and deposits, the checks and deposits on both the bank statement and the QuickBooks data.
The data after the Register Balance shows current transactions, those made after January 31, 2021
Next we have the detailed report.

The top portion of the detailed Reconciliation report shows the beginning balance of $25,000 and lists out the amounts that cleared, the amounts on both the bank statement and the QuickBooks data. The cleared data is not as important to us as the uncleared data, the cleared data having been recorded by both the bank and ourselves, the uncleared data not yet having been verified by a third party, by the bank.
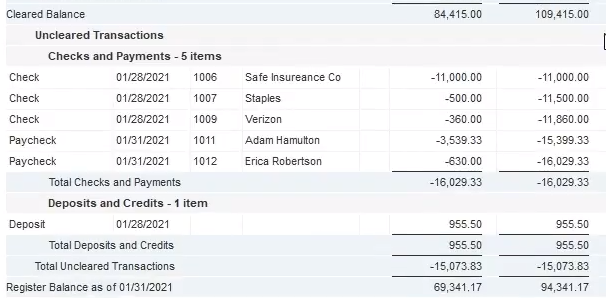
The portion of the Reconciliation Detail report above is the portion we really want, the portion we would can the bank reconciliation. The portion of the Reconciliation Detail report above shows the beginning cleared balance, the bank balance, as did the summary, but now shows the detail of the outstanding items. The Reconciliation detail report shows a list of the checks and deposits that have not cleared, a list of the item in QuickBooks data but not on the bank reconciliation. This list of outstanding items is what we really want.
If this information has been helpful take a look at our QuickBooks 2018 course soon. Click Here
QuickBooks Pro 2018 Home Page – Company Section
QuickBooks Pro 2018 Home Page – Company Section covers the company section portion of the QuickBooks 2018 home page. The home page is a great tool QuickBooks 2018 provides because it shows a visual navigation of the accounting processes. The company section will show very important general item like the chart of accounts and lists. These item can be found in other locations but it is nice to have them on the home page. The chart of account is critical to setting up the QuickBooks 2018 data file and lists are a key component that drives the day to day data input into the accounting system.
QuickBooks Pro 2018 Home Page – Customer Section
QuickBooks Pro 2018 Home Page – Customer Section covers the customer section of the account software’s home page. The home page is a great tool that QuickBook Pro 2018 provides because it give a visual of the content We will look at the customer section, which can also be though of as the accounts receivable cycle or the sales cycle. The customer section of the QuickBooks 2018 homepage starts out with an invoice. The invoice is the document that tells QuickBooks 2018 when to recognize revenue. When entering an invoice QuickBooks will increase revenue and increase accounts receivable. The second icon in QuickBooks 2018’s home page is the receive payment icon. This icon is used to report to the accounting software that payment has been received. When using this icon QuickBooks will usually decrease the accounts receivable for the amount received and increase an account called undeposited funds. The next icon, which is outside the customer section, but still indicated as part of the accounts receivable cycle, is the record deposit icon. This icon will record the increase in the checking account and will record the decrease to undeposited funds.
QuickBooks Pro 2018 Restore Backup File
QuickBooks Pro 2018 Restore Backup File will cover the restoration process of a backup file. Understanding how to restore a QuickBooks 2018 backup file is important so that we have security that we can retrieve our data. We will restore a QuickBooks 2018 backup file to a QuickBooks 2018 version of software. It is important to not that we can generally update an older version of a backup file to a never version of the accounting software but we cannot generally open a newer version of a backup file on an older version of QUickBOoks software. In other words we can open a 2017 QuickBooks backup file in QuickBOoks 2018 software but we cannot open a QuickBooks 2018 backup file on QuickBOoks 2017 software.
QuickBooks Pro 2018 Sales Receipts Cash Sales Transaction
QuickBooks Pro 2018 record receipt of payment will cover the creation of a receipt payment form within the accounting software. We will discuss when to use the receipt payment option as apposed to the invoice within QuickBOoks PRo 2018, an invoice being used when we have done work, earned revenue, but will not receive payment until the future. QUickOBooks Pro 2018 will increase sales and increase AR when an invoice is created. A sales receipt is generated in the accounting software when payment is received at the same time of sale, QUickBOoks Pro 2018 recording an increase to undeposited fund and to sales. The accounting software increases undeposited funds instead of the checking account until a deposit is made.