
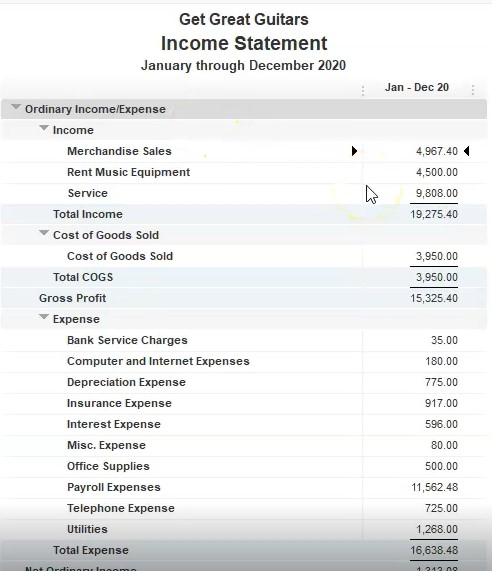
This presentation and we will create a custom income statement from a profit and loss of standard report within QuickBooks Pro 2020, QuickBooks desktop 2020. Here we are in our get great guitars file, we currently have the open windows open, you can open the open windows by going to the view drop down up top and selecting the open windows that list, we’re not going to be taking a look at our income statement or our profit and loss report.
0:26
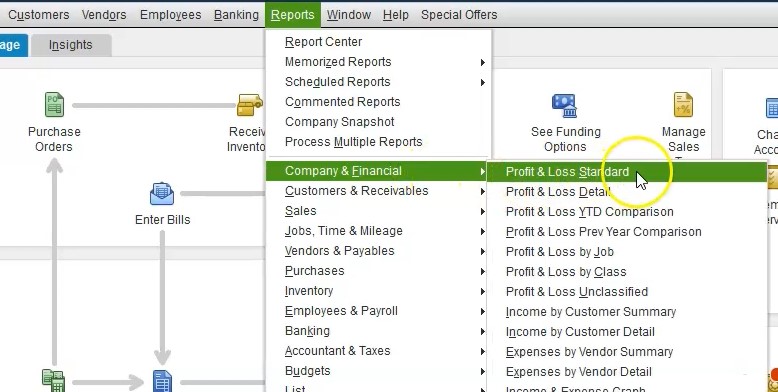
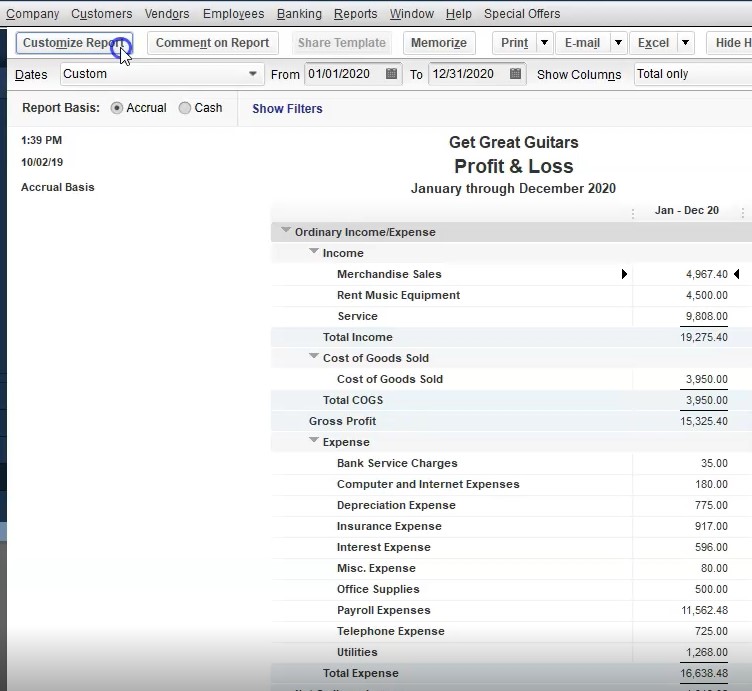
That’s going to be our starting point, we’re going to go to the reports drop down up top, we will go to the company and financial and then select the profit and loss standard. Within the profit and loss standard, we’re going to change the dates up top from a one a 120 to 1230 120. That’s January through December 2020. This is going to be our standard Profit and Loss report, we’re going to make some changes to the reports using the customized reports field in a similar fashion as we did with the balance sheet.
0:57
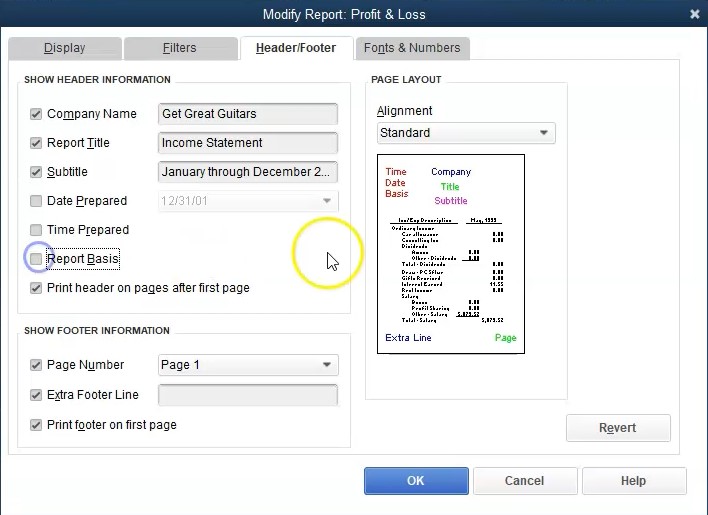
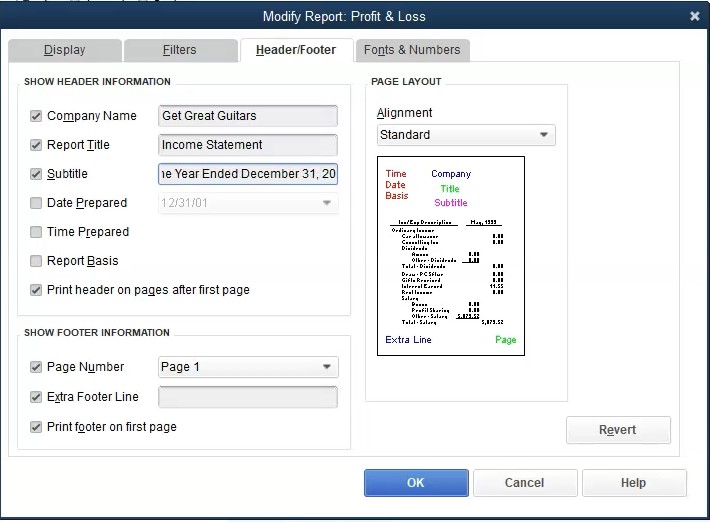
So we’re going to go to the customized reports up top. One change that we might want to do is to go to the header and footer, you might have some clients that prefer to see an income statement. So you might want to just change this or customize the report for some people. Rather than calling it a profit and loss report, we’re going to change the name to an income statement. So then if someone asks you for basically an income statement, you can in essence, just create the profit and loss report, rename it to an income statement. And that is your income statement. We’re also going to be removing the date prepared, the time prepared and the report basis. So we’re going to remove these three items on the left side.
1:38
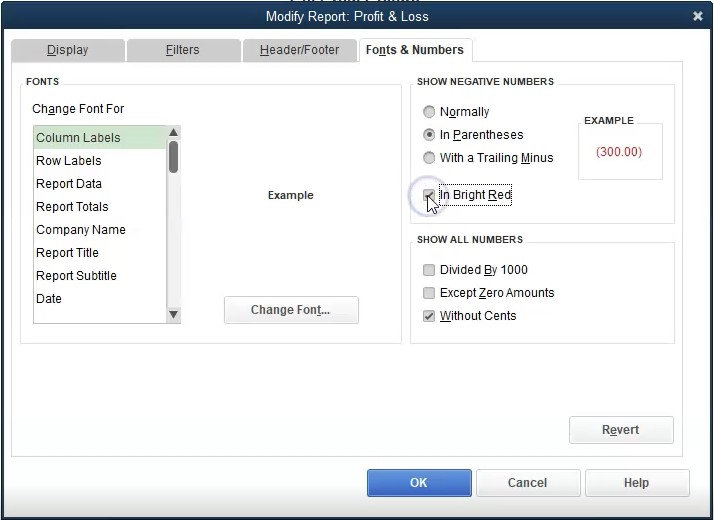
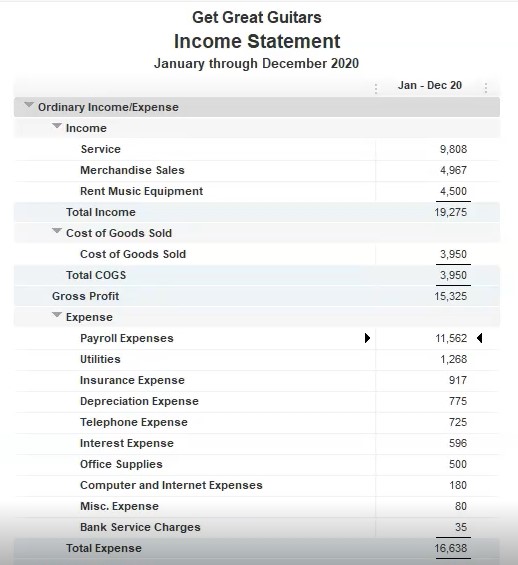
So if we say okay, that we have that now we have our income statement, rather than the profit and loss of reports, we’re going to do some adjustments to the fonts. Now I’m going to remove the pennies on it. So we don’t have the sense in there. We’re also going to make negative numbers be represented with brackets and with red. So we’re going to go up top, we’re going to go to the color miser reports.
2:00
Once again, that’s going to be in the fonts and numbers within the fonts and numbers, we’re then going to go in and say that we want to have the negative numbers represented with the parentheses like so then we’re going to remove the pennies remove the sense, I’m also going to make the negative numbers here to be read. So we’ll have them be read like so. And therefore the negative numbers will appear like this. And we’re going to be removing the pennies. So we’re going to say okay, and there we have that. So we’ve kind of cleaned it up, it looks a little bit easier to see without the change in there involved. And we have the brackets and negatives for the negative numbers.
2:37
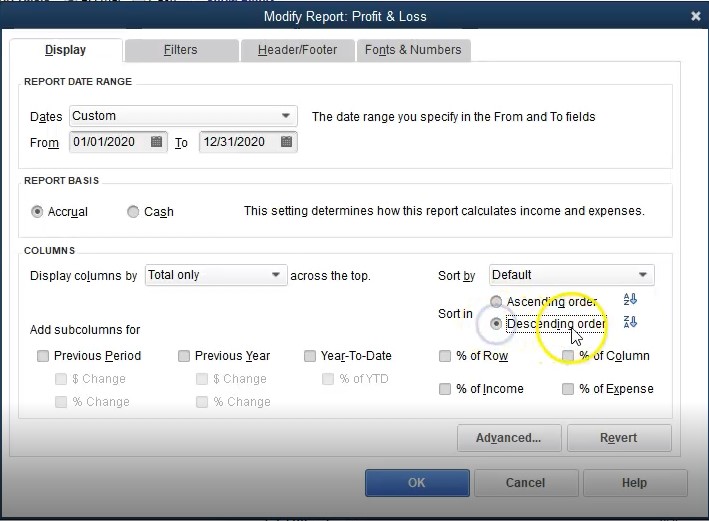
The next thing I would like to do is go into the expenses and the subcategories into the categories and reorganize the categories with the largest number on top. So you’ll note that right now we have the expenses and then it’s in order by alphabetical order within the category, what I’d like is to have the largest number on top within the category. Now we can do this by the sort item he or we can do it by the items over here, we’re going to go to the customized report, if we go into the customized report will see that same kind of sorting options here, it might be easier to see, however, in this format, so we’re going to say we want to sort by the total. And then we want to have the SNP and I’m going to say descending, because I want to have the largest numbers on top.

3:21
So we’re going to be the default, not the default, it’s going to be the totals, the totals and then in the descending order, and say okay, and now you’ll see it’s still an order of income, of course, and then expenses or income cost of goods sold and then expenses. But now we have the largest expense on top, which might make it a little bit easier to read because our I will go from top to bottom, it will see the largest or most relevant expenses then at the top of the report.
3:47
The other thing we often see in the name here, when we have an income statement we often see for the year ended December 31. So rather than have January through December, that’s an accurate title for the report. But we often see the terminology with an income statement for the year ended, and then the year end date. So let’s change that one. So I’m going to go back up into the customized reports. Once again, we’ll go into the customized reports, we’re going to go into the header and footer once again. And then instead of having January through December, I’m just going to delete this whole thing. And I’m going to type in for the year ended December 31 2020. And then if we say Okay, so now we have this and that’s kind of a more formal for the year in kind of date.
4:38
Rather than listing the date range will also often say for the year ended or for the month ended. Next thing we’re going to do is add an extra footer, and this will just put our name on it, we might put like the name of our firm or something in the footer. So I’m going to go to the customized reports, we’re going to go into the header and footer, and we’re going to go down into the extra footer. And we’re going to put the name here, we’re just going to call it Smith.
5:00
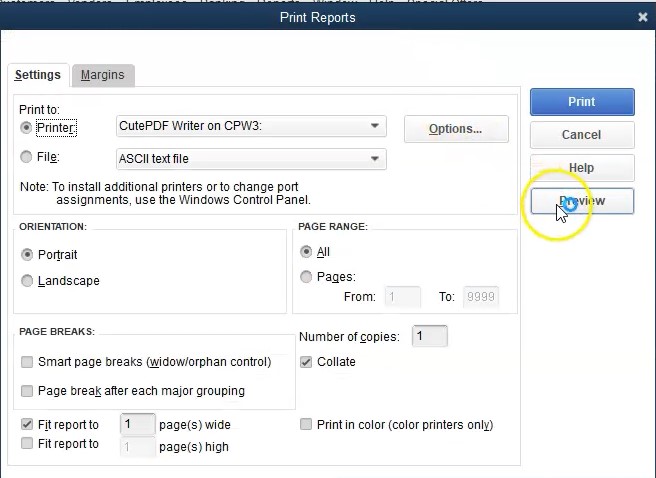
You know, CPA, we might put something like that or something like you know accounting on the or bookkeeping or whatever the name of our firm, we might put that on the report might be something we can add there. And so I’m going to say okay, and then if we want to see that, then we’d go to the print option to see the preview option, we’re going to go to print, we’re going to go to the report. And then I’m going to go to preview, and then down in the bottom will have our firm name here. So that’ll show up there, I’m going to close this back out. So I usually use the x. So you can use this button here, I usually close it out with the x however. So I’m going to go ahead and close this back out.
5:37
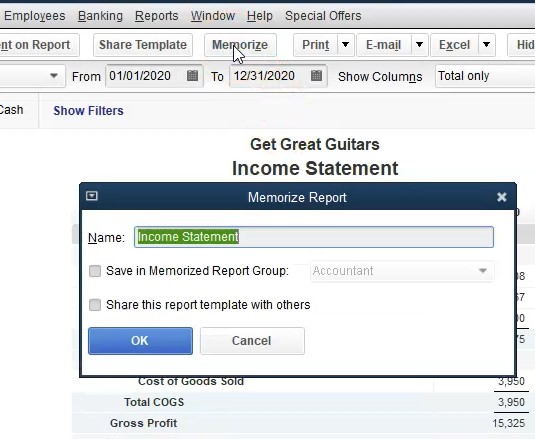
So this looks pretty good. I’m going to keep this for now that’s going to be our format. If I want to memorize this, I can put this in our memorized reports. Now I’m going to go ahead and memorize this report. And it’s going to be called an income statement. Notice it pick that up from the name here. That’s what I want to call it rather than the profit and loss, we’ll call this an income statement. That’s one way we can kind of customize our QuickBooks reports another way, we might want to differentiate ourselves a little bit by just basically changing that little name change, and then maybe some you know, a little bit of font changed a little goes a long way. And then we want to save it in the proper group.

6:10
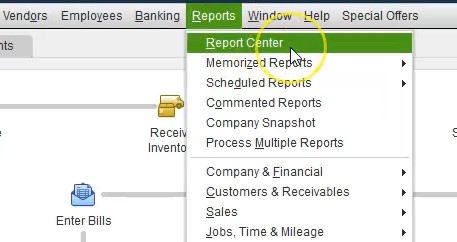
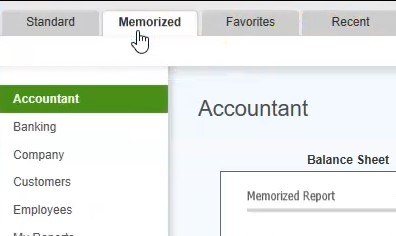
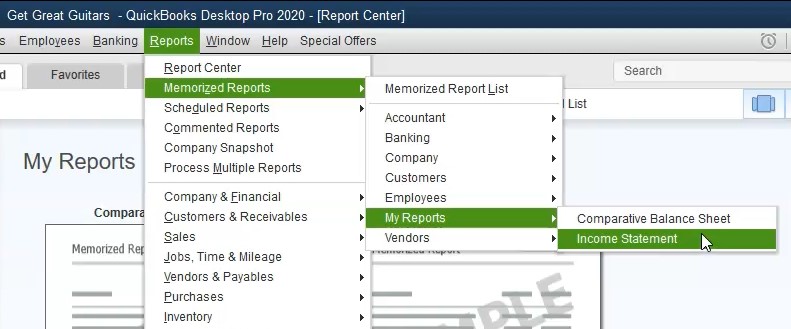
So we’re going to put it into our group, not in accounting, we set up in a prior presentation, my reports, so we’re going to put it into my reports. And then I’m going to say okay, so that we have that if you have the audio on you’ll hear a little camera that will take a picture. And then we’re going to close this out then. And then let’s go into the reports and see if we can then find it, we’re going to go into the reports, I’m going to go into the report center within the report center. I’m going to maximize the screen here I’m going to go to the memory memorized reports, we want to then go into my reports.
6:43
Now we have two in here we have the comparative balance sheet and the income statement. You can also get into this area with a drop down up top, I go into the reports drop down Up top memorized reports. And then we want to go into my records. And we have once again, they compare to balance sheet and income statement, I’m going to go back into the income statement. So here’s going to be our income statement back to our report. Now we’re going to save this now we’ve been working on in part one or section one, we’ve been working on putting on the balance sheet reports.
7:14
Now we’re looking at the income statement, I’m going to save this in a PDF format, I’m actually going to save it in the section one folder because I want to put all the financial statements basically together as we go through this. So so although we’re in Section two, I’m going to save it in the section one. And then I’m going to save it into the Excel worksheet as well that we have been working with as we go as well. So I’m going to save them into different formats. So I’m going to first go to the print item up top, we’re going to print, I’m going to print it as a report. And then I’m going to use the cute PDF printer.
7:44
So I’m going to go ahead and print this, then it’s then going to pull up our printing items so that we can see where we want to locate it. If I select the drop down, I’m in the get great guitars, I’m going to go into keep it in section one. And I might even change the name to call it maybe I should call this section one three, I’m going to right click and rename it, I’m going to call it section one through I believe four is going to be included here. And then we’ll go into section one through four, which is more appropriate name and then we’re going to go in and we’ll rename it I’ll put it into the financial reports 2020. And then I’m just going to call this an income statement. So we’re going to say this is going to be and

8:27
income states meant for 2020. And I’m going to say save. And then there’s that now I’m also going to export it to excel and existing workbooks, I’m going to select the Excel drop down we’re going to create, we’re going to create a new worksheet. However, I’m going to put it into the existing workbook that we did in the prior presentation. If you don’t have one, then you can just make a new workbook but we are going to put hours into an existing workbook, then select the Browse item within the Browse item, we’re going to go to where we need to be it’s going to be awesome the desktop, I’m going to go into the QuickBooks folder or the get great guitars get great guitars, we’re in section one through four.

9:09
And then I want to pick up the financial reports picking up the financial reports and then exporting to it. Here we have it, you can see it’s get a little bit longer. Here, we’re going to do some more of our normal kind of upkeep. And that’s going to be to delete this first tab, I’m going to go to the first tab, right click on the tab, delete it and say delete. And then I want to go back to the sheet one, I’m going to pull sheet one to the right, so I’m going to pull them all the way to the right.
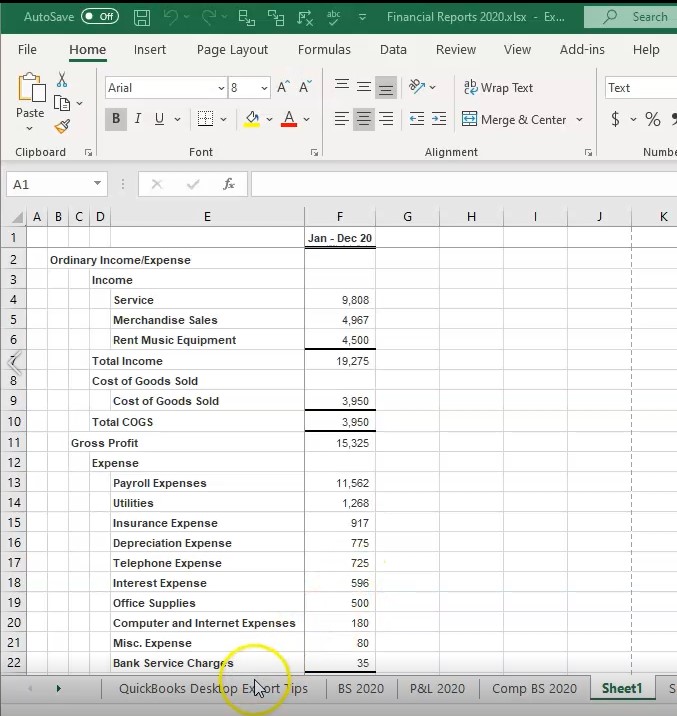
9:35
And note that you might want to reorganize these in some other fashion that I’m doing here, I’m going to reorganize them in the format that we created them. So you might want for example, the balance sheet and income statement kind of like the starting points of your reports. And then so I’m going to pull this to the to the right However, because that’s the order in which they were created.
9:53
Then I’m going to go to the layout view. So we’re going to go to the Page Layout view and say okay, within the Page Layout, the we see the splits now. So I’m going to go up to the View tab up top the windows group, remove the slits, then I’m going to rename the tab down below by double clicking on the tab and calling it and income statement. I’m going to abbreviate, and this is going to be for 2020. So income statement 2020, then I’m going to go back to the normal view. That’s what we have.
10:24
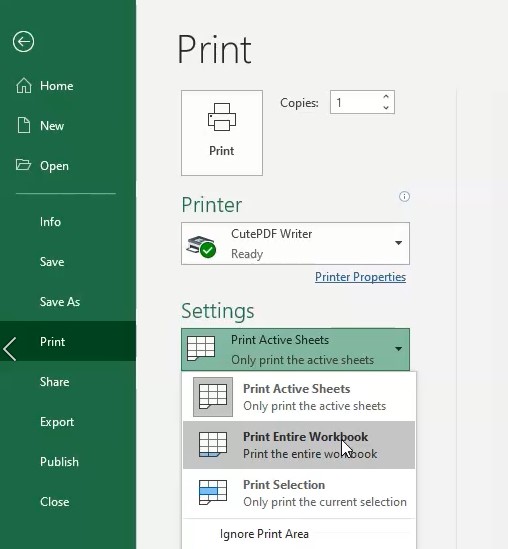
Now I’m going to save all these reports then on one PDF file. So we’re going to go to the File tab up top. Then we’re going to go to the printing option, we’re going to be printing it using the cute PDF printer, so we’re going to send it to a PDF printer. Then we’re going to select the entire worksheet. So we want to select the drop down here, we want to select the entire workbook, not the worksheet workbook, the entire workbook, and then that’ll give us six pages. So we got page one, page, do phase three, page four, page five, Page Six looks all good looks, everything looks good. So I’m gonna go go ahead and print this, it will then print to a PDF printer, in essence saving the file as a PDF.
11:06
Here’s what it looks like I’m going to overwrite this file with it, I’m in section one through four, we’re going to say save. And yes, in there we have that list. Let’s see what it looks like. Now, if I was to open up the section one through four, this is how we can save this data, we can either give someone basically if we’re imagining we’re going to send an email with everything that we have printed thus far, we can give them five different attachments to that email, which is getting a bit tedious at this point might be overwhelming for the person that receives that or we can zip the file. So I’m going to delete this zip file.
11:41
And now I’m going to zip it we could say what if I compress this file, then I can send the compressed file with one email and they can just basically open up that one compressed file rather than five attachments might be a little bit easier. Or if they’re okay with getting an Excel file, we can give them the Excel file. However, I wouldn’t give that to somebody unless they were they like it in that format. But we use the Excel file in order to then create one PDF file as well. So we could just send them this one PDF file which would have all reports in it, including the balance sheet, and the profit and loss reports.
12:17
The competitive balance sheet and what we created now, which is going to be the won’t know the summary balance sheet. And then what we created now, which was the income statement, so we can have the one report which will in essence include all of those. So you want to keep in mind how you’re going to group this stuff how you would give it to someone else how you would save it in your own files.