This presentation and we’re going to take a look at the pay bills form. In other words, we’ve entered bills in the past, and now we’re going to be paying them using the paid bills feature. Let’s get into it with Intuit QuickBooks Online. Here we are in our get great guitars file. Before we go any further, let’s first take a look at our flow chart that’s going to be in the desktop version. So we’re going into desktop version just to take a look at the flow chart.
00:23
When we typically pay for bills when we take pay for our expenses as we did in the prior presentation, we could simply pay them off either with a check or some type of electronic transfer and enter that information directly into the register. However, we could also go through the process of entering the bill here and then paying the bill.
00:42
So in our second month of operations will run some of our normal kind of expenses that we did in the prior presentation through this process. This time, we just want to show this process so you can see it in the first month of operations. So we have entered a bill in the past. That’s going to increase the accounts payable what we owe we owe oven And the other side goes to either an expense or inventory for what we purchased, then we’re going to pay it and in essence, when we pay it, we’re, we’re basically making checks at that point in time, though we can make multiple checks at the same time.
01:13
And it QuickBooks will indicate separately that we have that pay bill feature, which will be decreasing the checking account, obviously, because we’re basically writing a check, and the other side will be decreasing the accounts payable, the account represented that we owe someone money. Let’s take a look at that.
01:29
We’re going to go back to our data. Let’s open up our reports first, so I’m going to open up our reports by going to the reports down below. And let’s just open up the trial balance for now. So I’m going to scroll down to or just open up here, the trial balance and select that item. So we have the trusty trial bounce. I’m going to scroll back up top and change the dates up top from a one a 120 to 1230 120. We’re going to go ahead and run that report. I’m going to duplicate the tab up top by right clicking on it and then duplicating it.
02:04
So now we have the trial balance on the right, I’m going to go back to the left now, going to go to our plus button, we’re looking through the forums, we’re looking at the items that are typically going to be a payout situation, we have a similar kind of layout here in a list type of format, where first you would enter the bill, then you would pay the bill. Now again, you typically might pay the bill with a check. So it might be a check that we’re paying with.
02:30
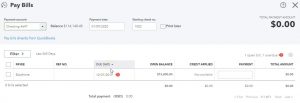
However, we’re going to go through the pay bill feature, which is going to show us that it’s going to be paying something specifically out of accounts payable. So we’re going to say pay the bill. And then we have the sorting of the bills down here. So what’s going to happen it’s going to come out of a checking account. Then we have everything that’s basically in the accounts payable down below. You can sort these items you can sort them in there typically will be sorted by the due date. So you can organize the items that will be there we only have one at this point in time.
02:58
So if you Talking about a larger type of organization, you may have a job that specifically refined down to simply accounts payable, which would deal a lot with organizing and sorting these bills and determining which bills to be paid when. So we have the due date item, we have the payee, and then the opening balance. This is a bill that had been entered. If we check that bill off, then we have the payment amount that’s going to be on the right, we’re going to say that we’re going to pay the entire bill. So if we were going to pay less than the entire bill, we can obviously populate something other than the entire bill.
03:33
Now if you are going to be printing these checks, or this is a check format, then of course the check number will be up top so we’ll have to check number up top. If so then if you’re going to print the checks from QuickBooks, you’re going to have the first check number here you’ll have the first check number then you will take the checks. The checks will be pre printed checks so they will already have a check number on it. What you want to do is make sure that they tie out they should tie out the check number in the system. And in on the checks those two should tie out and if they do that’s a Internal Control that you that you want to make sure those two tie out.
04:03
That’s why I have these separate checks that will be printed, then you put those into the printer and whatever format they need to be to be printing correctly, you may want to test a blank sheet of paper before you do that to make sure that you have it in the printer in the correct format. To print in the correct place. To do that, I would mark a piece of paper, this is the top this is the bottom face down, face up, put it in the printer, make sure you know how the printer is printing on that piece of paper, then put the checks in there and print them otherwise you’ll have to avoid the checks or something like that and print them again.
04:34
Now you may be using this feature and basically a hand writing the checks you can still do that you can use this feature and basically hand write the checks and you’ll have the same kind of thing the checkbook that you’re writing in where you’re going to mail out the checks in in just a normal kind of fashion should line up to the check numbers that are in the system still. And and then it should assign out the check numbers even though you’re not printing the actual checks.
04:56
If for some reason you’re using this pay bills function Basically possibly calling in the checks or something like paying them electronically after you’re, after you’re using the pay bill type function here, you could still do that you might want to put like other in the check number simply delete the check number so that you don’t have a check number and that will allow it so that the next time you do use an actual check, it will populate the check properly with the next check in line.
05:22
So you don’t want to assign a check number if you’re paying in some other way such as a telephone or electronic transfer of some kind. On the printing options, you can print it now or print later we have the options down here if I select the drop up, we can have the save it we can then save and print or I could say save and close I here I’m going to be using the Save and Close I’m going to say Save and Close and it says one bill has been marked paid. So that sounds good.
05:47
Now if you were to then print them later and you want to then gather the checks and print them later you can go into the plus box up here the new item and then you would want to base print the checks down below. Sometimes I like to check this in the check register. So then once I use this features, and then I would go down to the accounting down below, say, Okay, what does this look like in the check register. So if I will then open the check, register for cash and go to the View register here, and then I’ll close the hamburger so we can see a bit more of it. I’m thinking a search by type here.
06:22
So I’m going to search by reference type. So then we have the check, and then the pay bill. So notice that this pay bill item is basically a check, we have to check number check number one, check number two, although it’s going to reference it as a pay bill type of item. Also note, I put the date here as January 9, and I’m going to say that I want to adjust that date. I’m going to say I want to put it in there as of January 30. So I’m going to go into this pay bills. I’m going to select it, and I want to edit I could edit it right here, I could go to the editing function down below.
06:53
That’ll take us to the pay bill that I’m just going to change the date to January 30 2020. So I’m gonna change it to January 30th 2020. So it’s kind of in alignment with the order that we’ve been going in that I’m going to say Save and Close. And we get this warning, the transaction you are editing is linked to others. Are you sure you want to do it? She wants to modify it. And that’s because it’s part of the accounts payable link, we entered the bill and it linked the bill to the pay bill feature, but we just changed the date. So we should be okay. So I’m going to say yes, it should be okay. So we’re going to save that.
07:23
Notice if we needed to change the date, we could also get to that same information by going to the report. So if I went to the reports on the right, I’m going to close the hamburger and make this a little bit larger. Let’s take a look at the checking account then for go into the checking account selecting the checking account, we want to go down and note we have the pay bill. It’s on there as the 30th note it’s still a check in brackets we have check here it’s a check, but it’s a pay bill check special check meaning it means specifically that unlike other checks, this one paid down the accounts payable so that’s what that and so anytime you see that pay bill form, you can say all right down that paid down the accounts payable.
08:02
And here’s the AP. And obviously, if we needed to change the date or something like that we could have done it from this format rather than the register, we could go into here, go directly into the form, here’s the pay bill form, and we could have changed the date in the same fashion. We’re going to close this back out the other side, I’m going to go back up, Tom is going to be to the accounts payable, so we’ll then go to the accounts payable, that would be a liability account.
08:25
Notice both of these accounts are on the balance sheet liability account of accounts payable now at zero, it’s been closed out, I can open up the liability account and there is the pay bill for the 15,000 This should typically be what we should see in the accounts payable, it goes up and then it goes back down we should be able to basically match out the accounts payable.
08:46
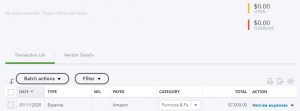
We can also see the more detail in accounts payable and the accounts payable or vendor detailed reports. As well as if we went to let’s go to the first tab, open up the hamburger if we go into the expense section here. We sort are our vendors we can see the detail of what vendors we owe here as well. And if we omit any particular vendor, we can then go into the detail for that particular vendor and and see the detail. I’m going to minimize this side so we can see more, we can minimize the hamburgers useful here.
09:18
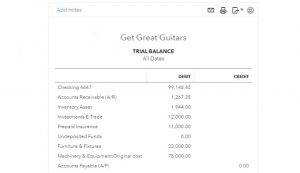
And we could see all we have here is an expense item that we had to this particular vendor. So here’s our trial balance that we have so far. So you can take a look at that. We’ll try to print these trial balances out so you can take a look at them after each section and line up your numbers with them.


