
0:00
In this presentation, we will discuss options for printing that reports and export and reports to excel, this is going to be a very important tool because the presentation of the reports and how we’re going to distribute those reports to either supervisors or organize them for our sales or give them to clients is very important. And it’s something that we’ll be looking on into, in periodically throughout the course will do this within QuickBooks Pro 2020, QuickBooks desktop 2020.
0:29
Here we are in our get great guitars file, we currently have the open windows open, you can open the open windows by going to the view drop down up top and selecting the open windows list, we’re going to take a look at our two major reports, those being the financial statements, those being the profit and loss and the balance sheet or in other words, the income statement and the balance sheet will think about how to save this information in a few different ways how to organize this information in a few different ways, will think about how to print this information will think about how to save this in permission to a PDF file will think about how to export this information to an Excel file.
1:06
And then how can we group this information in such a way that we can then give it to somebody else, we can give it to somebody else with individual attachments into an email of a PDF file. But that can be a little bit tedious. If we had a lot of files, we can at least group those into possibly a zip file which might be a little bit nicer. Or we can actually put them all into one PDF file that has multiple reports in it with the use of the Export to Excel feature, which is a skill I highly recommend taking a look at and we’ll learn that here. Let’s open up our two reports.
1:38
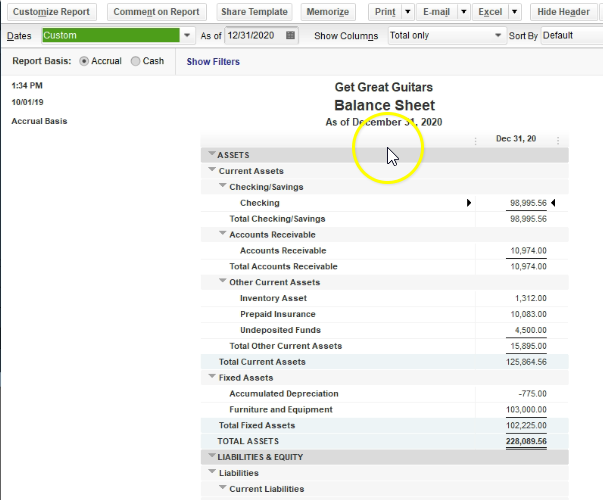
First, we’re going to go to the reports drop down up top, we’re going to go down to the company and financial, we’re going to first open the balance sheet one of our favorite t reports the balance sheet down here in the balance sheet standard report, we’re going to change the dates up top and the customized report field in the upper left dates will then be a 10120 to 1230 120.
1:58
That’s January through December 2020. So this is going to be our first report that we will be considering our balance sheet reports. Let’s then open up the profit and loss which will be the second report we’re going to go to the reports drop down Up top will go to the company and financial then take a look at the profit and loss standard report. The profit and law standard report changing the dates up top I’m tagging over to the dates a 10120 to 1230 120, January 1 2022, December 31 2002, and 20. So these are the two reports we would like to print, we can imagine that we’re going to print them and give them to someone else. I’m now going back to the balance sheet in the open windows. A couple different printing options. If you want to print up top, we go to the print button, obviously up top and we can print the report.

2:48
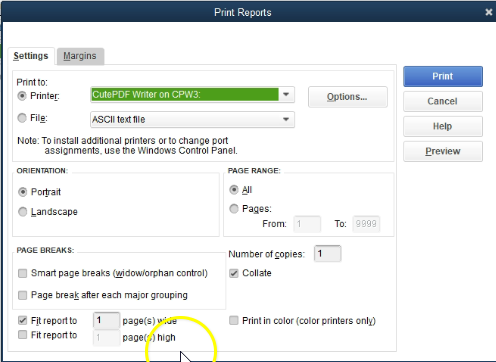
This is going to be our printing options within QuickBooks. So we have the printer here choosing the printer Of course. In other words, this is the printer that we will be sending our information to. And then down here we have a couple other options we have the orientation being landscape or portrait, we have the page range, the page range either all or we can select a range of pages here, we have the page breaks, we have these smart page breaks, we have the page break after each major grouping. And then we have down here which QuickBooks select as the default, which is to fit reports to one page, one page is wide.
3:26
And that’s kind of a nice default to have what QuickBooks will then do is basically forced the information to fit on one page wide, you’ll notice that when we run reports in the future, we will see some reports that will be longer than one page will have to scroll. In other words to the right to see all the detail in the report. When you print the report, you don’t want to have to basically be putting two pages side by side, especially when you’re basically sending something in a PDF file, QuickBooks then makes the default to say, Hey, I’m going to make everything at least one page wide, it may be multiple pages long, but it’s going to be one page wide.
4:00
So you do not have that problem. However, there is an issue with that, because it does then could possibly change the font size of different reports, which could be uneven looking. So there’s other ways we might want to modify the report. And you could do that extra modification in something like Excel where you might have some other tools that you can use to modify a little bit more easily. We’ll go into modification of reports at a later time though. And then we have the number of copies and we have the collate options within the margins.
4:30
Then we have the margin options that we can set over here, we have the preview tab. So once you’ve adjusted any of these options, then you can go to the preview tab. And you can look at what it’s going to be looking like when you consider the preview tab. One of the things you want to consider are things like does it all fit on one page wide? Do I want to fit it on one page tall, how big is the font and and those types of things that which you have the adjustments to and you can modify these types of settings.
4:59
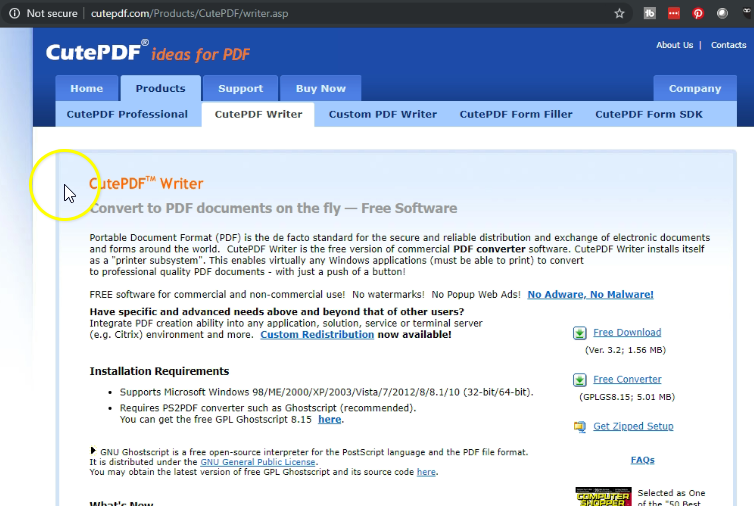
Now up top, you’re going to have the print here, the zoom, the help and the clothes, I’m going to close this back out. That’ll take us back to our printing screen. Now we will be using this printing screen. Often however we not we are not going to be sending it to a printer, we’re going to be sending it to a PDF file. And one way that you can do that is you can use this cute PDF printer or some other type of free printer setup, I highly recommend setting up some type of free printer that you can set up that will actually not print the document, but save it as a PDF file.
5:33
The reason you can do that is that whenever you need to print something that doesn’t have a printing options or doesn’t have a save as a PDF option, then you can use this, this printer option to to print it as a PDF. It’s a really good tool to have not just within QuickBooks, but for other resources as well. So and it’s free, so you could set it up. The one I’m using is called the cute PDF printer. I believe it’s free. This is the website for it was free when I downloaded it’s been a little while now, but it should be a free tool.
6:05
And what this will do if you download a PDF printer, then when you go to the printer options, you’ll get the cute PDF printer as an option. So this is a cute PDF French, I’m going to close this back out, you’ll get the cute PDF printer writer as an option. And then when I print to the cute PDF printer writer, it will then actually save it as a PDF rather than sending it to a physical printer. So let’s do that. Now I’m just actually going to print this report. And it’s going to give me even an option field to navigate where we want to save the report. Now I’m going to hit the drop down up top, I’m going to go to our desktop, I set up a file on the desktop or I’m going to put this into it’s going to be a get great guitars file. And I’m going to set up a new folder in here, I’m just going to call it section one. So I’m going to add a new folder. And here I’m going to do that by right clicking and go into new and then folder, I’m going to put this into section
7:01
one. And obviously when I go to section one, that’s going to be something that will be useful for this type of situation. But you might want to put it into something by client, or if it’s your files something by date. And then we’re going to go into the section one. And then I will adjust the name down here, I’m going to call this a balance sheet, sheet in old say 12 dot 30 120. And I’m going to put the date here with the dots because it won’t allow me to do the dashes.
7:35
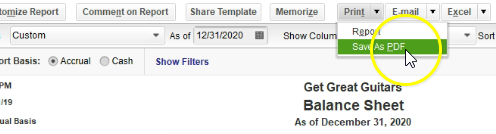
Of course, when I save it on Windows, that’s going to be it and I’ll save that report. That’ll then print it as a PDF file. If I was to open up that file, then I can say let’s open up the QuickBooks file. It’s going to be in section one. And then there’s our PDF file opening up the PDF file it then printed it in essence as a PDF. This is something that of course we can attached send as an email if we so choose. closing this back out, closing this back out. Now we can also do that by going to the print drop down and the state as a PDF report, which will do a similar type of process, it’ll basically save it as a PDF report.
8:16
Note, however, that it’s not always the case, you can have some type of reports that it may be difficult, or you may not have this safe to PDF option, when there isn’t a safe to PDF option in this program or any other but there is a print option, then you can always still save it as a PDF by using the cute PDF printer. So let’s do the same thing for the profit and loss. Now I’m going to go to the profit and loss. So now we’re in the profit and loss in the open windows, we’re going to go to the print option up top This time, let’s use the Save as a PDF, we’re going to say Save as PDF, it’s going to the correct location, I’m going to go to this section.
8:57
And then I’m going to call this the p&l. So the profit loss will call it profit and loss for January for let’s just say 2020. And then I’m going to save that. And now within our folder, then in section one, we’ve got these two files. Now if we wanted to send these to somebody, we can send them as two attachments on one email, which isn’t really a problem, that’s not a problem. But if we had a lot of attachments, a lot of reports that we ran for the month, and let’s say, then it can be kind of tedious. If we were to attach all those files to to an email, one way we can adjust that and make it a little bit easier on people is to I’m going to make a new folder, right click, I’m going to go to a new folder. And we call this the financial statements, let’s say reports. For 2020.
9:59
I’m then going to draft these two reports in there. So I’m going to take these, I’m going to highlight these two reports. And then I’m going to simply put them or drag them into that folder. Then I’m going to zip this folder, so I’m going to put my cursor on it right click on it. And then we’re going to send to send to a compressed or zipped folder.
10:19
So there’s the compressed or zipped folder, then when we make an email, we can attach it, we cannot attach this folder itself, we can only attach the files within it. However, we can attach this zip folder. And then somebody can have at least one attachment which has the files into it. That could be a nicer way to send your stuff. And notice your goal here is obviously to make whoever you’re dealing with it as easy as a relationship as possible.
10:44
So if it’s a supervisor, or if it’s a client, or if it’s just storing your own data and shipping it around, you want to be able to send it in a way that’s going to be as easy as possible, it can be kind of nice and kind of impressive if you’re able to zip the file and send it and make it look a little nicer. Now there’s another thing we could do, because there’s still going to be two files in the zip file. So what if I want to put both reports on one PDF file, we can do that with the use of the Export to Excel feature, and then we’ll convert it to a PDF.
11:15
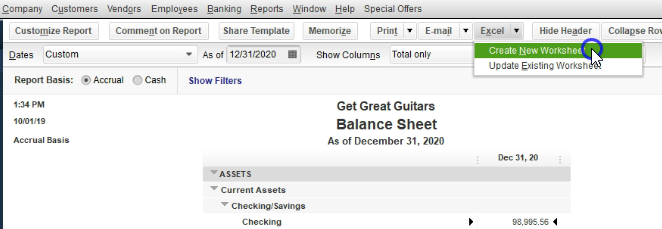
And that can be a very useful tool. So let’s take a look at that. Now we do that we’re going to go to the balance sheet. Let’s go to the balance sheet. First, we’re going to go to the Excel tab up top. Now obviously, to do that you’re going to have to need you’re going to need Excel to be able to do this. And then the QuickBooks program will integrate with Excel and open it automatically in order to do this.
11:36
So we will need Excel to it to complete this part. And we’re going to go to the Excel we’re going to go to create a new worksheet. Now when you think about Excel, remember the worksheets are the actual tabs within Excel and then excels the whole Excel file when you create it’s called a workbook. So this is actually not the workbook like a like a document. This is the worksheet within the document within Okay, so we’re going to go to the new worksheet.
12:00
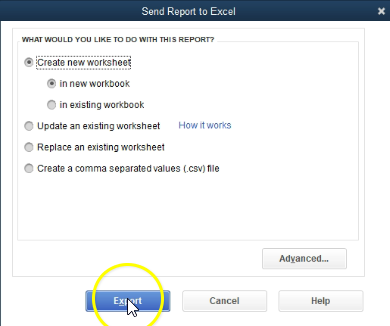
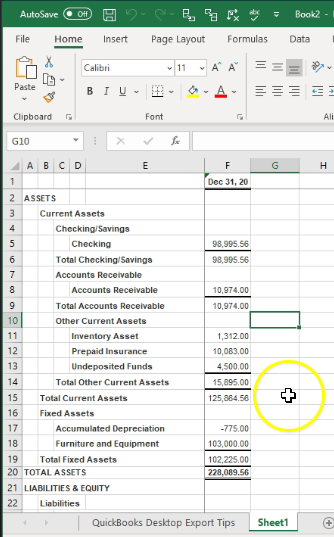
That’ll make more sense when we do the second one when we when we do this for the profit and loss. Now we’re going to open a new workbook, which is like the documents. So now we want to put it in a new workbook. And we’re going to say all right, export this, make a new workbook, Excel, create a new workbook, a new Excel document, in essence, and then create a new worksheet, which is the tab within it that will have on it this balance sheet report. And this is going to be the result.
12:26
Now once we have this, Excel does some quirky things when when we do this export from the PDF file. One is we always have this tab to the left. So I’m going to go into this tab on the left by clicking on this tab to the left, I’m going to right click on the actual tab down below, right clicking on it and delete it. So I’m going to delete that tab and say delete. So there we have that also you have the split options, the splits, which are going to be more apparent, if you go to another view, I like to go to the Page Layout View down below down here by selecting this little icon that’s called the Page Layout. So I’m going to look at that view and say, Okay, and then it says, hey, there’s the splits here. So now you can see them clearly how to get rid of them.
13:08
Because I would like to get rid of them, please, we’re going to go up top to the View tab up top. And we’re going to go then to the windows group. And you see that this splits is now highlighted or greater than normal, I’m going to click it and that’ll remove the split options. Also note when you’re in this field, you can see that the headings are here, they’re simply in the heading field, you can’t see them in the normal view. And if you want to make any adjustments, now in Excel, you can do so which is nice.
13:36
So if you it’s Excel can be easier for some type of formatting issues. So if you want to delete some rows, for example of a report that you are having difficulty filtering before that aren’t necessary for that particular report, you can do so here so many more kind of filtering options that you can use within Excel, very useful to be able to export and a report to excel. And it might also be a base tool that you want to use. Start some other worksheet with an Excel you want to export the data and then manipulate that data in some other fashion. So for example, I could delete if I don’t want this up here, you could do this in QuickBooks as well. We’ll talk about this later.
14:13
But I could just delete that option if I want to and whatnot. If I want to then name the tab, which I’ll normally do, I’ll then double click on the tab below. And then I’m going to call this I’m going to shorten the name, just call it balance sheet. I’ll just call it a balance sheet for 2020. And then I’ll click back off it, I’m going to go back to the normal view up here. And then we’ll save this I’m going to save this document, I’m going to go to the File tab on the drop down, watch this little drop down I guess anymore, but we’re going to go to the Save As and then I’m going to browse to put this where I want to put it
14:49
then I’m going to go back to that great guitars file folder that we were in. So I’m looking for the get great guitars folder, we’re going to be in section one. So within section one, I will then rename the report, I’m going to name it the finance she’ll, let’s say reports for 2020 once again, and that’s what will name it, I’m going to save it right there.
15:17
And it’s not going to save Mac or I’m going to say okay here that I’ll close this back out. And now we have this option in our reports. So here it is right here. Now we can send the Excel file to somebody. However, you know, we might not want to do that. But we can, because we send the Excel file, someone else would need Excel. And they might, they might just want the report. But if they want to manipulate the report, they can use Excel. And Excel might be a tool that someone is comfortable with. And it might and if someone is likes to use Excel, that’s one way we can put it in place.
15:50
However, it’s also useful as we’ll see within Excel to use Excel to then create one PDF file with multiple reports in it, which which can be a great tool to send to people and something that people can, you know, kind of be impressed with because not many people know how to do that. So then we’re going to go to the profit and loss tab. Let’s add this one. This time, we’re going to add this to the same Excel worksheet that we had set up. So to do that, we’re going to go to the Excel drop down, we’re going to still create a new workbook.
16:19
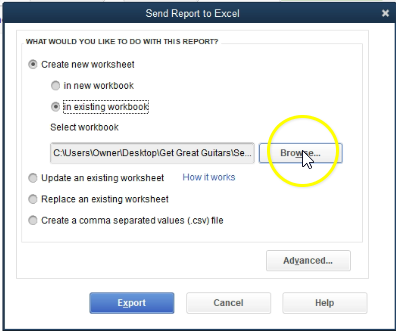
So the new workbook remember, it’s going to be in the same a new worksheet, we’re going to create a new worksheet, the new worksheet will be in an existing workbook however, so first step is still a new worksheet, then the second step is going to be us putting it into an existing workbook, which is going to be the second option, then we’re going to browse to find that workbook that we had just set up with the balance sheet. So we’ll go to the Browse option will then find the workbook which which is going to be in my case, and they get great guitars file, mine is in section one, we’re going to be picking up this Excel file, double clicking on it or simply opening it and then export, which should then open that Excel file, add another worksheet to it another tab to it, and then have those two tabs involved now.
17:11
So here it is it put, I did the quirky things. Again, we’ll do this every time. And I’m going to go to the first tab, we don’t want this tab, this is like it’s a little instruction page, I’m going to right click on the tab, delete it, then it put this sheet to the left, I would like it on the right. So what I want to do is just left click on the sheet tab, hold down the left click and drag it to the right. So that it should now appear on the right, then we have those quirky page splits. Once again, we can get rid of those, I’m going to go down to the Page Layout view in the Page Layout View, I’m going to say okay, then we’re going to go to There’s our splits. So we’re going to go then to the view up top, we’re going to been in the windows group, uncheck the splits option, which removes the splits, I could then change things if I so choose, I’m going to remove this we’ll talk more about, you know, formatting later.

18:08
And then I’m going to go back to the normal view. And then actually, let’s go back to the Page Layout View. Let’s rename it, I’m going to rename while I can see the name up top by double clicking on this tab, I usually just call this the P and L for 2020. So there we have the two tabs. Now we’ll go back to the normal view. So now we could send to this folder, I can save this and I could send this in one document to somebody if they’re familiar with Excel, they would like to see their information in Excel, we can do this, we can also use this as a tool to create a PDF file with two reports in it using the cute PDF printer that we had set up. So another great tool with a cute PDF printer and Excel. Now by going to the File tab over here, we can then go to the printing options. And then would go to the printing option drop down here and we want to imprint the entire workbook, not just one worksheet. So the default is whatever worksheet you are on, we want the entire workbook the entire document including all worksheets.
19:13
So we select that. And then you can see if I if I scroll down, we have the two reports on this document then, then if we were to select the drop down, where do we want to put this, we want this go into the cute PDF printer. So that’s the printer I wanted to go to, then we’re going to say a print. So we’ll print that item, we didn’t have our option. And once again, that PDF file to where we’re going to put it, here’s our section one folder, it’s going to be once again called the financial statement. 2020 will then save that, so we’ll save that, then I’m going to open up and take a look at the options that we have had within section one.
19:54
The options we have if we’re going to give this report to someone else, obviously, we can print the report give the paper copy. And then we can save it as a PDF in multiple different ways. We can save as a PDF, so that we have the multiple PDF files, which is not too bad with two PDF files, but could be a lot if you have more than two PDF files to then send someone with an email with like 10 PDF files that’s not very not, you know, the receiver of it will be overwhelmed with a lot of information. The other way we can do it is we can say Hey, I’ll give you an Excel file that’s going to have that information in it, which could be useful if people are used to excel. If they’re not used to excel, then that might not be the best way to go either.
20:35
But it’s a nice tool to put into Excel so that you can then create one report that we just created now, which will have multiple, one file which will have multiple reports, one PDF file, which will have multiple reports as we have here, here’s the balance sheet. And then we have the profit and loss right underneath it. This can be very useful, because then we can give this one thing to somebody else, this one report with reports in it.
21:01
And if they want to download it or save it, it’s a lot more easy for them to do if they want to take that information and give it on to somebody else, it’s a lot easier to do in that format than having 10 different files that would be in there. Obviously, we only have two. But if you did have 10 different files, that would be difficult. The other thing we can do is zip the file. And by zip in the file, we have the same two documents involved in it.
21:25
However, now by zip in the file, we can allow someone to attach the zip file to an email, making it easier for them to basically send it receive it again, hopefully be a little bit less overwhelmed will still open it up. And if there’s 10 files in it, or 10 reports, it could still be a little overwhelming but at least it’s in one folder and they can then save it more easily. Usually then then having 10 different like attachments into an email. So those are the major options that we’re going to use. We will go back to these options as we work through our practice problem in in QuickBooks, we’ll go back to this report, thinking about how to save these reports and practicing saving them using these options.