
This presentation and we will generate, analyze, print and export to Excel our month in financial statement reports that’s going to include the profit and loss report or income statement report, the balance sheet report, and then we’ll take a look at that transaction detailed report that’s going to give us a lot of information to see what we have done over the month. It’s really good information that some people use for billion for the month.
00:23
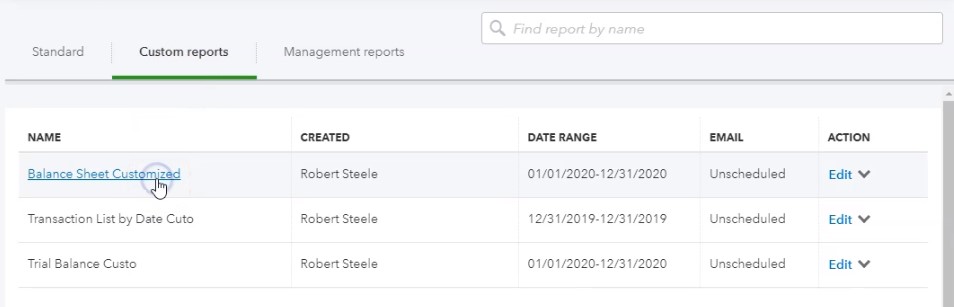
And when you’re reviewing work, as well as looking at in a class format. Or if you’re looking in practice format, really useful reports to take a look at. Let’s get into it with intuits QuickBooks Online. Here are our get great guitars files. We’re going to be generating our reports here. So we could go down to the reports down below. We have our standard reports that we’ve been going back and forth through and those were in the favorite reports here. You’ll recall however, we’ve customized our reports for the month and reports in prior presentations. And so we should have in the customized reports here. Our our favorite month in type of report.
01:00
Now, oftentimes, you might be using these reports all the time, if you just like the formatting better of them as well. I’m going to go and open up these and I’ll spare you some of the formatting stuff that we’ve been doing for the first half of the course, by just simply opening these items. And that should make it easier for presentation purposes. So we’re going to then open up the balance sheet that has been customized.
01:19
Again, I’m in the customized reports tab, going to open up that customized report. You’ll note that the formatting has already taken place. If we scroll down, I’m going to I’m going to Well, let’s right click on it up top, let’s duplicate the tab. And then let’s scroll back up top and adjust the dates. I’m going to scroll up top and I’m going to make it from 1120 to 1231 to zero, then I’m going to run that report. Then I’m going to close the hamburger for now and make this a little bit larger. Just to note the difference between this report. What we have is we don’t have the decimals here. Y’all know we took off the header and footer we made the negative numbers bracketed.
01:58
So we have some of that information. All set up for us already some of that formatting. If you don’t have that and you want to format it, you can go into the customized reports up top and and do that formatting. So then we’re going to go back to the prior tab, we’re also going to be opening up the profit and loss. Let’s go down to the reports. I’m going to scroll back down to 100%. So I could see this a little better. I’m going to be back in the Custom Reports tab.
02:21
Now we want to take a look at the P and L. We didn’t customize the piano, I don’t see it customized here, I didn’t customize the p&l. So I’m going to go back to the standard tab. And we’ll have to do a little formatting on the p&l and then on customize it. So we’re going to open up the profit and loss. And then I’m going to adjust the dates up top from a 10120 to 1230 120. Let’s go ahead and run that report. Then I’m going to go up top and right click on it. We’re going to duplicate that tab. I’m going to close the hamburger up top and then I’m going to customize this report a bit let’s do our standard customization.

03:00
I’m going to remove the pennies, we’re going to make the negative numbers bracketed, I’m going to make them also read, then I’m going to scroll down to the header and footer, I’m going to remove the date, time and report basis. I’m also just just to make it a little bit different for this one as well on the header. I’m going to change it from a profit and loss report to an income statement. And that’s another way you can kind of customize, customize your reports there, I’m going to say run that report. So now it’s called an income statement.
03:32
And we got the period running there. So everything looks looks good. Let’s go ahead and then save that customization. I’m going to call it an income statement. Custom. And then I’m going to go ahead and save that report. So these are the first two reports that you kind of want to analyze and then and then go into the transaction detail.
03:53
That’s what I would think about it as doing so if you’re reviewing your numbers to our numbers, then you’d want to be taking a look at these two reports. Possibly then the trial balance report as well of course, that might be easier to actually take a look at, and then line up all your numbers. If something doesn’t show up at the same, then take a look at the transaction detailed report and tie out each number there.
04:14
So let’s first go to the balance sheet. If we go then to the balance sheet, this is what we have for the balance sheet. All of this of course been constructed from scratch, we entered the beginning balances and then a month worth of information. This is where we are at at this point in time.

04:31
So if we scroll down, that’s what we got. Now, if I scroll back up and I minimize this, I go to the assets and minimize it. And the liabilities and equity. This is what we have in terms of total assets. If we were to maximize the total assets, then the current assets are the cash the checking account what people owe us. And then the inventory that we have. We put some money into the trade accounts.
04:53
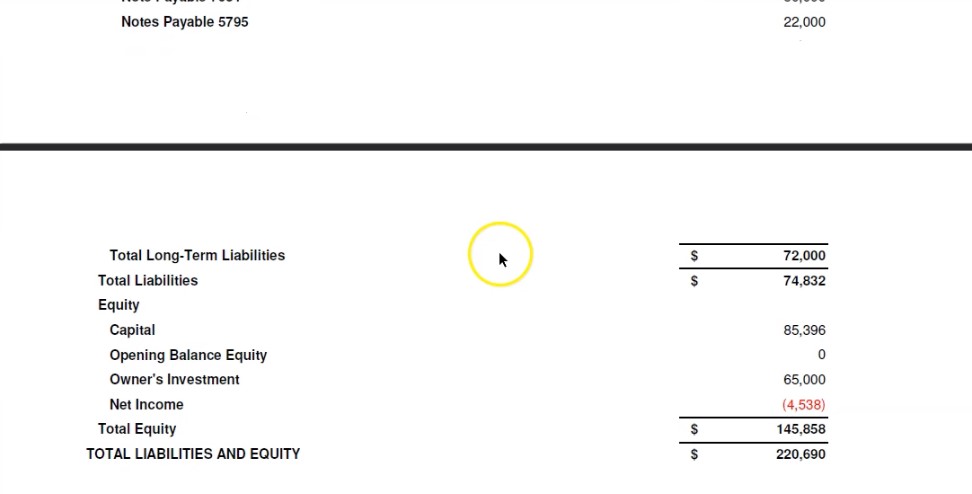
We’ve got the prepaid insurance which we haven’t consumed yet, but we paid for. We’ve got the undeposited funds, which are Cash we should have on hand that we’re going to go to the bank with at some point in time, we’ve got the furniture and fixtures long term assets, we have the machinery and equipment long term assets that are going to help us generate revenue in the future liabilities, we’ve got the current liabilities, nothing in accounts payable at this time, we still have the credit card debt we owe to the state for the sales tax, then we have our loans that we took out which are total in the 72,000.
05:25
At this point, we have them the equity, the 85,003 96 from the beginning equity, and then we the owner invested another 65,000 in it just put 65,000 in the company, we currently have a loss from this time period, that should be reflected on the income statement at the 4005 38. So that 4005 38 then if we go down to the next tab, the profit and loss tab, we should see that being in the bottom line number 4005 38.
05:56
Now just if I go back to the balance sheet tab just to say what’s going to happen next Period just to understand how this thing kind of rolls forward. If I go back up top and I changed the dates to a 10121010121, the next year, or you know, you can make it 1231 31 to one, that’s fine. And run that report and scroll back down. What happens to the equity section that net income rolls over into the capital that we set up, we changed the name from retained earnings, the capital rolled over to capital.

06:29
So that net income numbers trying to show you how it kind of rolls over. I’m going to go back up, we’re going to change it back to 2020 120 to 1230 120. We’re going to run that report, and then scroll back down and we see that 4005 38 to the profit and loss report. There’s the 4005 38. So what have we got so far? sales, the Sales Total in 4006 59, for sales of products and services, then we have the cost of goods sold.
06:59
That’s the inventory. That we had to consumer spend, at the point in time that we made the sale, that’s when we record the expense of the 1009 50. Then we have the office supplies and our biggest expense being our payroll. And then we have the payroll taxes and the telephone and the utilities resulting in 7002 47. And a loss of this 4005 38 in the first month. Note that the first month happened, a loss is not unusual for for startup businesses, that’s often you know, that often happens.
07:33
So now I’m going to go back to the first tab. Let’s also open up the trial balance. So if I open up the trial balance, just to take a look at it. I’m going to make this a little bit smaller so that QuickBooks doesn’t have any problems optimizing the screen, and we’re going to say trial balance. That’s the one we want. We’re going to open that one back up. I’m going to change the dates up top from a one Oh, 120 to 1230 120. Let’s run that report. Then I’m going to duplicate the tab up top right clicking on the tab up top, and duplicate the tab.
08:13
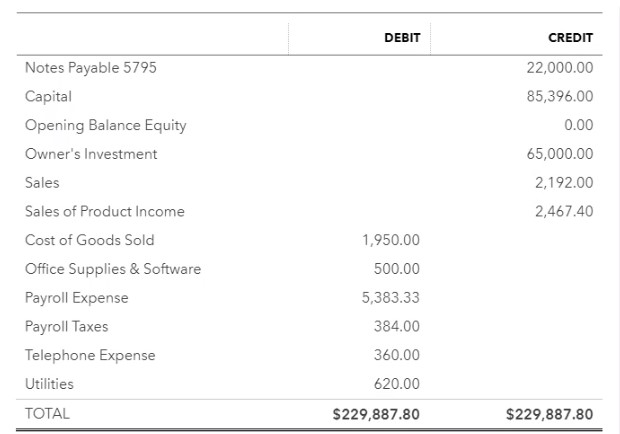
I’m going to then close the hamburger I’m holding down control, I’m going to make this a little larger to 125. Now note the things you can do with the trial balance and the things that you cannot do with the trial balance. When I look at the trial balance, I can look at all the account balances in one place, I can see them in order. And I can use the trial balance and very well to drill down and use the auto zoom feature to see any detail on the trial balance.
08:34
What the trial balance cannot do well, at least in this format, is that you can’t really see the net and you can’t see the net income number you’d have to add up what the net income number is, you can’t see the subtotal for the assets, you’d have to add those on up and so on and so forth. So it’s useful to know when when can you use the trial balance.
08:51
For example, if you’re tying out your numbers to this number to our numbers, the fastest way to do that would be with the trial balance because you can tell number by Number two, the trial balance, and you don’t typically have the subtotals. On the other hand, if you do use the balance sheet, you could try to take shortcuts, right. And in this, you could say, well do my total assets tie out, do my machinery and equipment tie out instead of tying out each number.
09:15
So there’s, you know, there’s pros and cons to each each way of looking at it, but the trial balance will probably be the fastest way to just kind of scan through and check all of your actual accounts to the actual accounts. Here. If you see any account that is off, you know that some other account must be off because it can’t just be one account that’s off because I’m in balance. And if you’re unbalanced and one accounts often there’s got to be at least one more. That’s awesome.
09:39
Where once you’ve taken a look at the trial balance or the profit loss and the balance sheet, if you determine that there’s a problem of some kind, whether in this practice format or in real practice, then you’d want to go probably to the transaction detailed report. It’s going to give you all the detail for the month. This is really helpful to know what has happened in the month if you’re working with somebody else. You want to see what they have done for the month, go to the transaction Detail Report, you get to see all the all the stuff that they entered for that time period. So that’s what we’ll do.
10:08
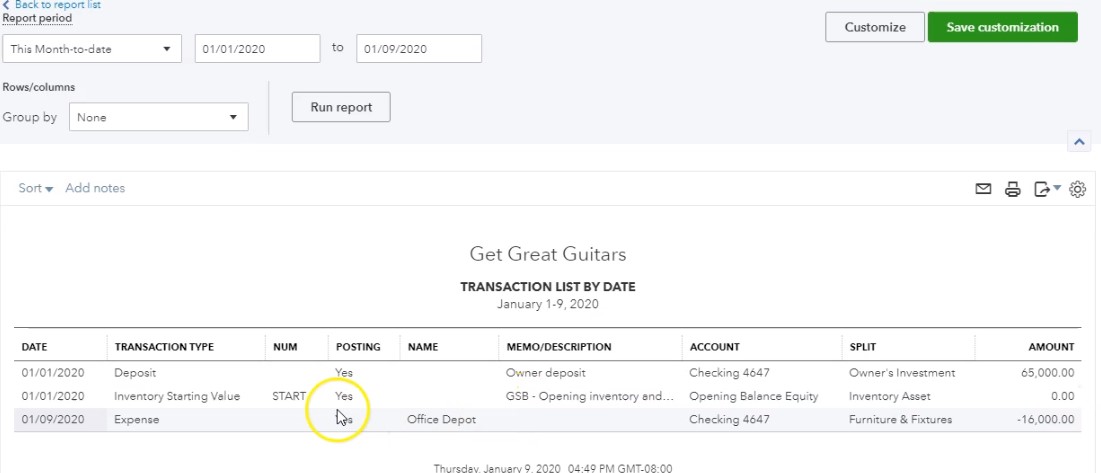
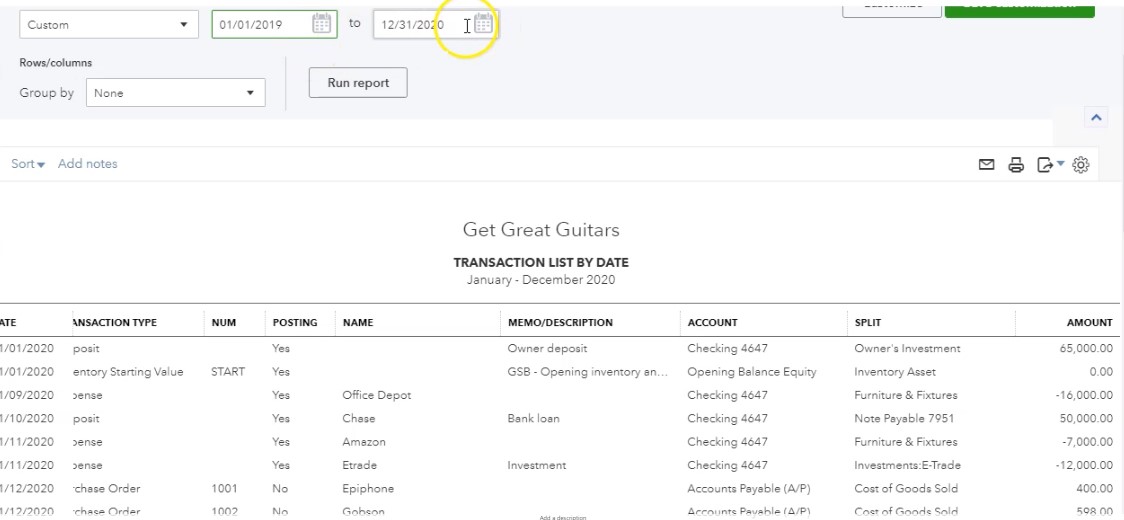
Now we’re going to go to the detail transaction detailed report, I’m going to open up the hamburger go back down to reports, I’m going to hold down Control and make this a little bit smaller again, back to 100. So QuickBooks doesn’t have any problems optimizing the screen, then this is going to be down in the accounting section. So if I scroll down to payroll all the way down to for my accountant and we want the transaction list by date, so I want the transaction list by date will open that one up.
10:39
Then I’m going to scroll back up top, I’m gonna change the dates once again, dates theand, from a 10120 to 1231 to zero and run that report. So then you want to go through the transaction detail, we will print these out so you can take a look at them. And I’m going to hold down Control and zoom in a little bit here to 125. And once again, you can see each transaction, you could see the date of the transaction, you could see that the account or the type of form that was used.
11:06
So deposit expense form invoice if no other form was available, it will then have a journal entry form. We see the numbers if any number was used check number, invoice number and so on. We see the name here. So if we had a customer vendor memo, if there’s any memo that was input, more memos or better, so if you if you know, more detail is always better. We didn’t put memos and all the all the information for here for our purposes, then we have the accounts and the split account.
11:36
So it’ll show the two accounts that will be affected in the journal entry that’s created by the form that’s really useful. You can look at each one of these forms here and say what’s actually happening to the accounts that are affected and and you want to, you know, be able to kind of memorize the accounts that are affected by the forms, then we have the numbers on the right.
11:55
So if you’re tying your numbers out to these, you probably want to try out each number on the right Then if you see something on your numbers that are not on our numbers, then you want to see if it’s a date thing, if it’s something that we entered in the beginning balance issues, things, or you might have duplicated something. If it’s on our, our system here and not on your system, then it might be a date issue. It might be that that you put it into your system, but not in the right date. To check the date issue, which is like 99.9% of the time, maybe not that much that it’s a problem. It’s usually a date problem. You can change the date range, let’s say to 2019 and let’s put it to 2021.
12:38
Now, there shouldn’t be any transactions after January 2020. Right? So 2019 is going to be including our beginning balance journal entries, so we’re going to have some detail in the past. Those should line up to what we had at the end of the of the first section where we entered the beginning balances. Then we have everything that’s going to be entered through January and you You shouldn’t have anything after January 31 2020.
13:03
If you do, then it’s probably a date issue that you put in the wrong date. And that’s fine, then you could zoom into that that transaction, change the date, and then check your numbers again. So I’m going to change the dates back up top, and then we’ll do our printing of the reports a 10120 to 1230 120. Going to run that report. I’m going to try to print these fairly quickly this time, because we’ve seen this process before, but I want to get in the practice of having our month in reports and basically printing them and saving them.
13:34
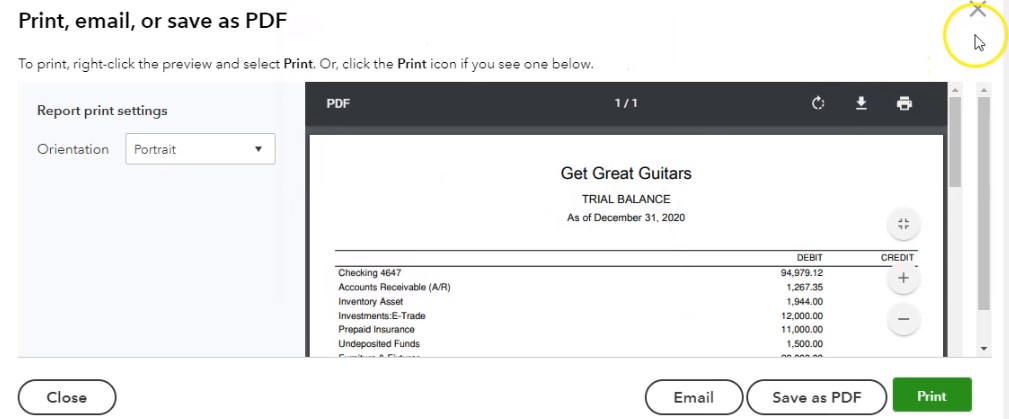
So I’m going to go back up top, and we’re going to say we can’t print the report, we could save it as a PDF, we could email it, we have four reports, we would like to send them either as a zip file or as one PDF file attachment in my opinion. So that’s what we’re going to do. We’re going to practice using the cute PDF printer as we have in the past. So I’m going to print the balance sheet with the cute PDF printer. Going to open that one up, go ahead and print it I’m going to put it in our course data, I’m going to make a, actually, I don’t need to make anything new, I’m just going to put it into seven month one. So this is, and obviously in practice, you probably would have clients and then and then the date, it is going to be the balance sheet.
14:15
So we’ll have that balance sheet, I’m going to go ahead and save that. And close that. And so that looks good. Then I’m going to go to the profit and loss. I’ll save them all, and then we’ll do the exporting thing. So I’m going to do the profit and loss report, same process, I’m going to go to the printing. And we’re going to go ahead and print that. I’m going to print it to the cute PDF printer as we seen in the past, go ahead and print that, that it’s going to ask us where do we want to put it and I’m going to keep it in the same spot. It’s in the correct folder that looks good.
14:46
This is going to be the profit and loss. So profit and loss. Let’s keep it at that will say save. I’m going to close this one out. We’re then going to go to the trial balance since like yeah, we might as well include the trial balance is I’m going to go up top. And I’m not going to format the trial balance, I’m just going to keep it as is we don’t we didn’t put it into our standard format. But that’s okay. I’m going to send it to the cute PDF printer once again. And it’s going to ask us where do we want to put it, I’m going to put it in the same folder. So it’s going to where we want to kind of call this the trial balance. So there we have that, save it. Close it.
15:27
Let’s do the same for the last report being the transaction list by date. We’re going to print that one out, printed, and I’m going to print it to the cutepdf printer. So that looks good. We’re going to print that one out there. I’m then gonna get the file and I’m going to call this I can oftentimes I can put this right underneath if I don’t know the report name, or I’m scared of spelling it wrong. Transaction lists List by day that doesn’t really stop me from spelling it wrong oftentimes, but might help lessen the likelihood. So then I’m going to go back to the first one.
16:05
Now we’re going to export it to excel, which we will use to create one PDF file. So I’m going to go to the drop down here, we’re going to export to Excel. There’s our Excel file, we’re in Google Chrome, so it’s picking up at the bottom. So remember, if you’re in a different browser, it might open up some other way. So here it is, I’m going to check to see if it all fits on a page. So I’m going to select the Page Layout view at the bottom, it looks like it does, I’m going to go back into the normal view. I’m going to save this as the financial statements. This is going to be the major report that I’m going to put all the other reports on using the tabs. So I’m going to go ahead and browse here.
16:39
I’m going to say it should be going to this folder and then I’m going to rename it down below just financial statements and statements, okay, and then save that. And then I’m going to minimize this for now I’m going to go back to the profit and loss report. Do the same thing. I’m going to go to the export Excel worksheet, we’re going to open up that Excel worksheet, I’m not going to save it this time, but just copy and paste the the tab the information. So then I’m going to copy this whole tab. And I’m going kind of fast here.
17:16
So you can look at the prior presentations if you have if you want to look at this in more detail, but I’m going to copy the whole tab here. And by hitting this sale or control a and then control C, and then I’m going to close this up and I’m going to make another tab in our balance sheet worksheet. And I’m going to double click on the on the name of it down below and call this P and I’m going to be in cell A one and this time, I’ll use the keystroke of control D in order to paste it. So there we have it there. Now I’m going to go back into QuickBooks. I’ll just minimize this going back to QuickBooks, it will do the same for the trial balance.
17:55
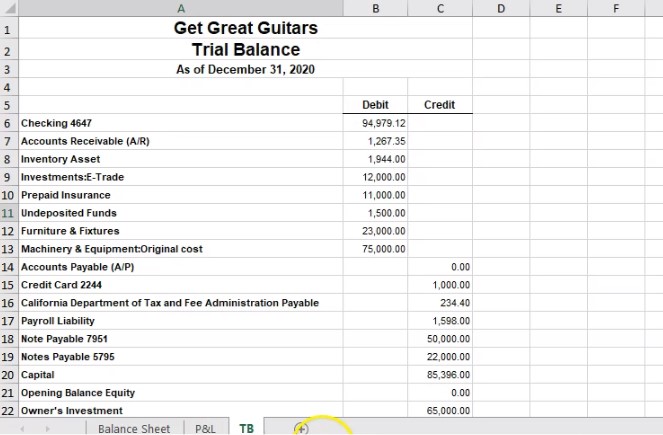
So I’ll go ahead and export that to excel and open up the time. in Chrome, there we have it, I’ll see if it fits on a page by selecting the second page back to the first page it does, I’m going to go back up top, highlight the entire thing, right click on Actually, I’m just going to hold down Control C to copy at this time. And then I’m going to go to our major one with a balance sheet was, I’m going to make another tab, I’m going to double click on the name, call it a trial balance of it’s called the TV.
18:26
And then I’m going to be in a one, I’m going to put Control V on the keyboard Control V, and that’ll paste it out. All right, let’s keep on doing this. I’m going to minimize this and get back to our report, we have the 111 more the most difficult one, it’s going to be the transaction list by date will export that one will open it up. Now this one definitely doesn’t fit on a page. I’m going to first move it over to where I want it and then I’ll do the formatting just so I don’t have to duplicate any formatting. So I’m going to click on the triangle control. See on the keyboard to copy it.
19:01
And then I’m going to go back to our other tab, where our major reports are the three reports we have, select a new tab, double click on the tab name, and this is going to be the transaction detail. And then on a one, I’m just going to control V hold down Control and V as in Victor, there’s a report, then I’m going to check to see if it fits on a page, which I know it doesn’t.
19:26
But I if I go on the second view, which is the Page Layout, and back to the normal view, it adds those little dotted lines so I can kind of see what fits on a page. I’m going to do the same kind of format and we did the last time we looked at this report, I’m going to go up top, I’m going to go to the Home tab alignment, I’m going to unmerge so I’ve unmerged I’m going to do that again, Home Tab alignment unmerge. One more time, Home tab, alignment unmerge. So there we have that. Now I’m going to move the heading, I’m going to select these three calls. And then grab it. So I can grab it like when my cursor looks like that and move it to the right, I’m going to make this a little bit larger, so hopefully you can see it better.
20:10
And then I’m going to go back back, I’m going to remove then the whole column selecting column A right clicking on it and deleting column A, I don’t need column at all. Then I’m going to remove the post in column, I don’t think I need to post in columns, I’m just gonna delete it. And then the name column, the memo column would probably be good the account and the split column and then I need the numbers. Okay, so the next thing we’re going to do is make it landscape notice I made the numbers a little bit larger here.
20:39
And I do that by going to a page layout up top. We’re going to then go to the page setup orientation, we’re going to make it landscape that makes it a little bit larger, so that fits a little bit better. And then we can make some of these cells smaller I could say I can bring this down to about you know, there. I can bring this down to probably there and be okay. I don’t really need to start. So I can bring this down to there and be okay. And these two, you know, I could probably bring these down, if it cuts off the name a little bit, I probably don’t care all that much. I can format that as small as it goes there. Now it fits on a column.

21:16
Now, if you couldn’t, if you’re scared to kind of remove a total column, you could try to hide one by you can right click and and hide it. And that might be a way that you can kind of make it work without without deleting a column, or you can kind of force it to work when to do the printing option. But I’d rather not do that because it makes the text, different sizes and too small and whatnot. I’m going to undo this, because I’d like to show you how to format the header again. So if I wanted to format the header across all these cells, you probably don’t want to do that.
21:45
If you hide sales, it makes it you know, that’s why it makes it a little bit messy if you hide it, but if I highlight the whole thing, then I can go to the Home tab, and we can then merge it again but I’d rather not. I want to just show you that I’d rather whenever you can use the other alternative, which is to right click and format the cell.
22:08
And then you want to go to the alignment tab, the second tab, and you want to make it center across the selection center across the selection. And then it will center it without kind of, you know, scrunching up off of sales and making it so you can’t do other things. Because of these, these merged cells, I’ll do the same thing here. We’re going to format, we’re going to go to the alignment tab, we’re going to say horizontal, we’re going to center across the cells. Okay. And then we’ll do the same thing one more time. I’ll highlight these, I’m going to say format the cells. We’re going to go to the alignment tab, horizontal center across the cells. There we have it.
22:46
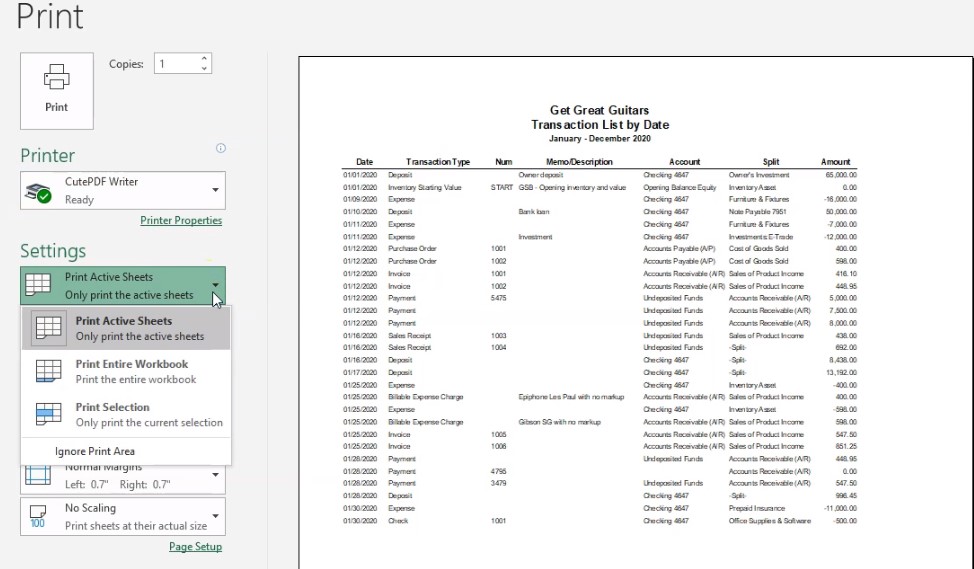
Now you could still go in here. Once you do this and try to hide something I can right click. I can have a whole column and hide it. I can’t see the hide their hide. And that should should still keep the centered amounts centered where you want them So just be aware of that. Now I’m going to go ahead and print this out. So let’s go ahead and print it out. So I’m going to go to the File tab, we’re going to print it, we’re going to be using the cute PDF printer again. So it will be printing to a PDF file, we need to print the entire worksheet.
23:14
So I’m going to print the entire worksheet. six pages down below. There’s the balance sheet. There’s the end of it, there’s the income statement, there’s the trial balance, there’s the transaction detail report all fitting on the one page across, it’s two pages long, that’s fine. one page across. There we have that going to go back to the prayer. Actually, I didn’t print it. What did I do? I have a debt, it didn’t print it. Let’s go back to print.
23:39
And now that we see that that all fits, let’s actually print it and it’ll print it as a PDF file. It’s going to ask us where do we want to put it? I’m going to say it’s going to the right spot. It’s called financial statement that looks good. So I’m going to keep it there. This has been what we have at this point in time if we were to send this stuff to somebody.
23:59
We You could send them individual files, the balance sheet, the profit loss, the transaction detail and the trial balance in one email with multiple attachments, or we can put this into another folder, adding another folder, simply calling it financial state men’s. And then we could put that into it, put in there, the balance sheet, put in there, the profit and loss, put in there the transaction detail and put in there the trial balance, then we could zip that folder right clicking on it, and send it to a zipped folder, which is nicer to see right, I can go in there and then there’s all of our zipped information, I can attach the zip folder to an email where I cannot attach the just the one folder, right?
24:48
So I can have one attachment. So I’m going to delete that. And then the other way we can see it as of course with this one PDF file that we created from the Excel worksheet with the use of the cute PDF print. And it would look like this. And obviously you can, you know, do more formatting on this but these are the options and you can attach the one file which will have all of the reports on it and the transaction detailed nice.
25:12
This is when you want to keep an eye on to make sure it fits on the one page wide. I don’t care that it’s two pages long. I you know, it is a problem for readers. You know, it’s not nice to give someone a report that are two pages wide and they got to tape it together or kind of, you know, go up and down and try to figure out what number tides out to what transaction