
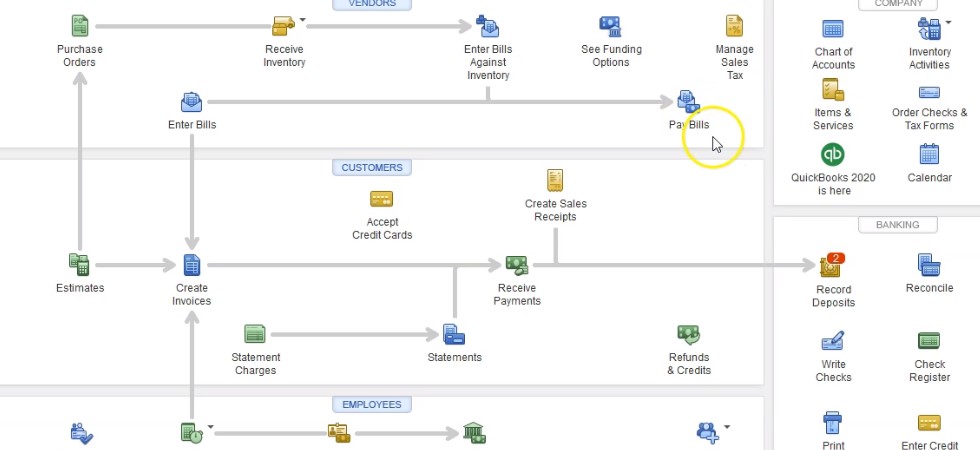
In this presentation, we will track and pay bills. In other words, we’ve enter bills and prior presentations, we’re not going to use the pay bills feature in order to pay them. Let’s get into it with Intuit QuickBooks Online. Here we are in our get great guitars file, we’re first going to take a look at our flowchart in the desktop version just to get an idea of of our objective. In prior presentations, we have entered bills, we entered bills for inventory that we purchased, which was a little bit different than what we did in the first month of operations.
00:30
In other words, we requested inventory with a purchase order which had no transaction. And then on the second piece, when we got the inventory, then we had the inventory with the bill instead of simply paying for it at that point in time we entered it into the bill instead of writing an expense or a check or decrease to the checking account at that point. So that’s when we entered the bill, which increased accounts payable and it also increased the inventory. So now we’re going to take now we’re going to go and have to actually pay the bills and now we’re going to go into the process of paying the bill. And in order to do that, we’re going to use the pay bills type of feature.
01:04
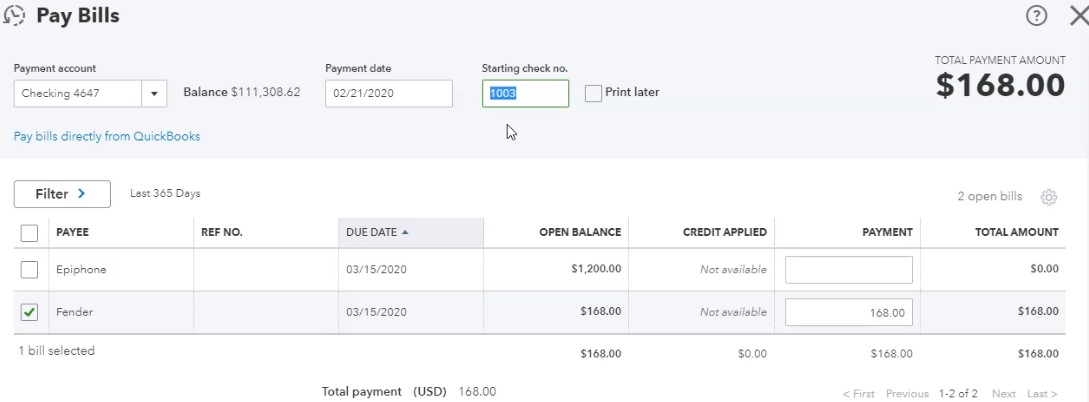
This process will basically generate checks, but it will also allow us to sort those those bills that are owed, select the ones we want and process the check. So I’m going to go back over to QuickBooks Online, we’re going to select the drop down, we have a similar kind of layout in the paid in the money out kind of system, where we have the at the bill item here. Now we’re going to pay the bill so we’re going to pay bill so we’ll enter the pay bill system, it doesn’t go to a direct form that you would kind of expect, which would be like an expense form or a check form, but rather a pay bill form, which will list the amounts that are basically currently in the accounts payable.
01:40
We have two items because we purchased inventory for those two items. And we’re going to be paying one of them. We’re going to be paying off the fender. So this was our new vendor vendor, we’re going to be paying off Fender, the new vendor, and we’re not going to be paying off the Epiphone so you can see how this how this system kind of works in the pay bills. feature, it’ll list out the bills that are owed, you can sort them by due date or by amount or whatever you’d like to sort them by select the ones that you want to pay, then we’re going to be putting the date of the payment, which is going to be owed to 21. to zero. If if we are writing checks, then we need to put the check number should populate automatically. And as we generate the checks, we if we’re printing the checks from the QuickBooks system, we would have the checks that wouldn’t be external checks would have this check number that should line up to this one automatically.
02:32
That’s part of your internal controls, put those into the into the printer. And then if you had multiple checks, you can print the multiple checks at one point in time with this system, which can be useful if you’re not using checks if you’re if you’re saying that you’re not using any checks, then you’d want to basically delete this if you’re just entering this into the system and you have like an A electronic transfer at a later point at some in some fashion. Then you basically remove the check number so that the check Number won’t be applied to those transactions. And next time you actually write a check, it should line up to the proper check number.
03:06
If you’re actually using a cheque book that you’re just going to hand write a check. And then you want it to line up to the system so that you can get the transaction in the system and you want to the checks to line up to what you write in in the checkbook and are physically mailing out in some way, then you want to keep this check number, it should, it should line up, but you simply won’t print it. And that’s what we’ll do here. So we’re going to keep the fender and that’s going to that’s what we’re going to be processing. What’s going to happen when we when we process this, it’s going to decrease the checking account basically with a check but a special check that’s going to be called a bill paycheck. And that’s an indication that the other side of the check the other account that will be affected will be accounts payable accounts payable, a liability which will be going down.
03:49
So I’m going to go down over here and I’m going to say Save and Close. So let’s go save and close and check out our reports for it. So then I’m going to go to the report. Down below. Let’s open up the trusty trial balance so we can see the the activity. So I’m going to go into our find reports, we’re going to type in the trial balance, I’m going to pick up the trial balance here. And then I’m going to change the dates up tops, I’m going to go up top and change the dates from a one on one to zero to 1230 120. Then we’re going to go ahead and run that report. I’ll close the old hamburger up on the upper left, hold down Control, scroll up a little bit, so we’re up the 125. Let’s first take a look at the checking account where we should have a decrease in the checking account.
04:34
Going into the checking account. Scrolling down, we see that we have then this is the one we want the 221 It’s a check but notice it’s a bill paycheck. So it’s a special check. So that indication is useful because it helps you to know that the other side must be accounts payable. If you’re if you have a bill paycheck, and there’s the 168 if we were to click on that, and then we’re going to get back to our data input form for the bill pay closing discussion. out, and then scrolling back up and going back to our report summary. We’re then going to look at the other side, which is going to be in accounts payable. It’s a liability account. So the liability account is here. There it is. I’m going to click on that item. And then we’ll see the activity going down. There’s our bill paycheck, there’s our bill paycheck. And if we go to the right, there’s the 168.

05:26
So you can see the increase and the decrease in this case, that’s what accounts payable will typically look like it’s going to go up when we have a bill and then it’s going to go down when we pay the bill. I’m going to go back to the trial balance. Then I’m going to duplicate the tab up top, I’m going to right click on the tab up top and duplicate that tab. Going to go back to the to the left item, and then we’re going to open up the old hamburger over here and then I’m going to hold down Control I’m going to go back to 100% on the zoom scrolling down to get there. Then I’m going to go to the reports down below. And I want to want to look at the details of vendor D tail report. So I’m going to scroll down till we get to who we owe money to. That’s who owes you money.
06:06
Then we got the sales that customers and then who you owe. And then in here we should have the vendor balance detail. Let’s take a look at the vendor balance Detail Report. And then I’m going to dates are all dates, that’s fine. I’m going to close the hamburger, scroll up a bit. And this report should tie out to what’s currently in the accounts payable. So we have the 1200. Here, if I go to the trial balance, we then have the detail in the trial balance for the accounts payable 1200. So we only currently Oh, the one vendor left if I go back over, which is going to be Epiphone.
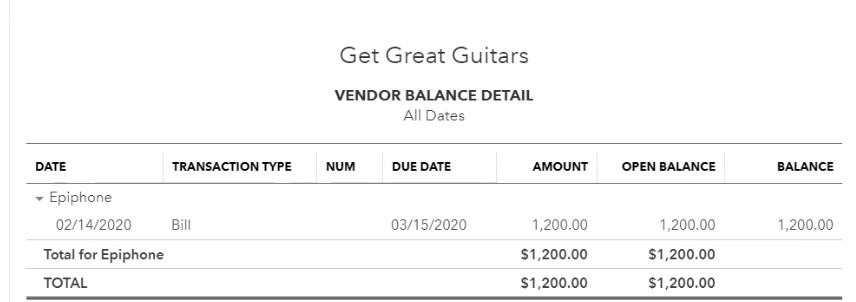
06:43
If you want to see a detail for the vendor we paid off, we can go to the drop down here, we can go to the expenses tab, and then we have the list of vendors and it’ll give us the vendor detail once again. Well, that’s a little too far little to shrunk, and there’s the there’s the epic vendor that we currently owe and we paid off think we paid off Fender which was our new vendor. So if we go into Fender here, then we can see the detail for for fender. I’m going to close the hamburger so we can see a bit more of the screen. There’s the bill, and there’s the related payment for Fender, our new vendor