Fonts & Numbers Report Options 2.25

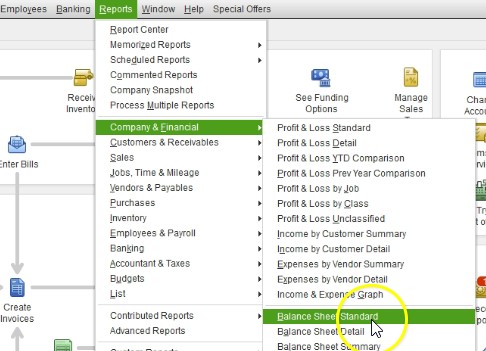
This presentation, we will take a look at the fonts and numbers options within the reports options related to a balance sheet. These options will be found in most other reports as well, we will do this within QuickBooks Pro 2020, QuickBooks desktop 2020. Here we are in our get great guitars file, we currently have the open windows open in order to open the open windows, you can go to the View drop down up top and go to the open windows that list, we’re not going to be going into our balance sheet and continue exploring the options in there, we’re going to go to the reports drop down in order to do so that company and financials and then scroll on down to our favorite report, that being the balance sheet standard report, we’re not going to be considering options and the customized reports.


0:44

First of all has changed the dates, I like to do that with the range up top, I go into the customized reports, changing the date range from Oh 120 to 1230 120. That’s January through December 2020. And then we’re going to say okay, here’s going to be then our standard report, we’re going to go back up top, we’re going to go to the customized reports once again, this time and go into the fonts and numbers.


1:07

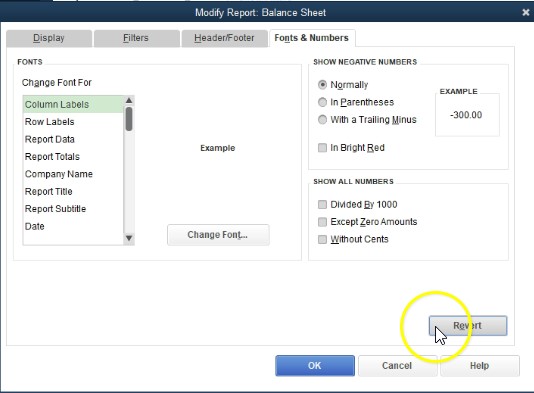
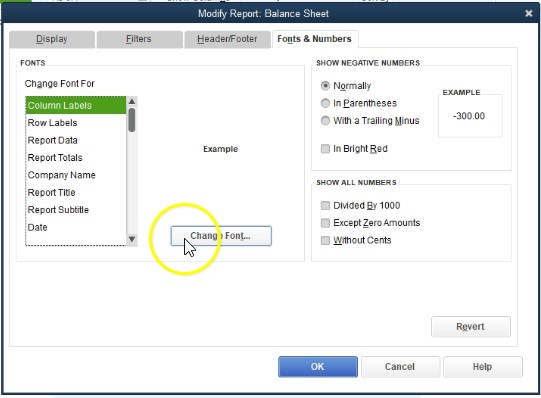
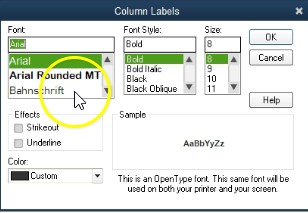
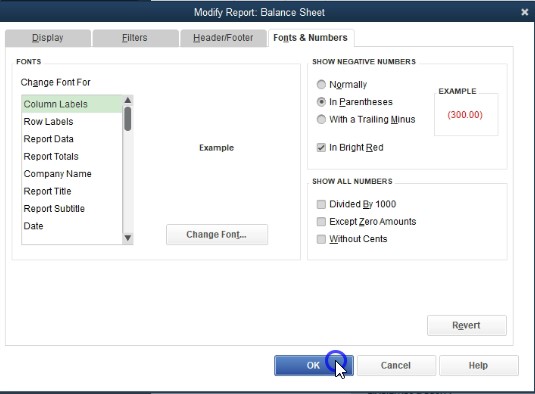
You’ll note to that we skipped the filtering options, the filtering options will make more sense and particular type of reports will spend more time into filtering options when we get to other types of reports where this will be a useful tool for us. So we now are going to go back to the fonts and numbers. Within the fonts and numbers. We have the change the fonts for the various items that are in the reports. And then we can change the fonts here including the changing of the font, a mountain the font itself, we can change the style to bold to italic, and so forth. And then we can of course change the size as well.


1:45

We also have the effects, which include the strikeout effect, or the underlying effect that can be included. And then we have the coloring options will play a little bit around with these. So you can get a feel for them. These can be a great tool, they can also be over us. So you don’t want to go over the top with it. But if you do a little bit of changes here or there to the QuickBooks report, it really gives a little bit goes a long way it gives a feel to your reports that are a bit different than other types of reports which can can make you stand out I can you don’t want to go too far with them, I would stick with the normal default.


2:17

So you also don’t want to make default settings that would be difficult to do for other types of reports to mimic that default setting. But once you set the default, if you have your customized default, then I’m going to close this out and close this out, you can memorize those reports. And then you don’t have to do it every time. So it could be a great tool to set some of the fonts to be a bit different. If you want to change the title a little bit or memorize some reports, alter some reports and change those titles, then you can do so and again, that could be a nice touch. To have on the reports back to the customized reports up top, we’re going to go to the fonts and numbers.


2:53

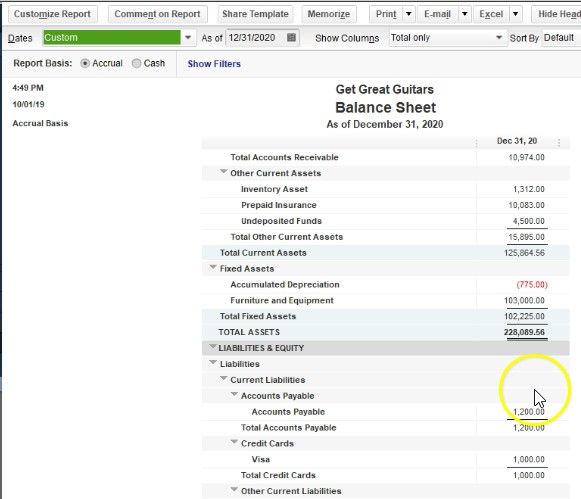
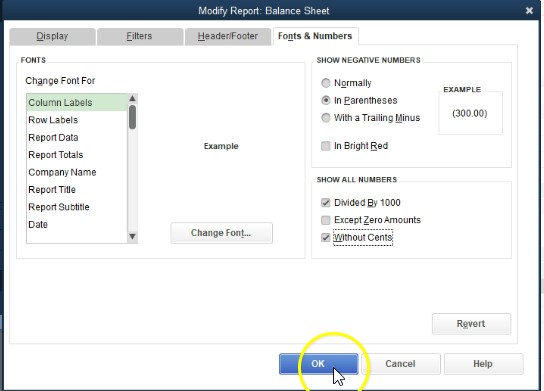
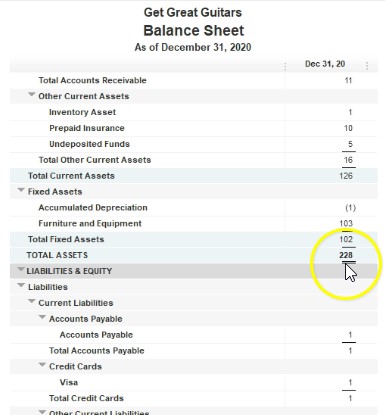
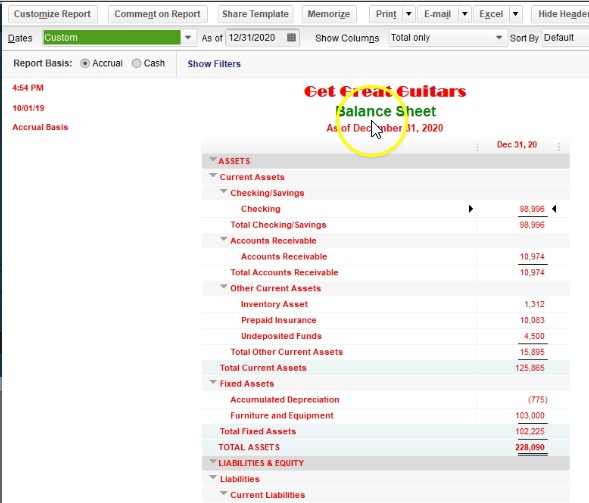
Then on the right side, we’re going to first explore these items on the right side, then I’ll show you a couple examples. On the left, we’re changing things like the color and the font and whatnot. So if we have these show negative numbers, normally QuickBooks will show negative numbers with a negative sign. As we can see here for depreciation, for example, we have a negative 775. I kind of like to see them with parentheses, which they will show like this, it’ll stand out a little bit more. That’s my my personal preference. And if you would like to stand out a little bit more, you can make them read. So it’ll look like that.


3:27

If I was just if I was to select this, then we’ll say okay, now we have that negative number that really kind of pops out for us both being bracketed. And with a negative numbers, you can have it just read and no brackets, or brackets and no read whatever kind of setup you would like to see, we’re going to go back into the customized reports, we’re going to go into the fonts and numbers. The other effect we can have is the negative trailing the number which might be useful in some areas, it’s not something I’m particularly used to most of the time, so I would keep it with the parentheses, I would generally remove the red brackets, that’s just my personal preference, then we can show all numbers.


4:06

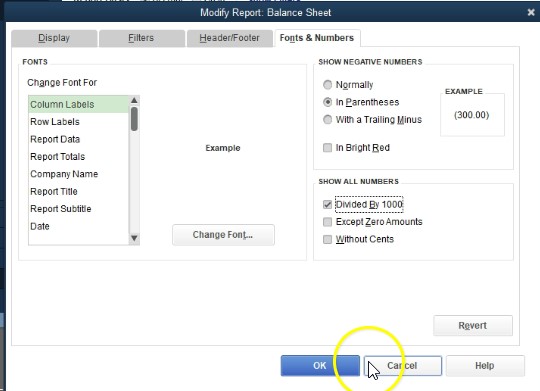
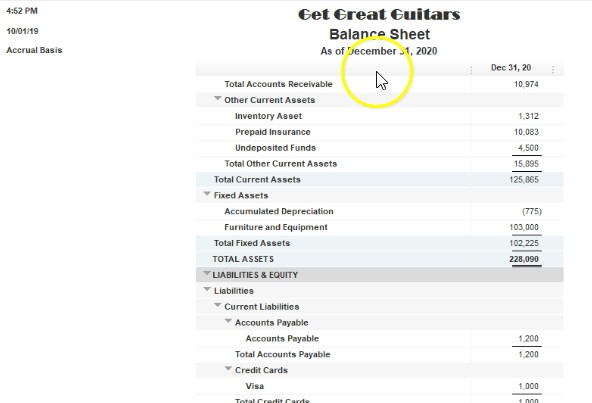
So we can divide the numbers by 1000. Note that I can take all the numbers and divide them by 1000. If I was to check this and say, okay, and if we have long numbers, if we have a lot of numbers, then this can be a useful way to display the numbers. So we can have that as a useful way to display. If I go back up to the customized reports. Typically, if we do that and go to the fonts and numbers, we will also be removing the pennies, we wouldn’t divide by 1000 and a half of the pennies, they’re typically so we would say remove the pennies too. And then there we have it. Without this sense, we can also go back up top customized reports, and go to the fonts and numbers. And we could basically have to thousands but remove the pennies have it have no sense that the reports still make sense, but it has no sense to it has no pennies involved in it.


4:54

So we’re gonna have no sense. Okay. And then we have that type of report. So then we and that can use that can look a lot cleaner, this might be something that’s very useful to do. Some people don’t want to see the pennies that just add up, they just kind of clog up the the viewing screen. And they don’t basically add any more value typically to normal decision making processes. So oftentimes, this is a useful tool to help remove the pennies remove the sense, if we go back up to the customized reports and go to the fonts and numbers. And now let’s take a look at some of these changes to the font styles. Notice you could change like individual areas within the report. So for example, we could change just the column labels.


5:35

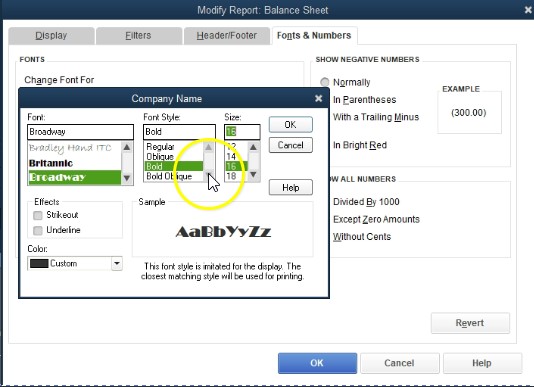
If we have a report with multiple columns, like here, the column label, the row labels, the road data, so the actual data, the numbers in it, we have the report totals. So when we go down to the bottom, the total amounts, we can change the fonts there, the company name, which of course is up top here, the report title, so the report title, the report, subtitle, the date, and so on and so forth, let’s take a consideration with the report title. For example, if you wanted to customize your report title in some way, then you can go to the change font. And you know, say you want a different font on the on the report Title I again, I wouldn’t choose anything, that’s two, you want you want pretty straightforward fonts. But if you want something a little bit more bold or something like this, like I wouldn’t choose something like this unless you


6:25

for some particular reason you want a really fancy looking font, on the name possibly. But typically, I would use a, you know, more straightforward font that doesn’t have a lot, a lot of detail into it. But that’s just my preference. Let’s choose one that is a little bit different here. So we can see what that’ll be like. And then I can, I can apply this just there by saying I could make it larger, too.


6:47

We might say, well, let’s make it 16 font, it’s already bolted. So let’s keep it there. And we’ll say okay, and then it’s going to give you this default change all related fonts. And I’m going to say no, for this time, I just want to do it to the company name, which is what I have selected. Now if I say it’s all related funds, it’ll in essence, apply it out all to the related fun. So I’m going to say no. And then I’m going to say okay, and there we have the company name, his name is going to be different. So I’m not an expert at timeout, you know, the best fonts and whatnot. So these are just some options. If you’re really good with fonts, and you’d like to, you know, mix and match and put the fonts together that looks really nice, then you can you can adjust these in this format, we can then go to the fonts and numbers.


7:33

And if I was to say, do this for a color, for example, if I went to the the report title, and we wanted to change the color to it, I can make it something like a green color, here’s the color drop down. And we could say okay, and then again, I just want to say no, just apply it there. And then Okay, so then we have the color changed. If you want to change something like the color or the font of everything, you can go to the customized reports up top, you can go to the fonts and numbers. And for example, if I was going to go to the company name, or let’s go to the report totals, and I wanted to change the font, and I wanted to make them all a certain color, let’s say you know, say red, and then I said okay, and then if I want to change all related fonts, I can just simply choose change all related fonts, and say yes, and then Okay.


8:27

And then you could see basically it apply that to all related fonts, pretty much all the fonts here, except for the other one that we had changed previously. So again, you can mix and match with these type of things. I wouldn’t go too far with him but a little bit, a little bit of your personal touch on the fonts, a little bit of change from just a standard, I could make your reports pop a little bit a little standout and might be worth doing. And once you do them, you can memorize them which will show in a future presentation.

8:53

So you wouldn’t have to redo it every time. We’re going to go back to the fonts if you want it to revert back, then you would go to revert back. And okay, that’ll revert it back note also if you wanted to reverted back obviously, you can just delete you can just close the report and start a new report. You know and do it again. If I didn’t like all the red there or whatnot. I do it just closed the report up top. Go back into reports. Go back into the company and financial make a new balance sheet standard. Adjust the dates up top 201 a 120 to 1230 120 January through December, and then we can just go back in and make any adjustments we need from a fresh report.


Header Footer Report Options 2.20

0:00

This presentation we will take a look at the header and footer options within a balance sheet reports there will be similar header and footer options in other reports as well, we will do this within QuickBooks Pro 2020, QuickBooks desktop 2020. Here we are in our gift great guitars file, we currently have the open windows open, you can open the open windows by selecting the view drop down up top and go into the open windows list.

(more…)

Balance Sheet Display Options 2.15

Its presentation and we will take a look at the display options for a balance sheet type report options that will typically be applicable to many other types of reports as well within QuickBooks Pro 2020, QuickBooks desktop 2001 a. Here we are in our get great guitars file, we currently have the open windows open, you can open the open windows by selecting the view drop down up top and go into the open that windows that list, we’re now going to be going to the balance sheet standard report and taking a look at the customized options or the display options within it.

(more…)

Balance Sheet Display Options QuickBooks 2.15

0:00

Its presentation and we will take a look at the display options for a balance sheet type report options that will typically be applicable to many other types of reports as well within QuickBooks Pro 2020, QuickBooks desktop 2001 a. Here we are in our get great guitars file, we currently have the open windows open, you can open the open windows by selecting the view drop down up top and go into the open that windows that list, we’re now going to be going to the balance sheet standard report and taking a look at the customized options or the display options within it.

(more…)

Create Backup File 1.50

In this presentation, we will take a look at QuickBooks data file backup options, and they will create a backup file within QuickBooks Pro 2020, QuickBooks desktop 2020. Here we are in our get great guitars file, we currently have the open windows open, you can open the open windows by selecting the view drop down up top and the open windows lyst.

(more…)

Print & Export Reports 1.45

0:00

In this presentation, we will discuss options for printing that reports and export and reports to excel, this is going to be a very important tool because the presentation of the reports and how we’re going to distribute those reports to either supervisors or organize them for our sales or give them to clients is very important. And it’s something that we’ll be looking on into, in periodically throughout the course will do this within QuickBooks Pro 2020, QuickBooks desktop 2020.

(more…)

Help Options QuickBooks 1.40

This presentation and we will consider the help options within QuickBooks Pro 2020, QuickBooks desktop 2020. Here we are in our get great guitars file, we currently have the open windows open, you can open the open windows by going to the view drop down and selecting the open windows lyst. When considering health options for QuickBooks, there’s a lot of different options. And the two main categories of options you can consider are the help options provided by QuickBooks itself, or the owner of QuickBooks into it. And those help options that are outside of QuickBooks provided by other people that are in using QuickBooks, lot of resources for both of those options.

(more…)

Home Page Banking Section 1.25

This presentation and we will take a look at the banking section of the homepage within QuickBooks Pro what 2020 QuickBooks desktop 2020. Here we are in our get great guitars file which we set up in a previous presentation. If you don’t have access to the get great guitars file, that’s okay, you can follow along with your own data, we currently have the homepage open, the homepage is usually open when you open QuickBooks However, you can also open it by selecting the company drop down up top and go into the homepage.


0:31

This is going to give us a nice flow chart a flow chart by activity or cycle including the vendor cycle and the customer cycle and the employees cycle, we took a look at the vendor and customer cycles in a previous presentation. Now we’re going to be looking at the banking section know that the banking section doesn’t have a nice flow chart to it.


0:50

But the banking I except for of course, the deposit here, which is in essence, usually hopefully, most of the deposits been an extension of the receivable cycle, because the deposits hopefully most of them are from customers. However, most of the banking items are just going to be the groupings of what are going to be commonly used items.


1:07

So these are things that QuickBooks, basically things are important enough to put on the homepage. So they’re going to have to quick access to it on the homepage. They’re basically saying, hey, these things are things that you may want to use, they’re kind of important, we’re going to put them on the homepage, you can find most of them in other locations. And many of them I actually go into with other locations. However, the fact that they are on the homepage mean, they’re important items.


1:33

Now, of course, we have the deposit here, which we looked at when we thought of the customer section, that’s going to be hopefully many of the deposits being the end result of our customer cycle, where we get the Create sales receipts, and the receive payments from customers and then we deposit them however, we may have deposits for other things as well, we as the owner may be depositing money, we might have got a loan out and deposit money into the banking section.


1:58

That’s why the deposits isn’t banking, even though we’re hoping that many of the deposits is going to be connected to the customer section. And it’s intimately involved. Of course, with the customer cycle in that fashion as well. We then have the reconcile. So when we think about reconciliation, we’re typically thinking about a bank reconciliation. So the banking section, of course, is going to include the reconciliation of our books to the books of the bank, that gives us a third party kind of verification that we have done the proper data input into the system.


2:32

Now the bank reconciliation will spend a lot more time with later it’s not going to be a data input screen, what it’s going to do is help us to kind of verify that the data input that we have put in place is correct. And then if we need to do more data input, we can go into something like the register and put more data in place, we’ll go into the bank reconciliation in depth as we go through a practice problem.


2:53

Also note that you can see these up top tier, if you go to the bank and drop down. Typically I would go to reconciliation here to banking, and then reconcile here, you can also of course, make the deposit here too, I often use the deposit in the home screen. When I reconcile for whatever reason, I typically go to the banking section up top and reconciled rather than using this item, then we have the right checks. writing checks is actually it’s just what you would expect it’s going to be the right checks feature, it’s going to look like a check when we open it up, we see the check.


3:26

Now this is going to be a data input form within QuickBooks like the others we have seen it will record of course, a transaction in QuickBooks as we write a check, for example, if we go to the previous check here. So in this case, we paid the sales tax, which is to the New York tax collector, this is the amount of the payment, the other side is down here, it was paid out of a bill payment, so it’s actually going to be decreasing the accounts payable. So the check of course means that the checking account will be going down, and the other side will be indicated down here.


3:56

If it came out of accounts payable, then it’ll be decreasing accounts payable. And if we wrote a check for some other expense item, then it’ll be listed as that expense item down here, closing this back out. And then the right checks. Of course, you can do up top as well, you can go to the banking up top, and you can go to the right checks in the drop down, then we have the check register.


4:19

Now oftentimes, if you’re entering data into QuickBooks, it can be easier to enter it straight into the check register. So if I just want to write if I just want to interject into the check register, or if I want to enter increases or decreases to the checking account, oftentimes, I will just simply go to the check register rather than writing checks. So I’ll just go right to the check register, which will look like this.


4:40

And then if you see the note that check register, and we’ll just give a quick list of in essence, the checks and the deposits that are going to be involved here. So the check register is a is a huge tool that can really make things faster, especially if you’re doing types of data input where you’re basically taking the bank statement at the end of the month and entering it into the QuickBooks file in order to get your data into QuickBooks, well, then, it’s a lot more tedious to be entering using deposit forms and checks, it’s much easier to go directly into the register and enter that information directly into the register much faster.

5:17

To do so we’ll talk about when it might be more appropriate to use the register when it might be more appropriate to use the forms as we go through example problems for it. So just note that if we think about the register, of course, this is going to be a check, this one went to the Internal Revenue Service. And this is going to be the other side of it, which is going to be the payroll liability.


5:37

If I double click on this little check icon here, then of course, we get back to a check. closing this back out, closing or and then the other side of this would be deposits. So here’s the deposit. If I was to double click on a deposit form, you get to the actual deposit screen that we’ve looked at in prior presentations. closing this back out. So this can be a great tool should look a little bit like a checkbook if anybody’s still used to enter in the information into their checkbook.


6:06

This should remind you of the checkbook. Note that you can also find this and this is where I would typically go in order to get into the check register to the bank and drop down. And then you go to use register. And you’ll will usually default to the check register. But be aware that you can open a similar register for just about any balance sheet account here. So you could select just about any balance sheet your account you want.


6:30

And if you are in some other screen, such as the customer section or the vendor section, it may default to something other than the checking account. And then you’re just gonna have to take yourself out of that screen and come back. And so for example, if I close this back out, close this back out, I go to the customer section by selecting customers up top. And then if I went into the check register from here, I go to banking use register.


6:58

Notice it just took me right to a different register, which is actually accounts receivable, it looks like it looks like a check register, kind of. But this is not the check register. This is a accounts receivable register, I’m going to close this back out and close this back out. So then if I close this back out, and I will do that, again, banking, use register. Now it defaults to the checking account, and we’re back to the check register.


7:22

So just be aware of that. closing this back out, we’re back to our banking section, then we have the printing of the checks. Now when you print checks, you still need to buy the checks, because they need to have the pre printed numbers on them. They’ll be bought in such a way that they’ll be in the size of basically paper typically normal paper that you put into the printer. And then you can put the into the printer and you can then print the check straight out of QuickBooks if you so choose.


7:48

So that could be a nice feature to have. So you can write the checks and then you get the checks it will be listed here that you can then print them directly out of QuickBooks. Next, you’re going to have the internet credit card charges. So if you select the Enter credit card charges, you have a similar type of screen that we have seen for the checks and the bills. So we have the purchase from and then we’ve got the data input screen entering the MT amount, and then the expenses or the items will be for inventory.

8:19

So the expense will be the tab that we will typically use the items would be an inventory amount tab, closing this back out, that’s going to be our major forms that we’re going to be using. Within the banking section. Obviously, the one you’ll use the most that will be like a forum is going to be the record deposits, which we’ve looked in the past and the creating of the checks, the reconciliation isn’t really exactly a form, that’s going to be something that we’re going to be doing as a reconciling item important, but not recording that transaction.


8:50

As we’ve seen with some of these other items that are in the vendor and customer section. The check register isn’t an actual form really, because the the check register will contain the deposits and the checks in a kind of a shorthand format. So the register is a tool that can allow us to enter things enter forms, such as the deposit and checks more efficiently. The print checks is of course the printing feature of the printing checks.


9:20

It’s not really the data input form to print the checks, that’s the activity of printing them. And then we have the inter the credit card deposit, which is a transaction type of form. So you want to kind of differentiate between the forms that are going to be transaction forms because whenever you think about a form, you want to think about how that forms set up so that the data input will be easy to do, what’s going to be the effect of that form on the financial statements on the balance sheet and the profit and loss