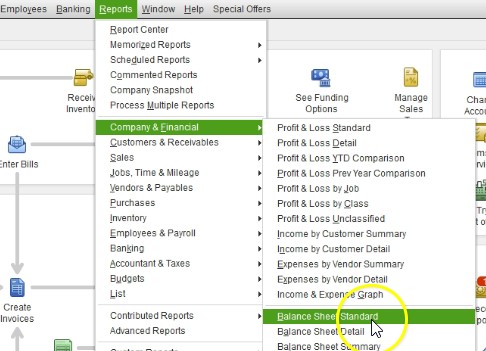
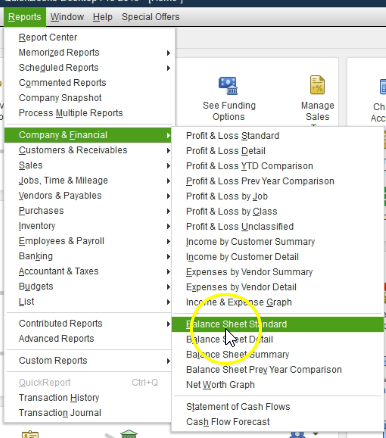
This presentation, we will take a look at the fonts and numbers options within the reports options related to a balance sheet. These options will be found in most other reports as well, we will do this within QuickBooks Pro 2020, QuickBooks desktop 2020. Here we are in our get great guitars file, we currently have the open windows open in order to open the open windows, you can go to the View drop down up top and go to the open windows that list, we’re not going to be going into our balance sheet and continue exploring the options in there, we’re going to go to the reports drop down in order to do so that company and financials and then scroll on down to our favorite report, that being the balance sheet standard report, we’re not going to be considering options and the customized reports.
0:44
First of all has changed the dates, I like to do that with the range up top, I go into the customized reports, changing the date range from Oh 120 to 1230 120. That’s January through December 2020. And then we’re going to say okay, here’s going to be then our standard report, we’re going to go back up top, we’re going to go to the customized reports once again, this time and go into the fonts and numbers.
1:07
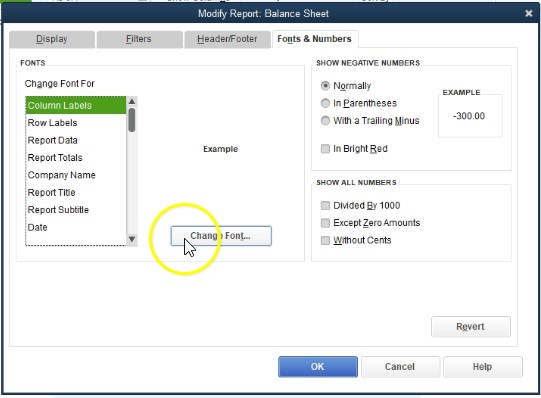
You’ll note to that we skipped the filtering options, the filtering options will make more sense and particular type of reports will spend more time into filtering options when we get to other types of reports where this will be a useful tool for us. So we now are going to go back to the fonts and numbers. Within the fonts and numbers. We have the change the fonts for the various items that are in the reports. And then we can change the fonts here including the changing of the font, a mountain the font itself, we can change the style to bold to italic, and so forth. And then we can of course change the size as well.
1:45
We also have the effects, which include the strikeout effect, or the underlying effect that can be included. And then we have the coloring options will play a little bit around with these. So you can get a feel for them. These can be a great tool, they can also be over us. So you don’t want to go over the top with it. But if you do a little bit of changes here or there to the QuickBooks report, it really gives a little bit goes a long way it gives a feel to your reports that are a bit different than other types of reports which can can make you stand out I can you don’t want to go too far with them, I would stick with the normal default.
2:17
So you also don’t want to make default settings that would be difficult to do for other types of reports to mimic that default setting. But once you set the default, if you have your customized default, then I’m going to close this out and close this out, you can memorize those reports. And then you don’t have to do it every time. So it could be a great tool to set some of the fonts to be a bit different. If you want to change the title a little bit or memorize some reports, alter some reports and change those titles, then you can do so and again, that could be a nice touch. To have on the reports back to the customized reports up top, we’re going to go to the fonts and numbers.
2:53
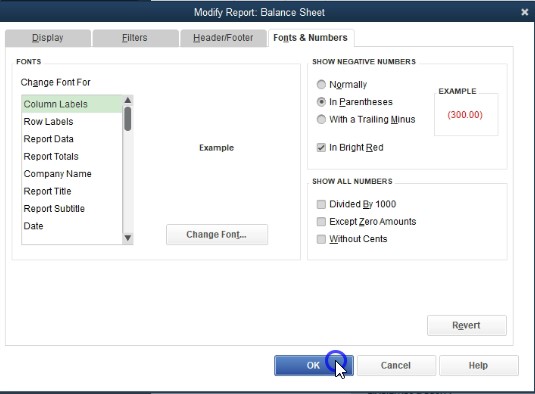
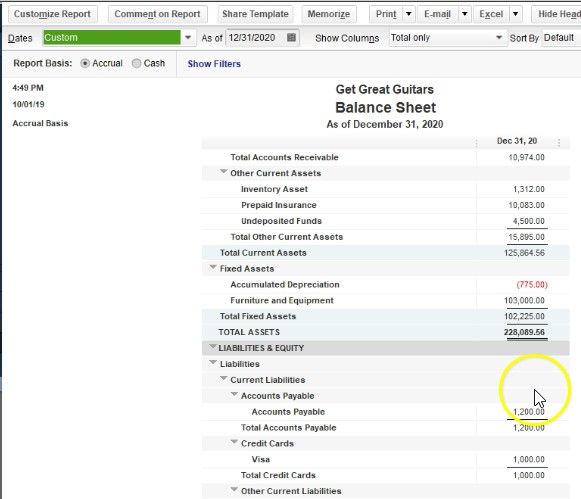
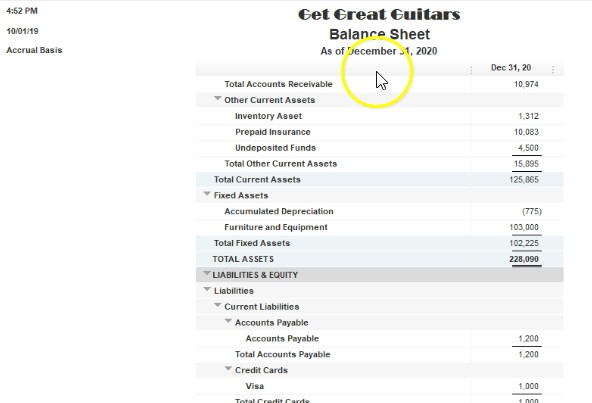
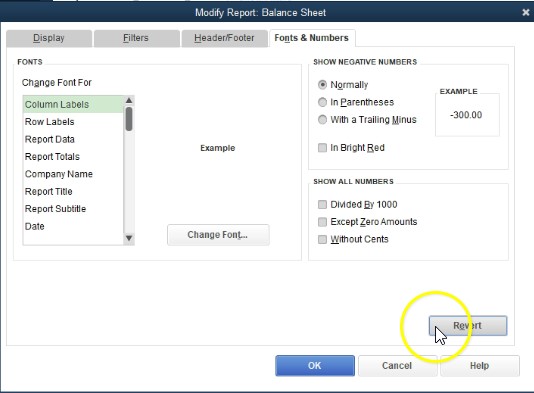
Then on the right side, we’re going to first explore these items on the right side, then I’ll show you a couple examples. On the left, we’re changing things like the color and the font and whatnot. So if we have these show negative numbers, normally QuickBooks will show negative numbers with a negative sign. As we can see here for depreciation, for example, we have a negative 775. I kind of like to see them with parentheses, which they will show like this, it’ll stand out a little bit more. That’s my my personal preference. And if you would like to stand out a little bit more, you can make them read. So it’ll look like that.
3:27
If I was just if I was to select this, then we’ll say okay, now we have that negative number that really kind of pops out for us both being bracketed. And with a negative numbers, you can have it just read and no brackets, or brackets and no read whatever kind of setup you would like to see, we’re going to go back into the customized reports, we’re going to go into the fonts and numbers. The other effect we can have is the negative trailing the number which might be useful in some areas, it’s not something I’m particularly used to most of the time, so I would keep it with the parentheses, I would generally remove the red brackets, that’s just my personal preference, then we can show all numbers.
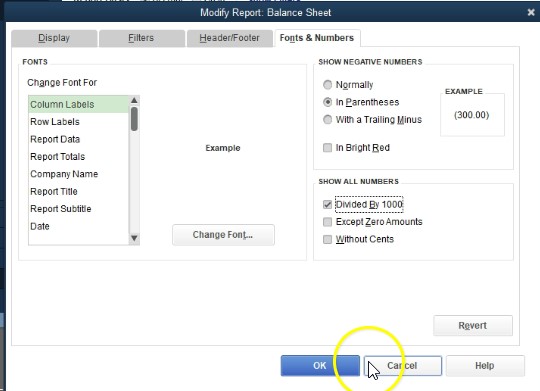
4:06
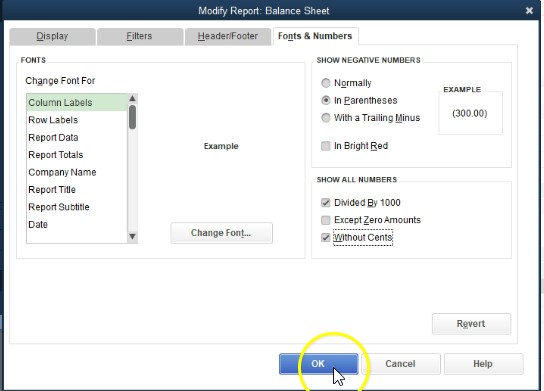
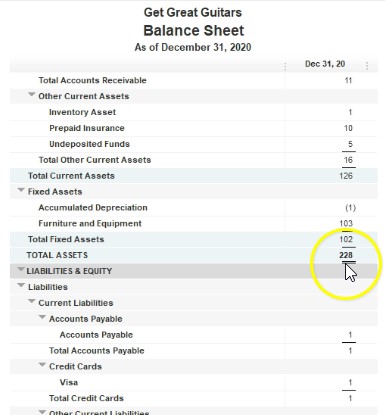
So we can divide the numbers by 1000. Note that I can take all the numbers and divide them by 1000. If I was to check this and say, okay, and if we have long numbers, if we have a lot of numbers, then this can be a useful way to display the numbers. So we can have that as a useful way to display. If I go back up to the customized reports. Typically, if we do that and go to the fonts and numbers, we will also be removing the pennies, we wouldn’t divide by 1000 and a half of the pennies, they’re typically so we would say remove the pennies too. And then there we have it. Without this sense, we can also go back up top customized reports, and go to the fonts and numbers. And we could basically have to thousands but remove the pennies have it have no sense that the reports still make sense, but it has no sense to it has no pennies involved in it.
4:54
So we’re gonna have no sense. Okay. And then we have that type of report. So then we and that can use that can look a lot cleaner, this might be something that’s very useful to do. Some people don’t want to see the pennies that just add up, they just kind of clog up the the viewing screen. And they don’t basically add any more value typically to normal decision making processes. So oftentimes, this is a useful tool to help remove the pennies remove the sense, if we go back up to the customized reports and go to the fonts and numbers. And now let’s take a look at some of these changes to the font styles. Notice you could change like individual areas within the report. So for example, we could change just the column labels.
5:35
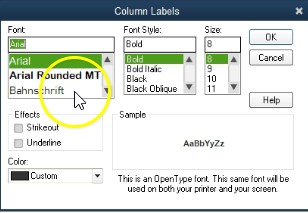
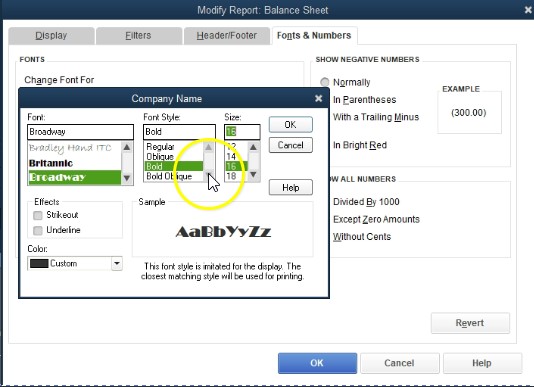
If we have a report with multiple columns, like here, the column label, the row labels, the road data, so the actual data, the numbers in it, we have the report totals. So when we go down to the bottom, the total amounts, we can change the fonts there, the company name, which of course is up top here, the report title, so the report title, the report, subtitle, the date, and so on and so forth, let’s take a consideration with the report title. For example, if you wanted to customize your report title in some way, then you can go to the change font. And you know, say you want a different font on the on the report Title I again, I wouldn’t choose anything, that’s two, you want you want pretty straightforward fonts. But if you want something a little bit more bold or something like this, like I wouldn’t choose something like this unless you
6:25
for some particular reason you want a really fancy looking font, on the name possibly. But typically, I would use a, you know, more straightforward font that doesn’t have a lot, a lot of detail into it. But that’s just my preference. Let’s choose one that is a little bit different here. So we can see what that’ll be like. And then I can, I can apply this just there by saying I could make it larger, too.
6:47
We might say, well, let’s make it 16 font, it’s already bolted. So let’s keep it there. And we’ll say okay, and then it’s going to give you this default change all related fonts. And I’m going to say no, for this time, I just want to do it to the company name, which is what I have selected. Now if I say it’s all related funds, it’ll in essence, apply it out all to the related fun. So I’m going to say no. And then I’m going to say okay, and there we have the company name, his name is going to be different. So I’m not an expert at timeout, you know, the best fonts and whatnot. So these are just some options. If you’re really good with fonts, and you’d like to, you know, mix and match and put the fonts together that looks really nice, then you can you can adjust these in this format, we can then go to the fonts and numbers.
7:33
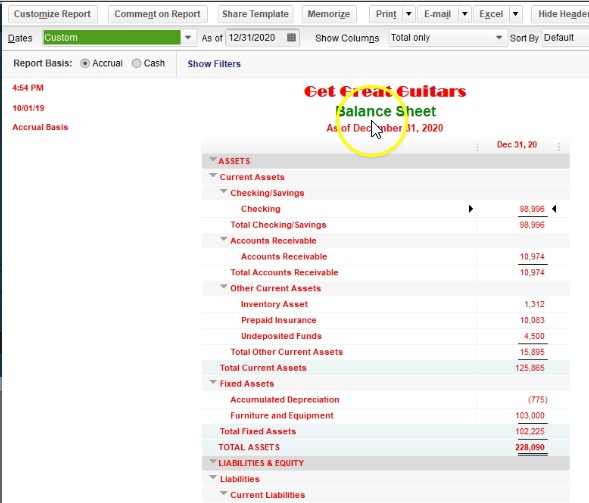
And if I was to say, do this for a color, for example, if I went to the the report title, and we wanted to change the color to it, I can make it something like a green color, here’s the color drop down. And we could say okay, and then again, I just want to say no, just apply it there. And then Okay, so then we have the color changed. If you want to change something like the color or the font of everything, you can go to the customized reports up top, you can go to the fonts and numbers. And for example, if I was going to go to the company name, or let’s go to the report totals, and I wanted to change the font, and I wanted to make them all a certain color, let’s say you know, say red, and then I said okay, and then if I want to change all related fonts, I can just simply choose change all related fonts, and say yes, and then Okay.
8:27
And then you could see basically it apply that to all related fonts, pretty much all the fonts here, except for the other one that we had changed previously. So again, you can mix and match with these type of things. I wouldn’t go too far with him but a little bit, a little bit of your personal touch on the fonts, a little bit of change from just a standard, I could make your reports pop a little bit a little standout and might be worth doing. And once you do them, you can memorize them which will show in a future presentation.
8:53
So you wouldn’t have to redo it every time. We’re going to go back to the fonts if you want it to revert back, then you would go to revert back. And okay, that’ll revert it back note also if you wanted to reverted back obviously, you can just delete you can just close the report and start a new report. You know and do it again. If I didn’t like all the red there or whatnot. I do it just closed the report up top. Go back into reports. Go back into the company and financial make a new balance sheet standard. Adjust the dates up top 201 a 120 to 1230 120 January through December, and then we can just go back in and make any adjustments we need from a fresh report.
This presentation we will take a look at the header and footer options within a balance sheet reports there will be similar header and footer options in other reports as well, we will do this within QuickBooks Pro 2020, QuickBooks desktop 2020. Here we are in our gift great guitars file, we currently have the open windows open, you can open the open windows by selecting the view drop down up top and go into the open windows list.
Its presentation and we will take a look at the display options for a balance sheet type report options that will typically be applicable to many other types of reports as well within QuickBooks Pro 2020, QuickBooks desktop 2001 a. Here we are in our get great guitars file, we currently have the open windows open, you can open the open windows by selecting the view drop down up top and go into the open that windows that list, we’re now going to be going to the balance sheet standard report and taking a look at the customized options or the display options within it.
Its presentation and we will take a look at the display options for a balance sheet type report options that will typically be applicable to many other types of reports as well within QuickBooks Pro 2020, QuickBooks desktop 2001 a. Here we are in our get great guitars file, we currently have the open windows open, you can open the open windows by selecting the view drop down up top and go into the open that windows that list, we’re now going to be going to the balance sheet standard report and taking a look at the customized options or the display options within it.
In this presentation, we will take a look at QuickBooks data file backup options, and they will create a backup file within QuickBooks Pro 2020, QuickBooks desktop 2020. Here we are in our get great guitars file, we currently have the open windows open, you can open the open windows by selecting the view drop down up top and the open windows lyst.
In this presentation, we will discuss options for printing that reports and export and reports to excel, this is going to be a very important tool because the presentation of the reports and how we’re going to distribute those reports to either supervisors or organize them for our sales or give them to clients is very important. And it’s something that we’ll be looking on into, in periodically throughout the course will do this within QuickBooks Pro 2020, QuickBooks desktop 2020.
This presentation and we will consider the help options within QuickBooks Pro 2020, QuickBooks desktop 2020. Here we are in our get great guitars file, we currently have the open windows open, you can open the open windows by going to the view drop down and selecting the open windows lyst. When considering health options for QuickBooks, there’s a lot of different options. And the two main categories of options you can consider are the help options provided by QuickBooks itself, or the owner of QuickBooks into it. And those help options that are outside of QuickBooks provided by other people that are in using QuickBooks, lot of resources for both of those options.
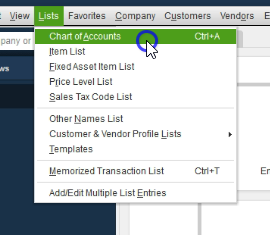
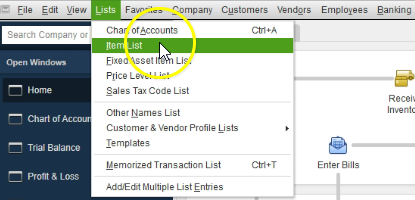
This presentation we will take a look at lists within QuickBooks lists within QuickBooks is going to be a categorization of items. The major two items that will be included within the lists will be the chart of accounts and the item lists. We’ll take a look at this in QuickBooks Pro 2020, QuickBooks desktop 2020.
0:20
Here we are in our get great guitars file, we currently have the open windows open, you can open the open windows by going to the view drop down and go into the open windows list, we’re not going to consider the lists drop down within QuickBooks, when you think about lists. It’s another one of those terms that you kind of want to keep familiar as a separate term within QuickBooks, because you’re going to be grouping separate type of items or specific kind of items within lists.
0:46
And people might actually use the term lists in practice or a while using the QuickBooks software in describing certain things. And they will definitely use it when they’re trying to group or locate these these different types of items where they will be within QuickBooks. So the lists drop down will be here, the major two lists that we will be focusing in on will be the chart of accounts and the item list.
1:13
These are two items. Once again, if you were to talk to someone outside of QuickBooks, if you were to try to talk about the chart of account as that list, that it wouldn’t be something that really rings a bell to people that are just learning financial accounting, that aren’t using QuickBooks, it just so happens that QuickBooks then use the term and grouped all these things under the subheading of lists.
1:35
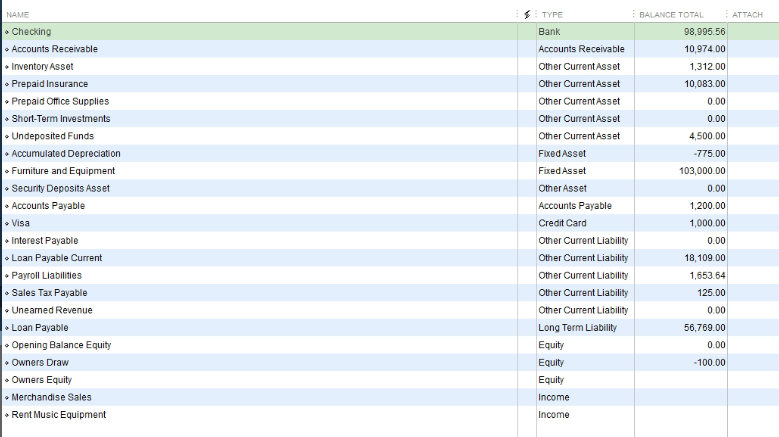
And now, so within QuickBooks, when you talk about lists, item lists and whatnot, then these things are going to be important and be thought of kind of as lists. So of course, first we have the chart of accounts Chart of Accounts is going to be our most important type of list. The first thing we’re going to set up in essence with the QuickBooks set up. This will give us a list of all the accounts that we will be using.
1:58
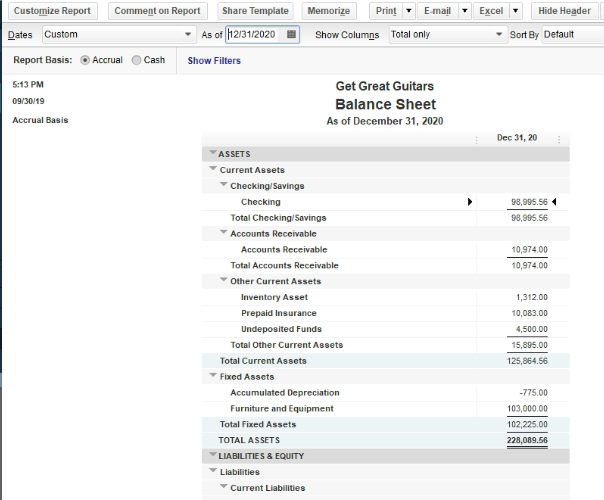
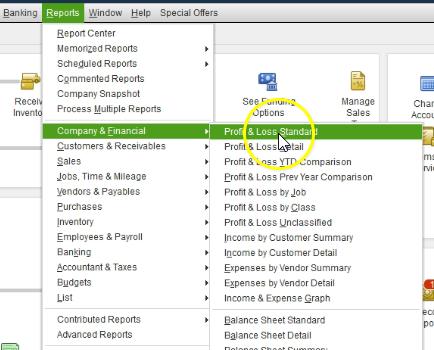
So you’ll recall that we have taken going to look at the trial balance, we’ve taken a look at the balance sheet and the profit and loss statement, those the profit loss and balance sheet or the major to financial statements. These are the accounts that will be making up those major to financial statements. Let’s take a look at those now. We’re going to go to the reports drop down, we’re going to go to the company and financial will scroll down to the balance sheet standard.
2:23
Within the balance sheet standard will change the dates up top in the customized reports from a one on one to zero to 1230 120. That’s January through December 2020. I’m going to say okay, here’s our balance sheet. You’ll note that we have all these accounts here and the subcategories within these accounts. They are in order assets, liabilities and then equity, then we’ll go to the reports up top company and financial will take a look at their profit and loss standard report.
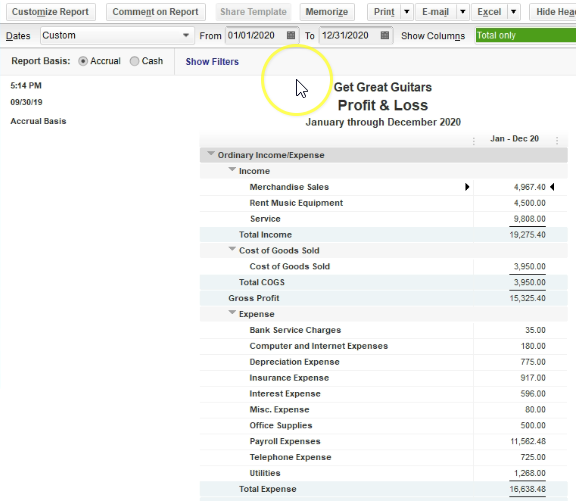
2:51
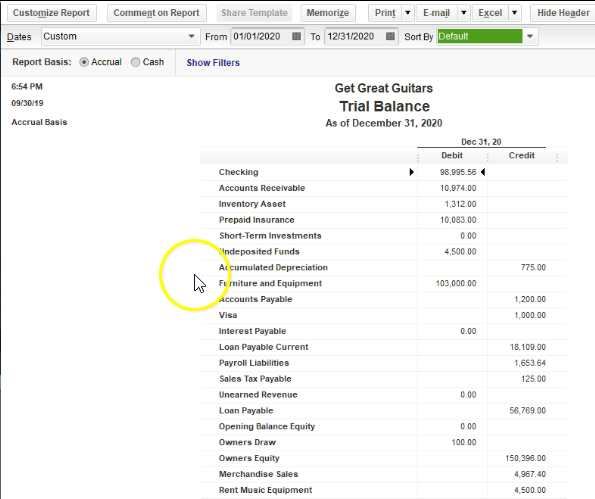
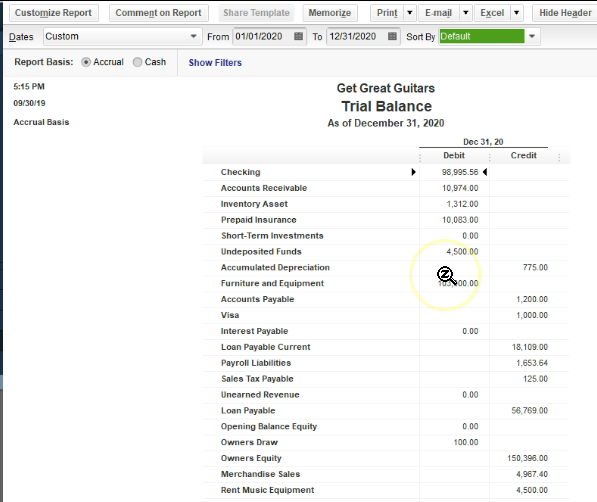
Within the profit and loss standard will change the date range from one on one to zero to 1231 to zero, and so January through December. We then have our income statement accounts which in essence are in order of income cost of goods sold a type of expense. And then expense accounts finally will open up our trial balance, which is under the reports drop down accounting and taxes and the trial balance, changing the dates up top once again from 10120 to 1230 120.
3:21
That’s January through December 2020. This gives us our list of accounts which is similar to our chart of accounts because it gives us our listing of accounts and it gives us the account balances but they’re going to be in the format of debits and credits basically removing the sub totals having the balance sheet and income statement in the same in the same place. The chart of accounts then are going to be these list of accounts. Notice in the trial balance we have a similar kind of format in the trial balance, the listing of the accounts will be balance sheet, and then profit and loss.
3:54
In other words, assets liabilities equity balance sheet accounts, then the profit loss or income statement Revenue and Expense Type of accounts. Same thing will be true with the chart of accounts. The chart of accounts will be ordered in by default. And by the chart of accounts. Now you can change the order. And if you were to select this items, you can change it to alphabetical order.
4:16
However, it’s really useful to get used to it looking like the chart of accounts sorting it by type, because that’s the way the trial balance will be located and you’ll get a better feel for the way the financial statements will be formatted. This list of accounts can be kind of daunting to look at it it can look like a lot of information to put in place. When you’re setting up QuickBooks, you might think well how am I going to set up all those accounts. Just note that when we set up QuickBooks from scratch, then we typically will be picking a list of the chart of accounts by the type of industry we are in. So QuickBooks will ask us common type of industry that we are in
4:50
will select the closest industry that will typically give us then QuickBooks will generate for us a chart of accounts that will have accounts that are typical to that type of thing industry doesn’t mean we’re not going to have to add more accounts, we will, however, we’re going to have a good basis start in that format. Now if we don’t want that chart of accounts, and we want to we want to build from scratch, we can do so we could just not choose an industry.
5:14
But typically for most people, especially beginners, and like QuickBooks file, we want the chart of accounts. And then we can basically use the QuickBooks setup to guide us as to what the accounts will be most likely used within the particular industry that we are in. And then we can make our deviations from that as we as we so choose, we can first think, Hey, is this account on the chart of accounts that QuickBooks has been provided to us, if it’s not, then we can consider adding, adding it or not. So the chart of accounts is going to be ordered in order by type.
5:49
And once again, balance sheet on top, and then the income statement, the balance that you can break down into what we would call the accounting equation, assets, liabilities, equity, and then the income statement is revenue and expenses or income and expenses. And then we break it down even further to basically most liquid type of assets. So in other words, if we were to think about this, in terms of the account types, the types of accounts we’re going to set up, we’ve got the checking account, that’s going to be a cash type of account or banking account.
6:19
So it’s it’s our most liquid kind of accounts a bank account, then we have accounts receivable, QuickBooks will break out accounts receivable as a separate account type. Because accounts receivable, it has a sub ledger that it’s going to have to tie into it. In other words, accounts receivable represents the accounts that are owed to the company. And therefore we need to track not only the amount that is owed to the company, but who owes it to the company.
6:44
And therefore we need another list of reports that are going to be attached to accounts receivable, basically giving the people that owe us the money, then we have the other current asset type of accounts. So these are all the other current assets, then we have the fixed assets, which are going to be things like property, plant and equipment, sometimes called appreciable assets, long lived assets. And so those are going to be and the depreciation related to it.
7:11
And then we have the other assets, which are going to be the more long term type of assets, they’re not the current assets, we have a security deposit account here. Then we have the accounts payable, accounts payable is a liability account. So now we’re into the liabilities, like the accounts receivable, the accounts payable is going to need a sub account that’s sub account tracking by vendors. So we have to track by vendors within the accounts payable, therefore we need its own special category for that the visa account credit card accounts, they’re going to be another type of liability account.
7:44
And they’re going to have a special kind of account title as well, so that you can track the outstanding balances that would be in a credit card type of account. Then we have the other current liability accounts, long term liability accounts, those that are going to be over a year that will be do and then we have the equity accounts, things like you know the equity section capital, if it’s a sole proprietor or equity, it’s going to be called owner’s equity for a sole proprietorship retained earnings if it was a corporation. And then we have the income and expense accounts. So now we’re in the income statement income or revenue type of accounts.
8:21
Then the cost of goods sold, which is a type of expense, but a special type of expense related to the inventory. And then all the expenses, all the typical accounts that we would think of as expenses, insurance expense, janitorial meals, and miscellaneous. And all these accounts would be helped to be set up by QuickBooks for it. Underneath that we have the other income and other expenses, these are going to be items that are that are not part of normal operations, and therefore will show up at basically the bottom of the income statement.
8:52
Now when we start to construct this list and build our information in input data input, we will be adding to this list. And we can do with the drop down or the rise up down here at the bottom and the account. And we can add new items here. And we can edit of course the items in here. Notice up top, they actually gave us the balances. These are the most current balance, but they only give them for balance sheet accounts. Why? Because the income statement accounts need a timeframe or else they don’t make any sense. There’s nothing we can put into the income statement accounts unless we specify a timeframe because they are performance type of accounts. Whereas the balance sheet or as of a point in time, so they basically put in the last balances the the latest balances in the balance sheet accounts.
9:35
Also note that if we go back to the homepage here, if I go back to the homepage, the chart of accounts can also be found on the homepage here. So we have the chart of accounts up top, I typically go to the chart of accounts with lists. That’s why I think of it as you know, a list item. And then the other major list item which you can also find here in the company section of the homepage.
9:58
Again, I always go to the list define this, I think of it basically as list, a list type item would be the item list. So if we select the item list, this is probably the most confusing kind of list factor that we have, that’s going to be a major part of the QuickBooks set up process, people have some time, it takes some time to get used to what these item lists do. So I’m going to put my cursor on the three dots here and drag it a little bit wider so that we can see more of the screen.
10:26
The reason is for that because when we when we learn normal debits and credits accounting, or people that have gone through normal accounting, setup, or financial accounting, don’t learn about items. So this is going to be another kind of thing where if you’re talking to somebody that learned accounting in terms of debits and credits, and you’re learning and you’re thinking about in talking about QuickBooks, then it’s not something that will possibly register for them, you got to basically explain what the item is, and in order to, you know, make that function.
10:56
So what kind of items do we have, the major two sections of our items that we’re going to have are going to be called service items. And they’re going to be called the inventory items. Now I’m going to make this a little bit wider two, or maybe this one. Now, why would we need these these types of items, these are going to be used to drive some of some of the data input screens, these screens are going to make it easier to make to put things together forms together, such as invoices and sales receipts. So in other words, if we go to say the homepage, and we were to create an invoice,
11:31
then we’re going to need to fill out the customer name. And then we’re going to need to fill out the item if we select an item, then all we have to do is then populate either a service item or inventory item. And then in essence, it’ll populate the information for us given us the rate given us the description, given us the calculation down below. So this makes it really easy for the data input.
11:55
When you make an invoice, it should be really easy to make an invoice if the item them lists are set up correctly. If they’re not, then every time you make an invoice, you’re going to have to basically figure out what you’re what you’re trying to put in the invoice, type it in there, figure out what the rate is for that figure out what the cost is for that, that’s going to be difficult. But in obviously, you can put multiple things in the invoice and it’ll calculate it for you as well.
12:20
But if you have everything that’s going to be in the invoice already driven by the items, then it should be the case that the invoice creation is easy. That means someone else can do it, someone else has no clue how to do the thing, how to set things up, and we can do it. So even if we’re setting it up for ourselves, we want to make the invoice as easy as possible. I don’t want to have to type in here that this is going to be an Epiphone whatever on the guitar in the process of a sale, I want to be concentrated on the client, or some other thing. I do not want to be thinking all the time, what am I going to charge for this?
12:53
I want to know exactly what I’m going to charge have it already in the system. So that actually filling out the invoice will be very easy to do. We need to think about things like rates in terms of how we’re going to charge for our rate, do we charge an hourly rate? Do we charge just by our service, if we do some service, do we just give a flat rate for whatever the services no matter what the time that will be involved? Do we charge for some period of time or something like that, we want to have those things all set up all ready to go.
13:21
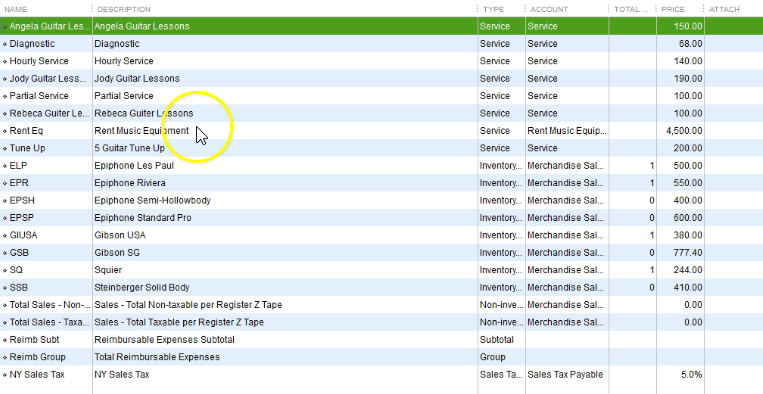
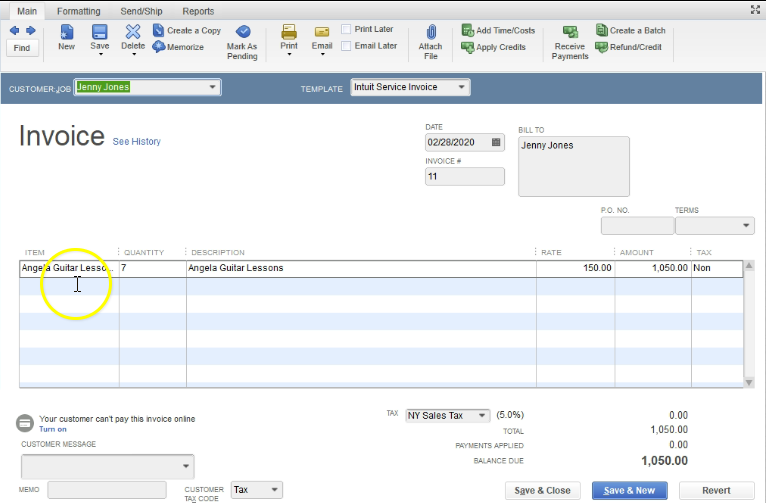
Because if you do not, it’s going to waste a lot of time basically creating the invoice. So I’m going to close this back out, we’re not going to save it, I’m going to say no, we’re going to go back to the item lists in the homepage. So those are going to be the major kind of items that we have if you were to think about how we’re going to put that together. If I selected an item, say a hourly service, I would say Angeles guitar lessons, this is a service item. And the way that you make an item is one way you can make an item from this screen is go to the drop down or rise up once again on the items down below and create a new item.
14:00
So let’s go into an item right now that has been created, we’ll take a look at the Angela guitar lessons. And what we have in here is the name of the item that’s going to be what appears in the description and the description that will happen in the invoice of the sales receipt will have the rate and then we’ll have whether or not there’s going to be tax apply to it, and the account that will be involved. So the item then is telling us Hey, when you choose this in an invoice, this is the rate that’s going to be charged This is what’s going to be in the description screen. And it’s going to be when you record it.
14:33
When you record the invoice. In other words, the sales account is going to go to service, this is going to be an income step type account on the income statement. So when you think about the income statement, then the profit and loss let’s take a look at the profit and loss. The account here the service account, that’s an income account, if I double click on that, it’s being driven by invoices in sales receipts. If I double click on those invoices in sales receipts, it’s being driven by passion pick the Angela guitar here, it’s being driven by the items, the items are what’s driving that whole process.
15:07
So closing this back out, closing this back out, we’re going to go back to the item list then. And then let’s go back into the Edit item. So edit item in the open screens. And so here is our item. So that’s going to be this one. Now let’s take a look at a different type of item, I’m going to close this out with the x not the big x not the blue x but the one underneath. If we look at an inventory item, it’s actually a bit more confusing to think about an inventory item. So these are inventory items. Let’s take this one, double clicking on it, we’ve got the item, we’ve got the description just as we did before.
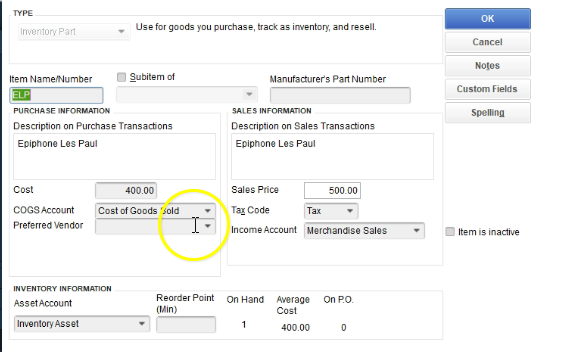
15:40
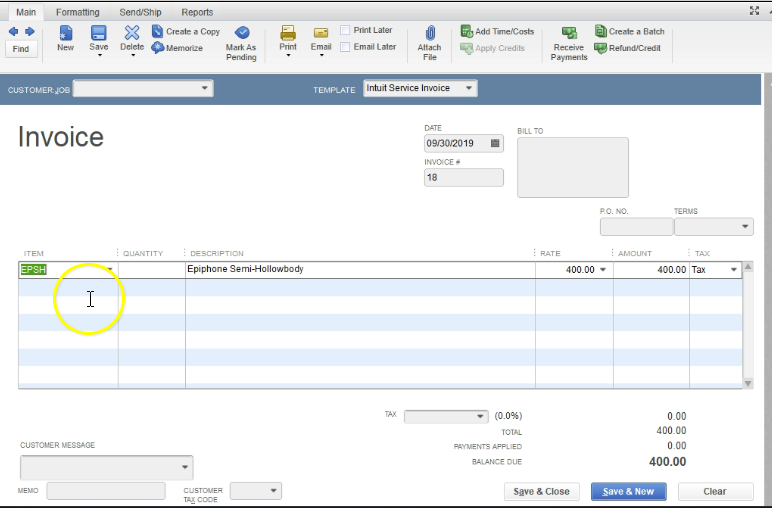
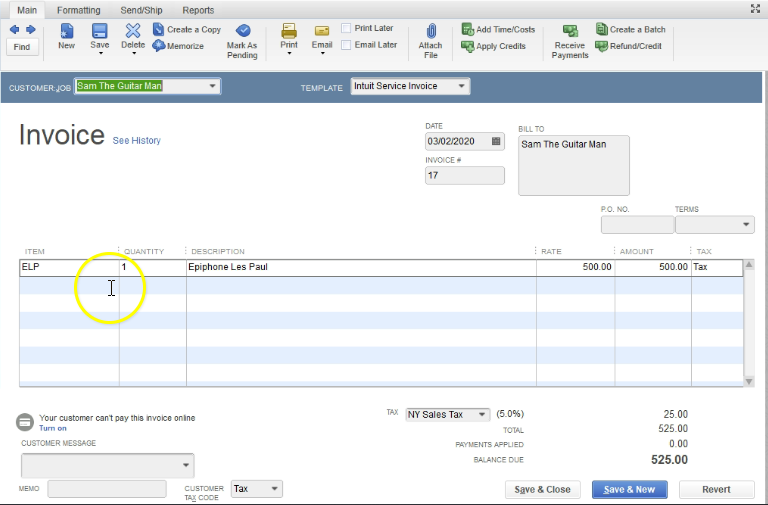
But now we’ve got two fields, we have to record the cost of goods sold on the invoice and we have to record the account the expense account that will be involved cost of goods sold, we need the sales price, and we need the sales tax and then the sales account. So this is really important. This is the most confusing component when you’re selling inventory. So an inventory because this will drive what’s on the invoice. And again, if you think about the invoice if we go back to an invoice and I go into an invoice here, and let’s go back to a prior invoice. This is an LP guitar. If I was to fill out this invoice, I would I may have no idea what what I’m doing. I just know that I’m filling out this invoice is going to be charged $500 plus to 25 on the sales tax.
16:30
Now someone was to ask me, How much was the cost? How much did you pay for that guitar? How much did the company pay for the guitar? Most people data inputting would have no idea. They would just say I don’t I don’t know what the cost was for that. I don’t even know what you’re talking about, you know, it’s not on, it’s not on the forum. That’s something I’m not aware of right.
16:48
But this this invoice is the thing that’s going to be driving the cost. And how do we get that going to be set up, it’s going to be in the item list. So in the item detail, it’s going to give us that information. So we we want to be we want to be able to know that because in order to set up these invoices and sales receipts properly, we got to set up these items properly. So this item is what’s driving what’s going to happen here what’s going to happen here, the invoice itself is going to increase accounts receivable accounts receivable is going to go up by the full amount plus sales tax 525, the invoice is going to increase sales by the sales price the 500, the difference between the two is going to go to the sales tax payable, the $25 increase in a liability and the cost of goods sold expense account related to using up the inventory is going to go up by an amount that’s not on this form.
17:43
Because it’s going to be in it’s going to be in the items. So in other words, if I go to the item, the Edit item I’m currently in, let’s close this one out, I’m going to go this this was a lp if I double click PLP, the cost is 400. So it’s going to record that 400 as a decrease in inventory, and the other side go into cost of goods sold and expense account driven by what we have put in on this side. Now the screen looks a little confusing and stuff too bad. Because notice it’s it’s all it’s always going to be cost of goods sold generally, you know, for the expense item. And the income item is always always going to be you have a merchandise inventory type of item.
18:28
So let’s see what that would look like then if we if we then go to our balance sheet. If we think about an inventory invoice that’s being recorded it let’s try this from the trial bounces time let’s go to the trial balance because it’s going to have all of our accounts get a little practice maneuvering around the trial balance since we have seen a similar process to this before. If we go into say the accounts receivable and we pick up an invoice, let’s take up an invoice which is going to be let’s take up this one. Let’s do the one on the 19th.
19:00
So we got to 19 this is musics stuff store, if I double click on it, we have our invoice our invoices going up by the total invoice of 630, which is again, it’s being driven by the item. If I close this back out the other side of it’s going to be in in the income side of things in revenue that’s on the income statement or Profit and Loss this son to 19. So if I scroll down, we’re then going to be in the income statement. And that’s going to be in the merchandise sales. This is part of the profit and loss statement.
19:35
Now, don’t worry about the debits and credits. If I double click on that, then we’re going to say here’s the music stuff store, it’s got the 600 double clicking on that. That is of course the sales price driven by the item, the difference between the sales price and the receivable $30. That’s sales tax that should go into a payable account. closing this back out back closing this back out, back up to the library ability kind of Section within the trial balance, we’re looking for sales tax table, which is here, the 125 if I double click on that, then we should be able to find that 19th right there for the sales tax payable, closing this back out, then the other side is going to be inventory is going to be going down.
20:21
So here’s inventory, if I double click on the inventory, and I look for the 19th again, here it is music stuff store. If I double click on that, notice you have 480 decreasing inventory going in there, there’s no one no 480 on this invoice. Why? Because it’s driven by the item. And the item is what’s helping QuickBooks to record it even though we don’t want it on the invoice because we’re giving the invoice to the client, we don’t want to have the cost on the invoice that we paid on the invoice.
20:52
So it’s going to that it’s going to drive the invoice is going to drive the recording of it because of the item, but it’s not going to be on invoice. closing this back out closing this back out the other side then is going to be in the cost of goods sold. Here’s the cost of goods sold and expense type of account back to the profit and loss type of account. Double clicking on it. If we go into February, we have 400 at once again, double clicking on it, there is our invoice, then I’m going to close this back out once again and close this back out, then we’ll go back to our item list.
21:28
Those are the major two kinds of items that you that you’re going to be considering when you set up a sales receipt. And when you set up a sales receipt or an invoice, the other kind of items you’ll have to be dealing with are going to be things like sales tax items. So when we when we set up sales tax, we’re going to have to think about whether something is going to be taxable or not. And the type of items that will be set up for relation to sales tax, we’re also going to have payroll items that are going to be important. Now the payroll items aren’t going to be something we’ll see setup in this problem because we’re not going to set up the paid payroll for it however.
22:04
So we will have another kind of section that’s going to be going into the paid payroll so you can see what it would look like and if you want to purchase the paid payroll at that time to work along with it, you can but this one, we’re not going to have the paid payroll. Notice if you select the lists drop down and you go to the sales tax code list. You can have basically the sales tax code will set up sales tax later and that’ll basically tell you something that’s going to be taxable or not taxable with regards to sales tax things like other things, we sell goods and services. Are they going to be taxable or not with regards to sales tax?
This presentation, we want to take a look at some terminology related specifically to QuickBooks in this case focusing in on the term of forums as it relates to QuickBooks within QuickBooks Pro 2020, QuickBooks desktop 2020. Here we are in our get great guitars file, we currently have the open windows open, you can open the open windows by selecting the view drop down and the open windows lyst.
0:23
We have the Home tab open in order to open the home page, you would go to the company drop down and the homepage. Now we want to talk a little bit more about the term of form. Within QuickBooks. We’ve discussed this a bit as we’ve gone through the vendors Center and the customer centered the flows of the activity, we want to emphasize it more here because it’s really important to understand the terminology that you’ll be using. Because when you talk to different people, they’re going to be thinking about different kind of terminology.
0:54
And even within the field of accounting, it will change. For example, if you’re talking about an accountant, that’s business learning, accounting theory, they’re learning in terms of debits and credits, and not so much through the data input forms. So when we as an accountant, as a bookkeeper talk to someone who’s mainly focusing in on financial transactions being recorded, which could include people like auditors, then we need to be we need to understand that the different types of terminology that we will be talking about.
1:25
So the term form, in this case, then when we think about QuickBooks will mean these data input screens, so things like bills, things like the pay bills, which will in essence be checks, the create the invoice, the receive payment, the Create sales receipt, these for QuickBooks, or the forms now and you know, if I was not in QuickBooks, and other accountants might see these screens as basically data input screens or something like that, QuickBooks will typically call these forms.
1:56
And for QuickBooks, then the forms which are these basically data input screens are going to be the things that drive financial transactions. If I was on the accounting side of things, or if I was learning, just basically financial accounting, possibly when you’re talking to auditors, or other people in the accounting field that do not work specifically with QuickBooks, or other accounting software that uses similar terminology, then they would think of financial transactions, basically, with debits and credits, the actual transactions are the actual increases and decreases in in accounts that basically the accounting equation going up and down.
2:32
So it’s important to understand that difference when you’re talking to other people, and have the have the term of form when you talk to other people. If you talk about forms, to somebody that’s not formally used to QuickBooks, then the term form may be confusing to them, you’re basically thinking, Well, no, these are the data input screens to them, right. And if you’re talking to someone that’s proficient in QuickBooks, or if they are talking to you, and they use the term form, then you’re going to want to basically be able to understand what where they’re going to.
3:02
So these types of terminology thing, when you just work with the software in and of itself, it doesn’t seem like a big deal, because you just you can call it whatever you want. I’m doing my own bookkeeping thing. And I used by using this thing, eating in here, right, or whatever. But when you when you go to get advice, when you go to look at the help views for QuickBooks, when you try to get information on something that went wrong, when you communicate to other people, it’s useful to communicate the language.
3:27
If you work with clients, or other employees, it’s useful to tell them hey, this is what the language is of QuickBooks and actually speak in that language. So when you start working with QuickBooks, note that you’re going to have to learn a few different languages, you’re gonna have to learn accounting language in general, because it uses different types of terminology.
3:46
And then you’re going to have to learn QuickBooks language. And QuickBooks deals with different types of formats of things and different kind of language as well. And then you’ll be able to talk whatever language people are in at the auditor comes in and speaks, you know, formal accounting language but doesn’t know QuickBooks language, then you can basically be the interpreter there. If on the other hand, you’re talking to someone that speaks QuickBooks language, and doesn’t know you know, the accounting term and can’t communicate with the auditor or something like that you could speak in those terms, or the tax preparer at the end of the year, possibly, same kind of thing, everybody’s going to have similar terms in terms of accounting, but they could differ even within that field, depending on the software that we’re using, and those kind of things.
4:30
So you’ll recall, then, all of these data input forms, then are things that are going to be driving for QuickBooks financial transactions, the main two financial statements on the balance sheet and the profit and loss statement. So if I was to select the reports, drop down, go to company and financial and go down to the balance sheet, then this is our major financial statement. If we change the dates up top in the customized reports from a 1120 to 1230 120,
4:57
January through December 2020, then the these accounts will then typically be affected by the forms. So what you want to think of is every time you create a form, on the homepage, how will it affect then the balance sheet, the other major form the profit and loss, also also known as the income statement, which will basically be what it is called in financial accounting. So again, if you speak to an auditor that’s not really familiar with QuickBooks specifically, they will typically call it an income statement.
5:30
And you’re gonna have to say well, that QuickBooks calls that a profit and loss statement, reports drop down, we’re going to go to the company and financial the profit and loss the other financial statement type form, the main type of form that we will be using all the time, oh, 10120 to 1230 120, January through December 2020. Again, every time you make a form, you want to think about how it may affect the profit and loss report and the balance sheet type of report.
6:00
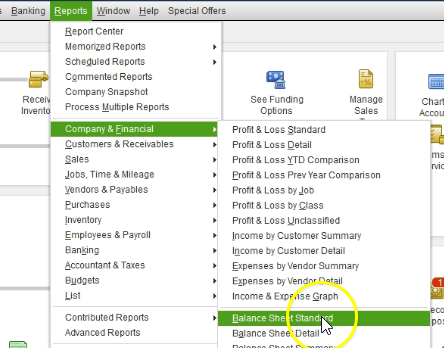
Now note, both of these reports represent basically the chart of accounts. And another useful report to take a look at is going to is going to be the trial balance. So if I go to the reports drop down Up top company or the accounting and taxes, then the trial balance, we’re going to select the trial balance, and change the dates from a one on one to zero to 1231 to zero January through December 2020. Now this one has debits and credits, that’s why many people stay away from the trial balance. However, even if you don’t know the debits and credits, the trial balance is very useful because it gives you the account balance. And it gives you the balance sheet accounts and income statement accounts in one section, and it removes the sub totals.
7:14
These are the driving forms within QuickBooks when you see these data input screens, and these are the things that are going to be driving the data input within QuickBooks when within the financial statements. When you go to the financial statements, let’s take a look at the trial balance. And you you take a look at these forms, you could see this double clicking on the say the checking account, the form type, now you’re going to have different form types here on the left, like you got the check.
7:39
Obviously, if I double click on that, that’s going to be a check, the check is going to be a form. If I close this back out, we have the transfer, we have a deposit if I double click on the deposit, that’s going to be a type of form that we’ve seen. So that’s going to be a data input form that will drive the transaction, we also have a bill paycheck, which is check, but QuickBooks is specifically calling it a check that was to pay a bill. So if I double click on it, still a check form, but you’ll note that the bottom is a little bit different because it would use the check paste feature, which was the payoff and accounts payable.
8:15
So it’s very useful that QuickBooks closing this back out has that that added feature because it could really tell us a lot in just a short amount of time, then we have the sales tax payments, same kind of thing. If I double click on the sales tax payment, I have a check. But it went through the sales tax payment module, and therefore has a different format to it on the bottom of the check. closing this back out. You could see those items here. If I close this back out and go into say accounts receivable will then see invoices here, which is going to be a type of form and then the payment.
8:49
So if I double click on the invoice, that’s going to be the form in essence, the data input screen that’s going to drive the financial transactions allow QuickBooks the information in order to record the debits and or the increase in and decreases of the accounts, then we have the payments, which is going to be the other type of form in the accounts receivable. This is going to be the form double click or closing this closing this. Then if we go down to say the accounts payable,
9:16
let’s say, which is going to be here, double clicking accounts payable. Within see we have bills and the checks that pay the bill. So if I double click on a bill, we have another kind of data input form, this is going to be a data input form. And then if I close that out in the check payment, this is going to be a check. But again, it’s specifically a payment of the bill. In other words, it’s coming out of accounts, accounts payable, double clicking on that, we have to check again check.
9:48
But the bottom is a little bit different than a normal check because it’s coming out of accounts payable, closing this back out closing this back out. So going back to the homepage. So our practice as we started go in input data into our couple months of data is not just to enter the data input into the forums, it’s to learn the terminology of the forums to be able to communicate what a form is to other types of people, or be able to interpret other people’s communications with with us when they’re talking about financial transactions, or possibly debits or credits or the effect on the balance sheet and the income statement.
10:23
We also want to think about you know, in order to do that, we need to be able to think about what each of these forms will do way beyond the data input. What’s it going to do to the financial statements? What are the accounts going to be affected? And we also need to think about how can we set up these forms for anything that’s going to be needed in order to fill them out as easily as possible, for example, and most importantly, with regards to the creation of an invoice and the creation of a sales receipt, in which case we’re going to need the items to be set up to set those up. Well, we’ll think think about that when we start a new company and of course the employee information how some detail and setting up the employee information
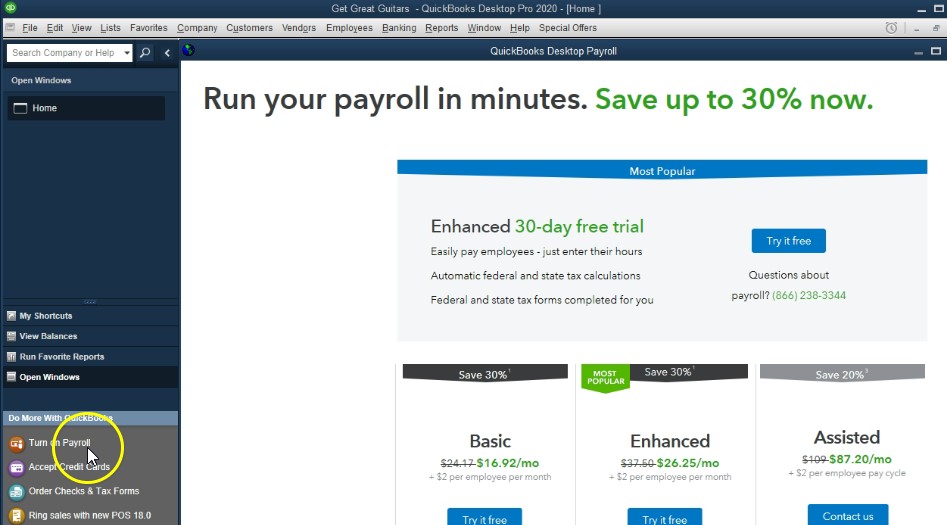
This presentation and we will take a look at the employee section of the homepage, which will include the pay employees and pay payroll, we will do this within QuickBooks Pro 2020, QuickBooks desktop 2020. Here we are in our get great guitars file which we set up in a prior presentation. If you don’t have the get great guitars file that is ok, you can follow along with your own company data.
0:25
We currently have the open windows open in the left side, you can open the open windows by selecting the view drop down up top and the open windows lyst. We also have the homepage open typically it is open when we open QuickBooks but if not, company file up top and the homepage. The homepage is a great tool for viewing activities by cycle and prior presentations, we took a look at the vendor cycle and the customer cycle. Now we’re going to be looking at the employee cycle.
0:55
Now note we’re going to be bouncing around a little bit from this current file that we have set up to a new because we’re not requiring that you set up paid payroll in order to go through this practice problem. To set up paid payroll you would go to this item over here to turn on payroll, it will typically be an add on feature, there is also going to be a manual payroll or is typically a manual payroll within QuickBooks. However, the setup process is having problems at this point.
1:23
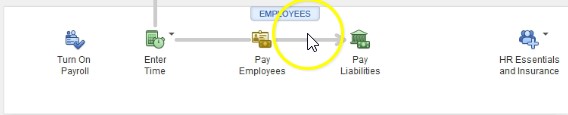
Therefore, we won’t be setting up the manual payroll, but we will demonstrate payroll in a future problem as we will display the paid payroll in that future problem. Therefore, down here, when you look at the employees in our current file, we don’t have the full type of items that you would see. Therefore, I’m going to go to another file now. So this is not going to be like the file that you have currently, it’ll be a different type of file, which will then be including this icon. So I’m going to go to the second file. Here it is the employees down below.
1:55
If we were to pair purchase payroll or set up the manual payroll, then you’d see this a flowchart that we’re used to seeing in the vendor and customer section. So in this flowchart you have the entire time, we’re not going to spend a lot of time, going through the entire time section, the entire time section will help us to track time by employee is not really the part of the payroll process, it’s part of the tracking of payroll that the tracking of the time for it that we can then use to help us out to generate the payroll. And it can also be used to build things on the invoices as well to clients.
2:31
So we’re not going to enter the actual times, typically we’re going to go straight to the item of pay employees. And the pay employees in this section then, of course, would be the tool that we would use to process payroll. So let’s take a look at that now to go into the paid employees. Again, this isn’t a separate file, not the current file that you’re taking a look at, because the current file, or the problem we are looking at now will not have paid payroll and currently doesn’t have the manual payroll. So if go into this item, then we’ve got the pay employees screen.
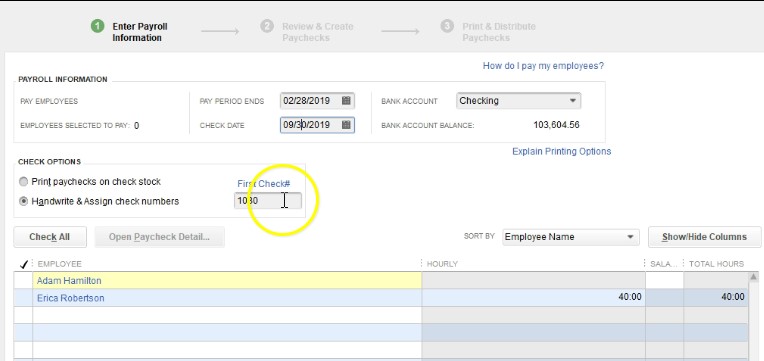
3:04
And what we’re going to have up top is the pay period ends, that’s when the period ends, for the payroll which could be bi weekly, semi monthly, monthly, or weekly or so on, then the check date, which is not always the same date notice, of course to the end of the pay period might end at some point and we might pay the check then at some future period, where they’re going to be writing a check. And we’ve got our two employees that we’re going to be writing the check for. If we were to select one of those employees, then we’re going to get the detail of the check, I’m going to check it off and then select an employee. And you’ll note then we have the detail for it. So this is Adam is going to be a salaried employee, the rate is this amount, which is a salary amount.
3:50
And then we have the salary that it’s going to be paid and the amount that’s going to be withheld from the check, including federal withholding Social Security and Medicare, which would have to manually input considering this was the manual input system, that would then give us the net check. Then we have the employee or portion including Social Security, Medicare and federal income taxes. Now, we’re not going to get into a whole lot of details, recording payroll, we got a whole nother course on recording payroll, we’ll spend a little bit of time after this problem focusing specifically on payroll. So if you want to get a lot of detail, you want to take a you know, payroll course on it.
4:26
And then if you want to get a little bit more update on the payroll will spend more time after this practice problem in specifically payroll. So we’re going to close this back out the other employee he is Erica, we have the same kind of process, hourly pay this time. And then you would basically have the same kind of detailed down here. If I close this back out, then we would process the payroll in this section, it would then
4:51
generate the payroll checks. So as with other types of items, we want to see, you know, what would the payroll do it’s similar to a forum type of thing happening payroll is, of course, generating checks, but they are specific checks, they’re going to be payroll checks, what will those payroll checks be affecting as we generate those payroll checks, it’ll affect much more than just two accounts oftentimes.
5:14
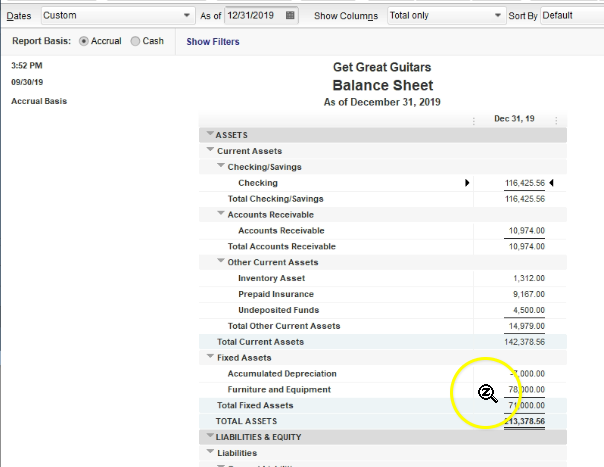
So what’s going to happen when we enter payroll, if I if I close this back out, this process will enter checks. When we enter checks into the system, let’s consider what will happen in terms of the financial statements. I’m going to go back up top over here, I’m going to go to the View drop down, I’m going to go to the open windows, I’m going to look at the financial statements are going to go to the reports and again, your financial statements will not reflect payroll, this is a practice file, we’re going to go to the reports up top, we’re going to go to the company and financial, we’re going to go to the balance sheet standard. Within the balance sheet, I’m going to change the dates up top to the customized report, change the date range.
5:50
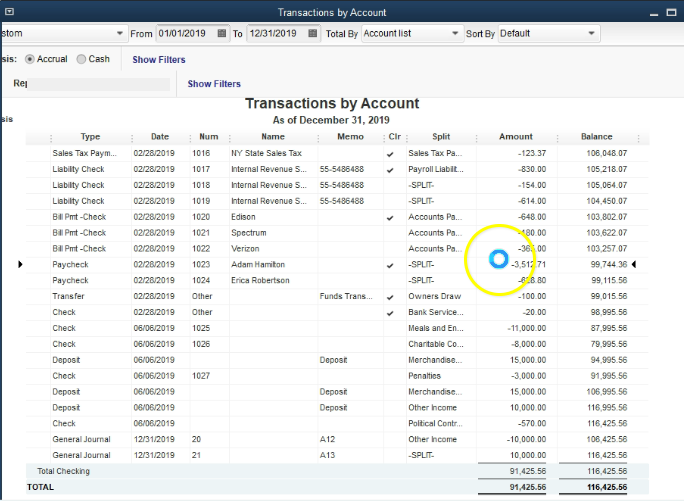
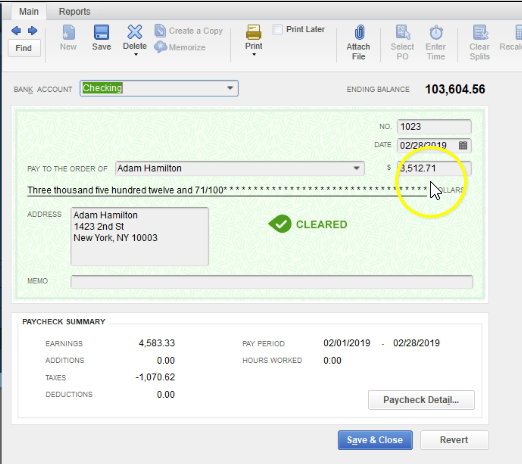
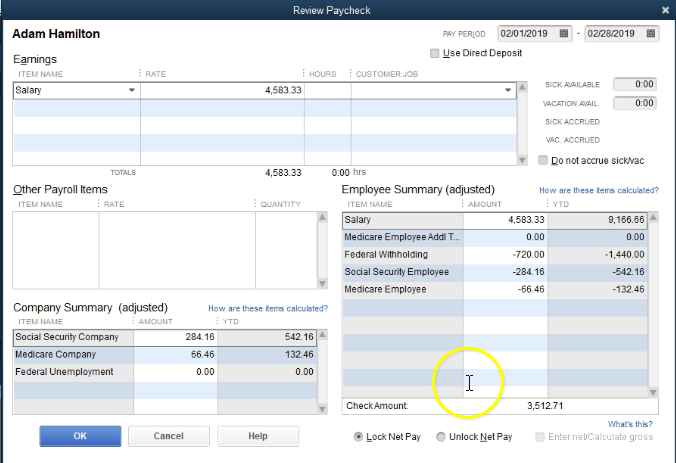
Now this is going to be in 2019 for this data file. So it’s going to be a 10119 to 1230 119. And then so January through December, I’m going to say okay, and this is going to be our balance sheet. Now within the balance sheet, we know that the checking account will be decreasing, because we’re going to be writing payroll checks. So I’m going to double click on the checking account. And let’s see if we can find some payroll checks. So if I scroll back down looking for the payroll checks, here they are here we have Adam, Hamilton and Erica, if I was to select one of these items, notice the check here is for Adam 3512, double clicking on it.
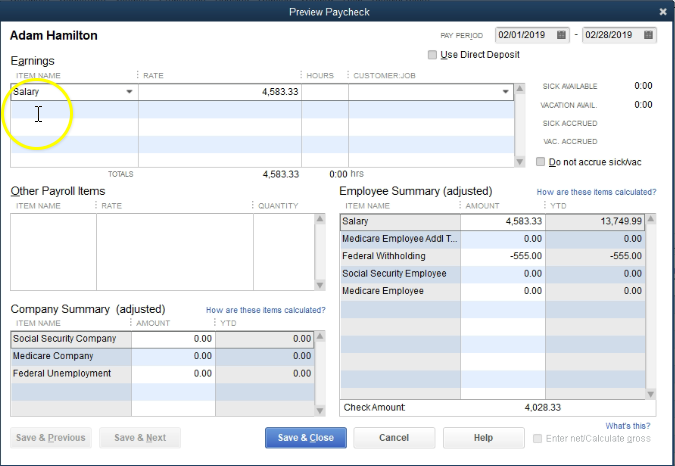
6:30
That amount, of course is not the gross check. But the net check. That’s the amount of the actual check, there were this amount of taxes that were taken. If I want to see the the detailed notice this is a check screen. But it’s a payroll check and therefore has a different kind of data input stream to it on the bottom here. If I go to the paycheck detail, then we see basically our input screen. Here’s the salary. Notice the actual check was written for 3512 71.
7:00
So we have the salary minus the federal withholding minus the Social Security minus the Medicare, these are the federal taxes that were calculated for this particular problem that will then give us to the payroll taxes. On top of that, then we also had the Social Security, Medicare and fed and federal unemployment are not here. But we could have that in terms of the employer taxes paid over and above what the employee amounts are.
7:27
So in other words, these taxes over here are theoretically taken out of the employee, check these taxes over here are paid over and above the 4005 at 333 in the employee check, closing this back out, closing this back out, then we can close this back out, then we’re going to go to the reports drop down up top, we’re going to go to company and financial. And now let’s take a look at the profit and loss of standard that’s going to be the income statement type report, changing the dates once again from Oh 1011, nine to 1230 119.
8:03
So January through December, scrolling back down through this, we’re looking at the other side being payroll expenses, within payroll expenses, I will double click on the payroll expense. And then we’re going to have these items for Adam and Erica, once again, if I was to select, for example, this paycheck for Adam, double clicking on that amount, and then I’m going to go to the check detail, we have the full amount in the expense of the 4005 83. So notice on the expense side, we’re recording the entire expense, not the net check, because that’s what was actually earned.
8:40
So we’re increasing the expense for the entire amount, the amount that’s going into the that or decreasing the checking account is the net check not the entire amount, but amount minus the taxes, closing this back out to closing this back out. We also have the 258, the 66 here, double clicking on that, where does that come from double clicking on the check item, that’s going to be the employer taxes. So that’s actually payroll taxes that are paid over and above the check, then the net check or the payroll check, closing this back out closing this back out. Now those liabilities, then that, that we didn’t pay the employee, but which they earned and the employee or liabilities or something we owe to the government,
9:30
and therefore they’re going to be on the balance sheet, and a liability account. So if I scroll back down to the payroll liability, the payroll liability will be increasing double clicking the payroll liability, we will once again see some examples of these paychecks for Adam and Erica, if I double click that 750, for example, and the check detail, there we have the the detail of it, it’s going to be these items that will be increasing the liability as well as these items on the employee and employer side, closing this back out, closing this back out 720 it’s breaking those items out this is the social security and for the employees social security for the Medicare.
10:13
So this is federal income tax employee Social Security employees Social Security, Medicare, Social Security employee or Medicare employee, Medicare employer. All right. And that’s what we’re going to owe to the to the government, that’s going to be the typical payroll. So obviously, that’s a lot of information. You got to understand payroll, you gotta kind of see this a few times. And you got it why and get into more detailed sense of, you know, running the reports, the quarterly reports, the yearly reports and all that kind of thing. And for that you really need a full practice problem on the payroll, I’m going to close this back out.
10:49
Going to go back to our homepage. The bottom line that we want to know here though, is of course, this item is similar to the forms that we have created up top, but a little bit different. Because this item is going to be something a tool that we will be used to in essence create checks, however, those checks are going to be specific checks that will have a lot involved in them, those checks being the payroll checks, then if we close this back out, the next item that we will have in our little function here will be to pay the employees and this will be a function that will help us to pay those payroll liabilities.
11:24
So you’ll recall that if we go back to the balance sheet then that we had payroll liabilities that we owe, that payroll liability field will in essence be a tool helping us to create paychecks or basically checks out paychecks checks, they will be decreasing the checking account for the proper amounts in order to process the payroll properly. So that’s going to be the the payroll items down here. Again, we’ll spend more time on payroll after this this presentation are this problem because we’re not going to be setting up the paid payroll within this problem.